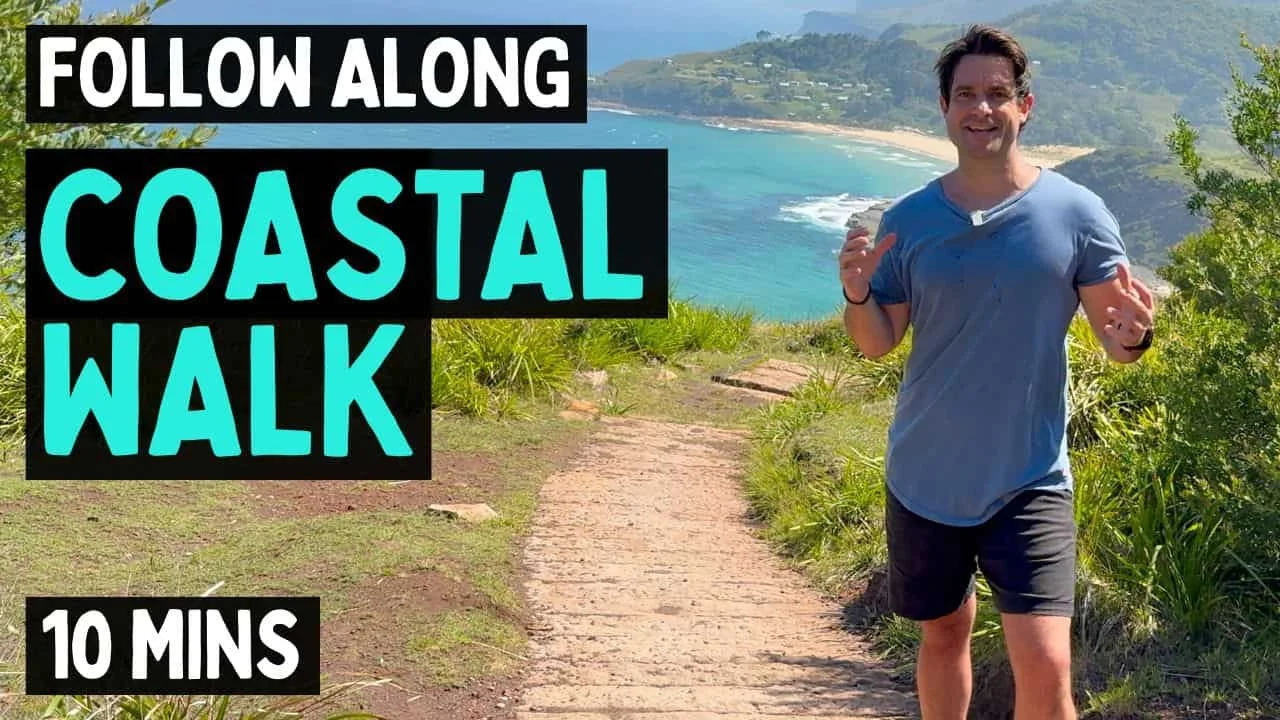
10 Minute Follow Along Coastal Walk
A gentle 10-minute walking video you can follow along with from home, set against a relaxing coastal backdrop. Designed for older adults, this session helps build walking endurance, improve balance, and keep your body moving comfortably and confidently each day.
Gentle Low Impact Exercise For Seniors
We all know that walking is important…. I’m sure you’ve picked that up with how much I’ve been talking about it lately. 🙂
But it really is one of the best things we can do for our health and fitness.
As simple as this may sound, walking more will help build the endurance that helps you keep walking well.
When you walk more, you’ll find yourself fatiguing less. It will help keep your joints nourished, supports balance, and gives the mind a chance to reset. and sometimes that’s all we need.
And today I have decided to take you out on another walk with me.
So dust off your walking shoes and join me by following along to this new video. You can start walking with me by clicking the video below or HERE.
I plan to share new walking videos every fortnight. So whenever you see one come through, why not get up and walk with me and get more steps in.
I’ll also be making other exercise videos as well… it’s not going to become a walking-only channel 🙂
So let me know in the how you are doing, how you went with the video or where you’re joining in from. I love reading the comments.
Remember to stay moving and stay happy without reason.
- Mike
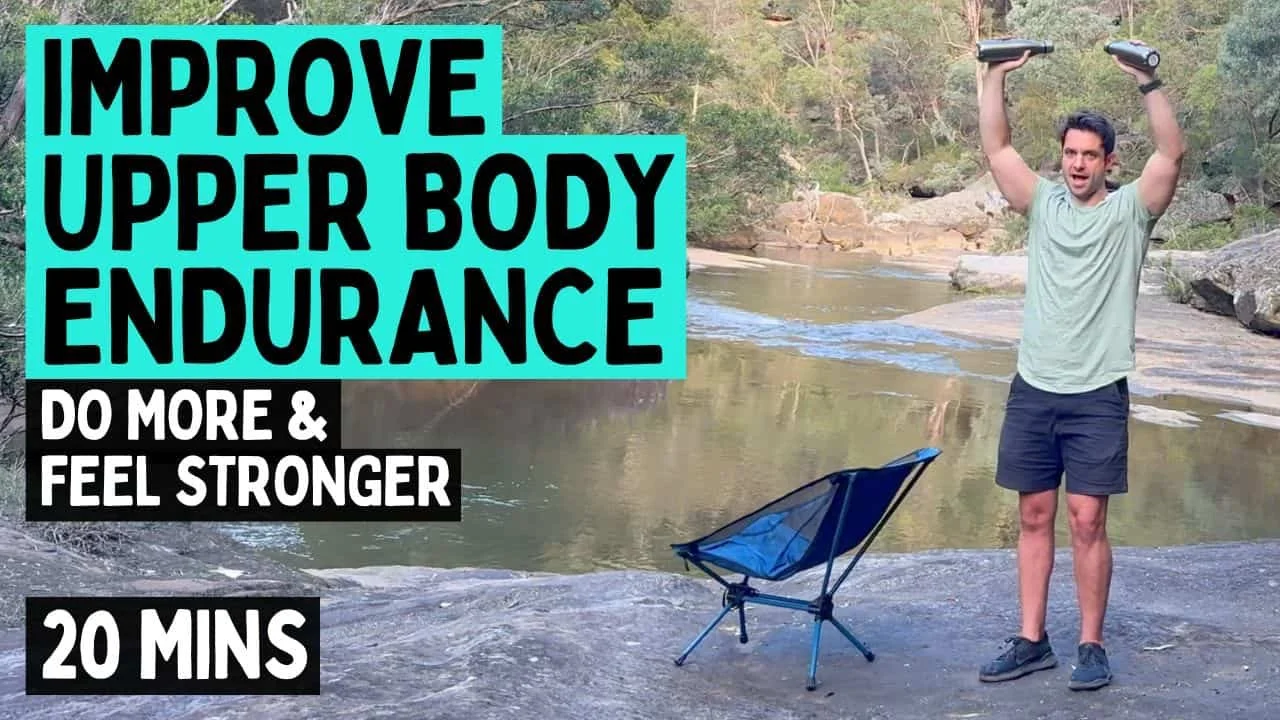
Stronger Arms and Shoulders: Upper Body Endurance Exercises
Building upper body endurance helps with daily tasks like carrying groceries, gardening, or getting up from a chair — all while supporting posture and mobility. This 20-minute Upper Body Endurance workout will strengthen and tone your arms, shoulders, and back, with a little chest work, too — all in the great outdoors!
Upper Body Endurance Exercises For Seniors (20 Minutes)
Building upper body endurance is essential for maintaining independence, improving posture, and supporting overall mobility!
When we work our upper body strength and endurance, it makes everyday tasks like carrying groceries, pushing a shopping trolley, or even getting up from a chair or moving about with other tasks (for example, gardening), much easier!
With the right exercises, you can improve your upper body endurance and make life feel a lot easier.
That's why I've just released a new 20-minute Upper Body Endurance workout, specifically designed to help you strengthen and tone your arms, shoulders, and back, with a little bit of chest involvement also.
To get moving with me again, in the great outdoors, click the video below (or HERE).
In this video, I use drink bottles or hand weights—so grab your hand weights (or water bottles) before you get into it. And if needed, these exercises can also be done seated.
Remember, when it comes to weights, always start lighter and work your way up. As I mentioned in my last email, it’s important to build it up slowly—give your body time to adapt.
Eventually, you want to choose a weight that challenges you for the exercise, without overdoing it. And always remember: correct exercise technique is most important!
And stay consistent with your exercises!
I’m looking forward to hearing how you go with this new video—let me know in the comments below the video.
More to come from me soon!
Until then...
Stay Moving. Stay Happy. And have an amazing week wherever you may be!
See you soon!
- Mike
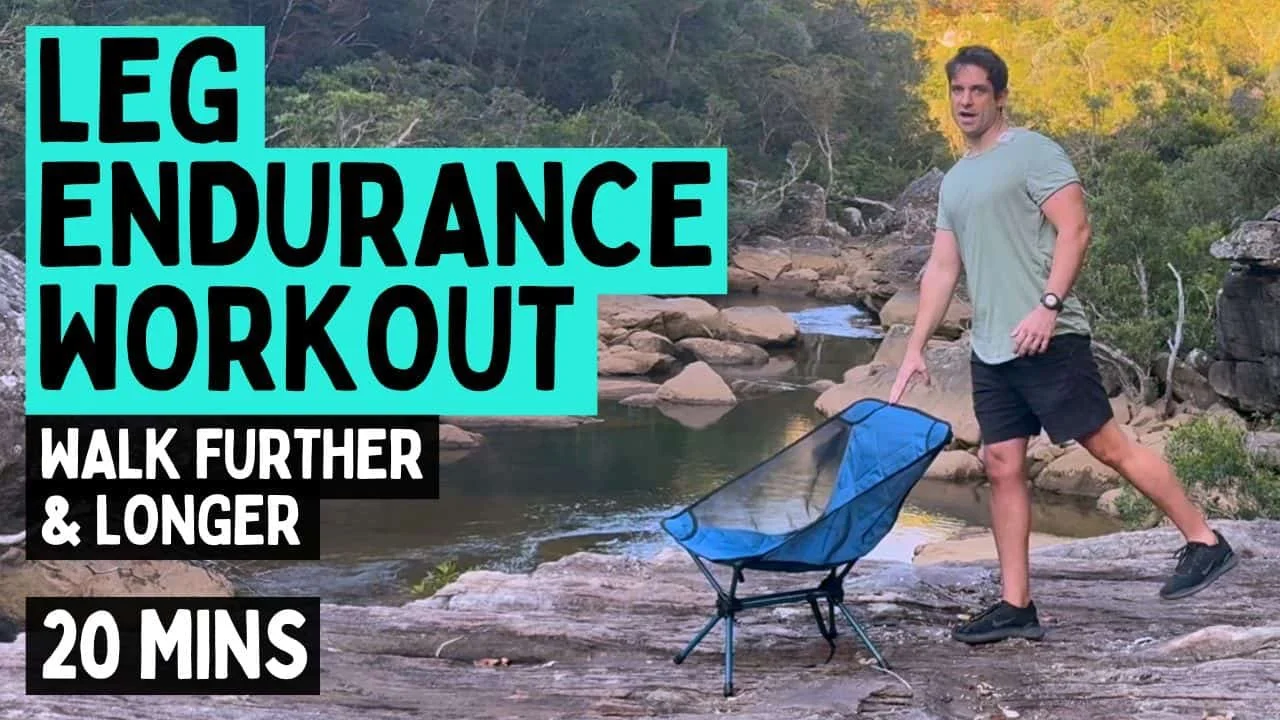
Simple, Effective Leg Endurance Exercises for Seniors (Standing - Intermediate)
Boost leg strength, stability, and endurance with this 20-minute standing workout for seniors. No equipment needed—just simple, effective exercises to keep you active and confident in your movements. Perfect for intermediate levels.
LEG ENDURANCE EXERCISES FOR SENIORS
Doing exercises for your legs should be the priority when it comes to your exercise program. This is the reason I have created many leg exercise videos in the past.
Your legs are your foundation! They keep you mobile, independent, and able to do everyday activities like walking, standing, and climbing stairs.
When your legs are strong, you move with confidence. When they have endurance, you can keep going without tiring too quickly.
So what’s the difference between leg strength and leg endurance:
Leg Strength is about how much force your muscles can produce to perform tasks like lifting, standing up, or pushing for example.
Leg Endurance is about stamina—how long your muscles can keep working before they get tired.
Both are essential if you want to be moving better. But… if you find yourself tiring too quickly, and you want to be walking further, working on endurance can make a big difference.
So, how do you build endurance?
Endurance is built through consistent, moderate-intensity activity over time.
One effective way to build endurance is by doing higher reps of exercises. Higher repetitions help your muscles adapt to working for longer periods without fatiguing too soon.
Another great way to improve leg endurance is by gradually increasing your walking distance, or challenging yourself with stairs and different terrains. This helps your muscles become more efficient and better equipped for longer or more intense activities.
It's important to build it up slowly—give your body time to adapt.
And with that said... Let’s get moving with some simple but effective leg endurance exercises in the beautiful outdoors to help you move better for longer.
To view this video, click the video below (or HERE).
I hope you enjoy this workout! Part 3 to come soon!
Remember to stay moving!
Stay healthy! Stay active, stay happy! and I’ll see you soon!
- Mike

Lower Body Bed Exercises For Strength and Mobility (Beginner Level)
This series of lower body exercises, done in bed, aims to enhance mobility and strengthen all areas of the lower body. Again, we'll finish with deep breathing exercises.
LOWER BODY BED EXERCISES FOR SENIORS
Join me (Mike – Physiotherapist) for Part 2 of this Bed Exercise Series, where we work the lower body.
These gentle exercises are ideal for anyone spending extended time in bed—whether it’s due to illness, injury, stroke recovery, surgery, or limited mobility.
In this session, we’ll work on improving strength and mobility in the lower body, and finish with deep breathing to support relaxation and circulation.
Not only will these exercises help strengthen and improve the mobility of the areas, they will also be helpful if you’re having difficulty moving in bed, or getting from a lying to seated position. You can progress these exercises by adding in weights or a resistance band..
In part 1 we went through some Upper Body Bed Exercises. Click HERE for Part 1.
Not only will these exercises help strengthen and improve the mobility of the areas, they will also be helpful if you’re having difficulty moving in bed, or getting from a lying to seated position.
You can progress these exercises by adding in ankle weights or a resistance band.
To view this video, click the video below (or HERE)
Remember to stay moving!
Stay healthy! Stay active, stay happy! and I’ll see you soon!
- Mike

Bed Exercises For Strength and Mobility (Beginner Level)
This series of upper body bed exercises focuses on improving mobility and strengthening all regions of the upper body. We’ll also include a relaxing stretch and deep breathing at the end.
Upper Body Bed Exercises FOR SENIORS
Join me, Mike—a physiotherapist—for this Upper Body Bed Exercise session.
This routine is designed for individuals spending extended time in bed due to various reasons such as illness, injury, stroke recovery, surgery, or limited mobility.
In this video, we focus on gentle upper body movements to maintain mobility and prevent stiffness. Additionally, we incorporate deep breathing exercises to promote lung health and relaxation. These are a series of videos I have wanted to create for a while.
This is part 1: of the series of bed exercises working on mobility and helping strengthen all regions of the upper body, and we also do a stretch and some deep breathing at the end.
You can progress these exercises by adding in weights or a resistance band..
For PART 2 of the series, Lower Body Bed Exercises Click Here. In part 2, we will do exercises to strengthen the legs, the core and help with lower body mobility.
To view this video, click the video below (or HERE).
I hope you enjoy this workout!
Remember to stay moving!
Stay healthy! Stay active, stay happy! and I’ll see you soon!
- Mike

Introductory Kettlebell Workout For Seniors (Intermediate Level)
In this 23-minute video, we guide you through a series of simple kettlebell exercises designed to engage your entire body.
Simple Kettlebell Exercises FOR SENIORS
What are kettlebells?
Kettlebells are cast iron or steel weights, typically shaped like a cannonball with a handle on top, used to do certain exercises. They look like this.

They range in weight from usually around 4 kg (9 lbs) and can go up to 92 kg (203 lbs), for those very, very serious about their strength training :) ..
Many are usually covered in coloured vinyl, to help you easier identify the weight. Which look like this.

They are designed to be swung, lifted, and manoeuvred in dynamic movements that engage multiple muscle groups and can improve cardiovascular fitness, strength, and flexibility.
So…. do you need to use them to get fitter and stronger? Nope!
But……. they are a great piece of exercise equipment, if you want to change up your training and try something different.
To change things up we go through some simple kettlebell exercises to work your whole body. So if you have some kettlebells, grab them and get moving with me! (You can do that by clicking the video below, or HERE)!
This video is an introductory kettlebell video and it is for those at a more intermediate-advanced level.
In the first part of the video (Round 1), I teach the exercise before we get into them for repetitions. Remember good exercise technique is crucial.
In the second part (Round 2) it is more fluid with the exercises (less chat).
We also go through some short mobility exercises in the beginning and a short stretch at the end.
Now if you don’t have kettlebells, they can be purchased from department or sports stores, or online. Or, you can follow along to this exercise video without any weight and still get in a good workout, you can also use a hand weight in place of the kettlebell.
I hope you enjoy this workout! More to come soon!
Remember to stay moving!
Stay healthy! Stay active, stay happy! and I’ll see you soon!
- Mike

20 Minute Full Body Standing Exercises for Seniors
In this video, we go through 20-minute whole-body standing exercises tailored for seniors and beginners, featuring easy walking routines and calming relaxation techniques
Whole Body standing Exercises For Seniors & Beginners
Follow along with me (Mike - Physiotherapist) for these standing full body exercises, we also do 5 minutes of walking, and some relaxation at the end.
Make sure you have a chair for the exercises if you need something to hold on to (and for the cool down section)
It is another video I have recorded outdoors in nature from Mount Greenly, Eyre Peninsula, & Fleurieu Peninsula, South Australia
To view this video, click the video below (or HERE).
Stay active, stay happy! and I’ll see you soon!
- Mike

8 Minute Morning Balance Routine for Seniors
In this video, we go through balance exercises to do each morning to improve your balance and decrease falls.
DAILY BALANCE Routine For Better Stability
Follow along with me (Mike - Physiotherapist) in Australia for these Balance exercises and relaxation to do each morning to improve your balance and decrease falls.
This balance routine helps improve stability, you can do it each morning. I’ve also incorporate some breathing to relax your body and start your day off right.
Remember, balance is a skill... and it's a crucial skill to practice as we age. And… you CAN improve your balance, no matter where you're starting from.
It is another video I have recorded outdoors in nature from Fleurieu Peninsula, South Australia
To view this video, click the video below (or HERE).
For more about balance, you can read my article HERE.
Stay active, stay happy! and I’ll see you soon!
- Mike

10 Minute Low Impact Seated Exercises for Seniors
In this video, we go through seated chair gentle, low-impact exercises working the whole body, outdoors!
beginner 10 minute seated WORKOUT for seniors
Follow along with me (Mike - Physiotherapist) in Australia for these seated chair gentle, low impact exercises working the whole body.
This exercise video is completely seated, can be done by all, and it only goes for 10 minutes! So why not give it a go right now!
It is another video I have recorded outdoors in nature from Fleurieu Peninsula, South Australia
To view this video, and get stretching with me, click the video below (or HERE).
Remember, consistency and progression with exercise is key!
Stay moving! and I’ll see you soon!
- Mike
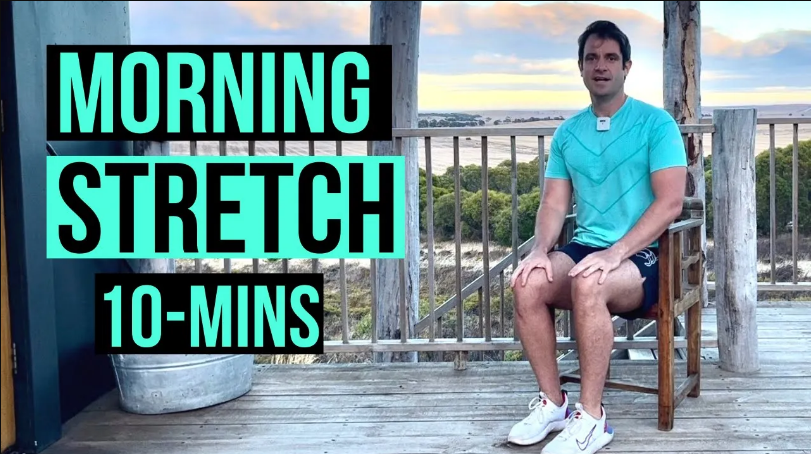
10 Minute Morning Stretch Routine for Seniors
If you’ve been following me for a while, you’d know I love getting out in nature and experiencing new places. So I thought why not film some new videos in some different places!
I have just uploaded the first exercise video in one of these locations. I recorded this video from Eyre Peninsula, South Australia
In this video, we go through a simple stretch, that you can do each morning!
Simple Morning Stretches for seniors
I have been around various parts of Australia lately, experimenting with something a little different with the exercise videos.
If you’ve been following me for a while, you’d know I love getting out in nature and experiencing new places. So I thought why not film some new videos in some different places!
I have just uploaded the first exercise video in one of these locations. I recorded this video from Eyre Peninsula, South Australia
In this video, we go through a simple stretch, that you can do each morning!
To view this video, and get stretching with me, click the video below (or HERE).
Remember, consistency and progression with exercise is key!
Stay moving! and I’ll see you soon!
- Mike

Hand Exercises With Therapy Balls For Older Adults: Improving Strength and Dexterity
As we age, our hands can become weaker and less dexterous (less able to perform precise and coordinated movements) due to natural muscle loss and decreased activity levels affecting our ability to perform everyday tasks.
Arthritis can have a profound impact on hand function, making everyday tasks difficult and painful.
Fortunately, regular hand strengthening exercises can help improve grip strength, dexterity, and overall hand function, making it easier to perform daily activities and maintain independence.
Today we are going to be covering some exercises for the hands using therapy balls to help provide resistance and improve hand strength and flexibility.
10 BEST Hand Exercises with STRESS Balls
Our hands are a vital part of our daily lives, enabling us to perform everyday tasks, communicate, and interact with the world around us.
They play a critical role in fine motor tasks which are activities that require precise and coordinated movements of the small muscles in the hands, fingers, and wrists, allowing us to write, type, button up a shirt, open a jar or participate in hobbies like drawing, playing an instrument, sewing and knitting.
And gross motor tasks which are activities that involve larger muscle groups of the hand. Which could be carrying an object, opening or closing a door, using a broom to sweep the yard, or throwing a ball!
Strong and healthy hands can improve our quality of life and reduce the risk of injuries conditions like arthritis and carpal tunnel syndrome, and allow us to do the things we love.
As we age, our hands can become weaker and less dexterous (less able to perform precise and coordinated movements) due to natural muscle loss and decreased activity levels affecting our ability to perform everyday tasks.
Arthritis can have a profound impact on hand function also, making everyday tasks difficult and painful. Osteoarthritis, which is caused by wear and tear on the joints over time, can lead to joint pain, stiffness, and reduced mobility in the hands, affecting motor skills.
Rheumatoid arthritis, an autoimmune disorder that causes joint inflammation, can lead to joint deformities of the hand, limiting mobility and dexterity.
Fortunately, regular hand strengthening exercises can help improve grip strength, dexterity, and overall hand function, making it easier to perform daily activities and maintain independence.
Today we are going to be covering some exercises for the hands using therapy balls to help provide resistance and improve hand strength and flexibility.
In the future I will also be covering hand exercises using no equipment.
BENEFITS OF USING THERAPY BALLS FOR HAND STRENGTHENING EXERCISES
Therapy balls, also known as stress balls or exercise balls, provide resistance that helps strengthen the muscles in the hands and fingers.
They come in various sizes, shapes, and resistances, allowing for customisation to individual needs and abilities. Incorporating therapy balls into hand strengthening exercises can provide additional benefits, including improved grip strength, increased range of motion, and enhanced coordination.
TO PURCHASE THE MORE LIFE HEALTH THERAPY BALLS, CLICK HERE.
Additionally, for individuals with arthritis, using therapy balls can provide a low-impact form of resistance that is gentle on the joints while still providing strength-building benefits.
HAND AND FINGER EXERCISES WITH THERAPY BALLS
These exercises are designed to help improve the strength and dexterity of your hands, forearms and fingers.
Remember to perform the exercises slowly and deliberately, focusing on squeezing with as much strength as you can without causing pain or discomfort.
Choose a resistance (light, moderate or heavy) for the level you are at, and progress the exercises as you get stronger.
Make sure to do the exercises on BOTH hands.
EXERCISE 1: BALL GRIP SQUEEZES (WRIST UP)
This exercise works the muscles of the fingers, hand and forearms helping to improve grip strength.
Hold your therapy ball in your hand with your wrist facing up. Squeeze the ball as tightly as you can, for 5 seconds then release.
Repeat 5 times.

EXERCISE 2: BALL GRIP SQUEEZES (WRIST DOWN)
This exercise works the muscles of the fingers, hand and forearms helping to improve grip strength.
Hold your therapy ball in your hand with your wrist facing down.
Squeeze the ball as tightly as you can for 5 seconds then release.
Repeat 5 times.

EXERCISE 3: TWO FINGER BALL SQUEEZE
This squeeze in particular is good to help strength the grip for tasks such as turning on or off a tap, or using a can opener.
Hold a therapy ball in one hand, with your palm facing up and your fingers slightly bent.
Position your index and middle fingers on one side of the ball and your thumb on the underneath the ball as per the picture below
Squeeze the ball between your two fingers and thumb as tightly as you can, hold for 5 seconds, then release.
Repeat 5 times.

EXERCISE 4: BALL PINCHES - ALL FINGERS
Hold your therapy ball between your thumb and first finger.
Pinch the ball as tightly as you can, hold for 5 seconds, then release.
Do the same for each finger.
Repeat 5 times.

EXERCISE 5: FINGER SIDE SQUEEZES - ALL FINGERS
Hold your therapy ball between the side of your index finger and your thumb.
Squeeze the ball as tightly as you can, hold for 5 seconds then release.
Do the same between your index finger and middle finger.
Repeat 5 times.

EXERCISE 6: THUMB FLEXION SQUEEZE
Hold your therapy ball between your thumb and your fingers.
Squeeze your thumb into the ball as tightly as you can, hold for 5 seconds, then release.
Repeat 5 times.

EXERCISE 7: FINGER BALL ROLL OUTS:
Place your fingers on top of your therapy ball, with the therapy ball on a table.
Roll your fingers over the top of the ball and back.
Repeat 5 times.

EXERCISE 8: BALL ROTATIONS (PALM/BALL UP)
Start by holding a therapy ball in your palm, with your fingers wrapped around it with your palm/ball facing up
Use your thumb and fingers to gently rotate the ball in a circular motion, as if you're trying to "roll" it around your palm.
Continue rotating the ball for several seconds, then switch directions and rotate it in the opposite direction.
Repeat the exercise for about 30 seconds to a minute, or for as long as you can comfortably maintain good form.

EXERCISE 9: BALL ROTATIONS (PALM/BALL DOWN)
Start by holding your therapy ball in your palm, with your fingers wrapped around it with your palm/ball facing down - this is more difficult as you have to hold the ball in place to not allow it to drop.
Use your thumb and fingers to rotate the ball in a circular motion, as if you're trying to "roll" it around your palm. - go at a speed you can manage.
Continue rotating the ball for several seconds, then switch directions and rotate it in the opposite direction.
Repeat the exercise for about 30 seconds to a minute, or for as long as you can comfortably maintain good form.

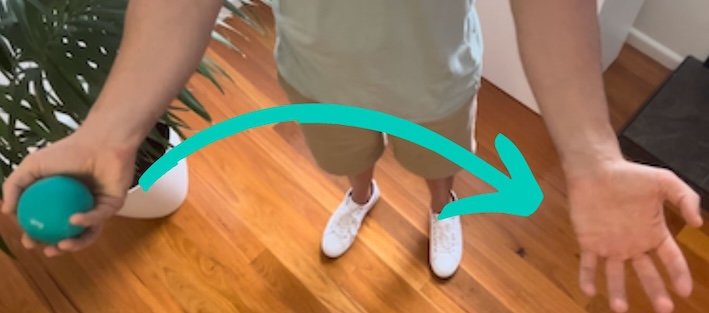
EXERCISE 10: BALL TOSSES
Start by holding ytour therapy ball in one hand, with your fingers wrapped around it.
Gently toss the ball to your other hand, catching it with your fingers and palm.
Immediately toss the ball back to the first hand, again catching it with your fingers and palm.
Repeat this gentle back-and-forth tossing motion for 30 seconds to a minute, or for as long as you can maintain good form.
BONUSE EXERCISE: ROLLING BALL MASSAGES
Place a therapy ball on a table and roll your hand over it, applying pressure to the palm and fingers as you go.
Continue for several minutes, focusing on any areas of tension or discomfort.

TIPS FOR INCORPORATING HAND EXERCISES INTO YOUR ROUTINE
Start slowly and gradually increase the number of exercises and repetitions or resistance as your strength improves. Also hold the exercises for longer time.
Start with 5 repetitions work your way up to 10-15.
Start with 5 second holds and work up to 10 - 15 seconds
Perform these hand strengthening exercises 2-3 times per week, allowing for rest days in between.
Use proper form and avoid straining your hands or fingers to prevent injury.
If you are using your hands a lot, maybe you are in a job that required heavy use of your hands, or you are doing a hobby that requires the same, rest off your hands until they feel better, and gradually incorporate these exercises into your life, and balance them with the task you are doing.
Listen to your body and stop if you experience pain or discomfort.
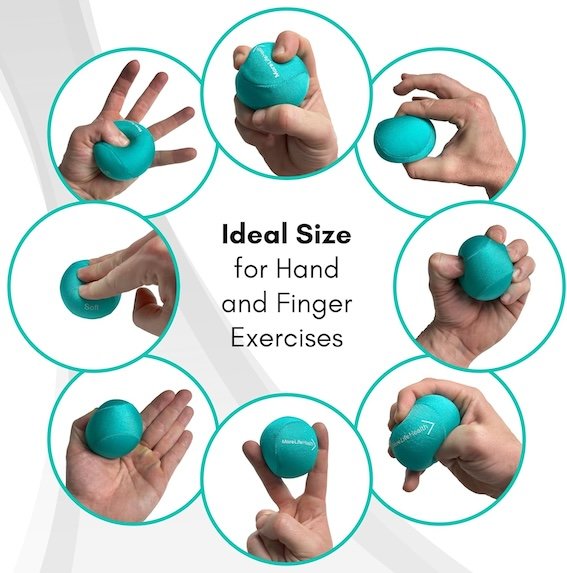
WHAT THERAPY BALLS TO USE - THERAPY BALLS I RECOMMEND
To purchase some high quality therapy balls, with different strengths, designed and tested by me, to improve your hand strength and dexterity (and can also be used as stress balls), click below.

Buy More Life Health Therapy Balls
TO PURCHASE CLICK BELOW:

Glute Strengthening Exercises For Seniors
The gluteal muscles (our buttocks) are comprised of the gluteus maximus, gluteus medius, and gluteus minimus and they are the largest and strongest muscles in our body.
They're responsible for many important tasks, like walking, running, jumping, and standing up from a seated position.
The gluteal muscles serve as the foundation of our musculoskeletal system, and when they are weak, it can lead to a host of issues. It can reduce our ability to move and function well in everyday life, affect posture and balance, and increase the risk of injuries and pain in the back, hips, knees and ankles.
On the other hand when we strengthen our glutes, we will move about much easier, balance and posture will improve and it will also take the strain off our hips, knees and ankles.
Glute Strengthening Exercises For Seniors (with Loop Bands - Seated, Standing AND lying Exercises)
The gluteal muscles (our buttocks) are comprised of the gluteus maximus, gluteus medius, and gluteus minimus and they are the largest and strongest muscles in our body.
They're responsible for many important tasks, like walking, running, jumping, and standing up from a seated position.
The gluteal muscles serve as the foundation of our musculoskeletal system, and when they are weak, it can lead to a host of issues. It can reduce our ability to move and function well in everyday life, affect posture and balance, and increase the risk of injuries and pain in the back, hips, knees and ankles.
On the other hand when we strengthen our glutes, we will move about much easier, balance and posture will improve and it will also take the strain off our hips, knees and ankles.
We cover many glute strengthening exercises in past videos, and today we go through some glute strengthening exercises specifically in the newest video. To get moving with me click the video below, or HERE.
These exercises are standing, seated AND lying glute strengthening exercises, ranging from beginner to intermediate.
I also use a loop resistance band during these exercises to add an extra challenge.
You may have seen these bands before, and their primary reason for use is to strengthen the glutes.
Adding the loop (circular) band to the exercises ensures sustained tension on the glute muscles, maximising the effectiveness of each repetition, and ensuring good results!

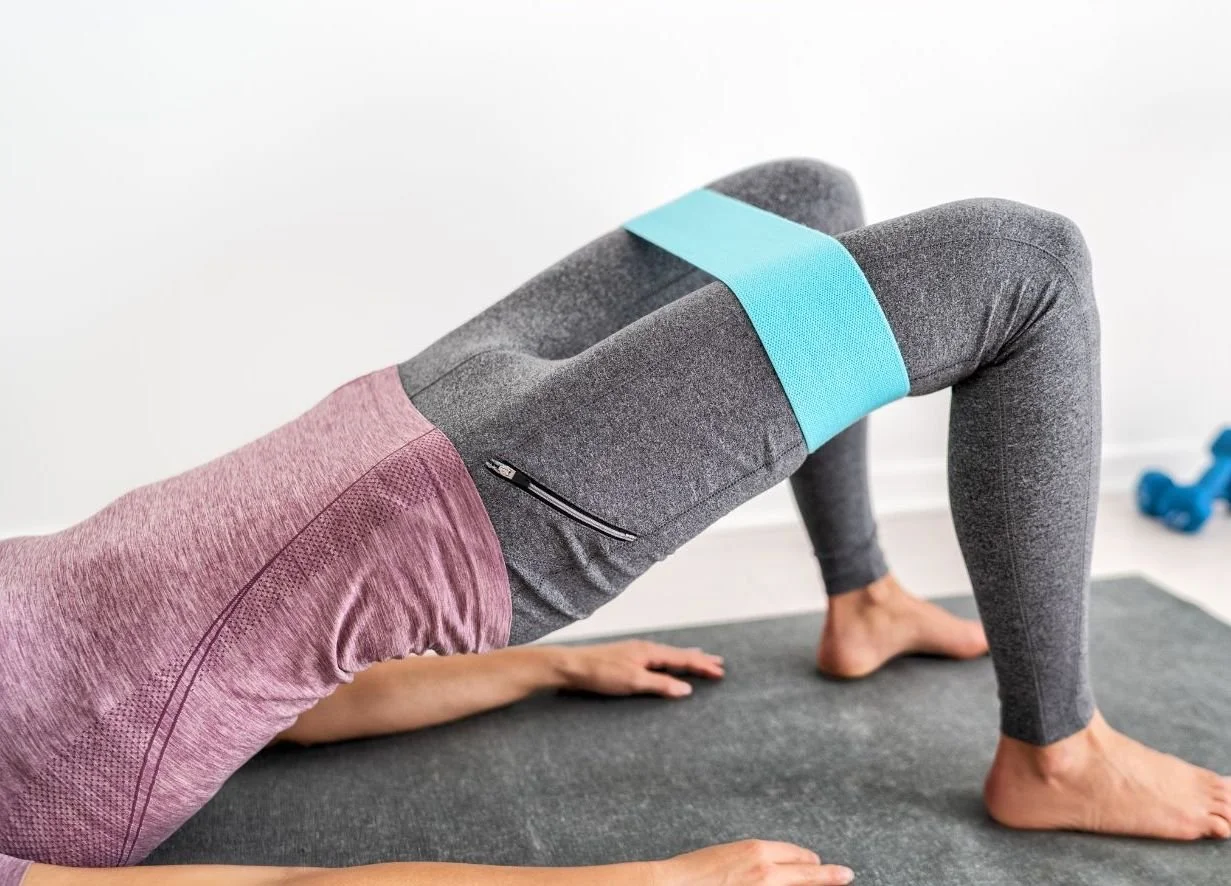
If you already have a set of loop bands, grab them and follow along with me to strengthen your glutes.
If you don't have loop bands, you can still work the glutes by going through the exercises without them. Then, when you're ready for the added challenge, you can add them in later.
You can purchase a More Life Health looped resistance band set HERE to work your glutes consistently.
Remember, consistency and progression with exercise is key!
Stay moving! and I’ll see you soon!
- Mike

The Power Of Light: Getting The Right Light For Improved Health
Natural light, especially sunlight, plays a vital role in our health.
Exposure to sunlight helps regulate our circadian rhythm, promoting a healthy sleep-wake cycle. It is also a natural source of vitamin D, which is essential for bone health and immune function.
Moreover, the brightness and colour temperature of natural light influences our mood and overall mental well-being. Like other living organisms, our relationship with light is fundamental to our health and vitality.
On the other hand, with the rise of technology and the increase in screen time over the past decades, certain types of light emitted from these devices can impact our health.
In this article, we'll explore light's impact on our health, how light affects our moods, and how we can maximise the use of light to our benefit.
PART 1: Blue Light: Your eyes, sleep, and health
I have wanted to write an article on the importance of light in improving health for a while now.
Other than hearing about getting vitamin D from sunlight, not much else about light is usually discussed.
In my career, it has not been uncommon to see new patients who spend most of their time seated indoors, away from fresh air and natural light. There have also been times I’ve seen patients and their blinds/shutters were drawn most of the day.
Natural light, especially sunlight, plays a vital role in our health.
Exposure to sunlight helps regulate our circadian rhythm, promoting a healthy sleep-wake cycle. It is also a natural source of vitamin D, which is essential for bone health and immune function.
Moreover, the brightness and colour temperature of natural light influences our mood and overall mental well-being.
Like other living organisms, our relationship with light is fundamental to our health and vitality.
On the other hand, with the rise of technology and the increase in screen time over the past decades, certain types of light emitted from these devices can impact our health.
In this article, we'll explore the impact of light on our health (sunlight/natural light), how light affects our moods. We will also look at the negative effects artificial light (blue light) can have on us and what we can do to prevent these effects.
We will also explore how we can potentially use red light for our benefit.
Now let’s get into it..
UNDERSTANDING LIGHT: THE ELECTROMAGNETIC SPECTRUM
To understand more about light and how it impacts our mind and body, we must first understand the electromagnetic spectrum.
The electromagnetic spectrum consists of electromagnetic waves (also called electromagnetic radiation) that surround us at all times.
These waves are omnipresent (everywhere), largely invisible to the human eye, and travel through space at the speed of light.
They are a form of energy that consists of oscillating electric and magnetic fields of different wavelengths and frequencies.
The frequency of the electromagnetic waves are closely tied to their roles and applications.
Waves with higher frequencies have shorter wavelengths.
Waves with lower frequencies have longer wavelengths.
The electromagnetic spectrum is an integral part of the natural world, and we utilise it in numerous ways daily. Some examples:
Radio waves allow us to communicate with each other and watch television. Microwaves allow us to heat food. Infrared waves allow us to use remote controls. Visible light illuminates our world, and X-rays and gamma rays help us diagnose and treat illnesses.
The harnessing of this spectrum has led to countless technological advancements and revolutionised how we live, work, and play.
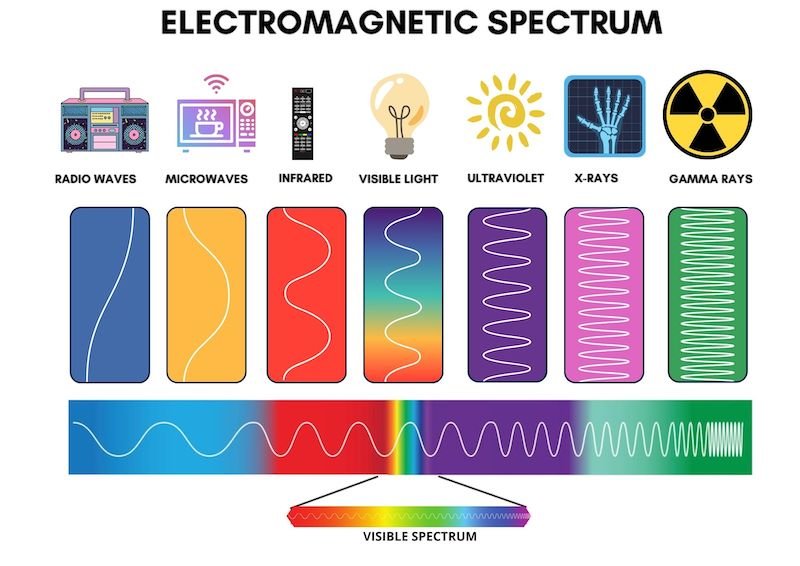
We can only see a small portion of the entire electromagnetic spectrum, and that portion is referred to as visible light.
Visible light consists of a range of wavelengths that our eyes are sensitive to, and it is perceived as different colours.
The colours of the visible spectrum, in order of increasing wavelength, are violet, indigo, blue, green, yellow, orange, and red. The colours of the rainbow.

Visible light from the sun IS the most beneficial source of light that our bodies are adapted to receive.
The spectrum of visible light from the sun contains a good mix of colours, from red to violet light, and each of those colours has a different effect on our health.
For example, blue light can impact sleep and mood, red light can affect blood flow and skin health, and green light can help regulate our body's internal clock.
That's why it’s important to get as much indirect exposure to natural sunlight as possible rather than relying solely on artificial lighting. I am not talking about laying in direct sun here, suntanning, or burning. It’s about letting natural light in.
Here are different forms of light globes compared to natural light and the spectrum of light they emit.

In short, sunlight gives us the full spectrum of visible light, which is like a multivitamin for our health.
Halogen and Incandescent globes are the closest to the visible light spectrum of the sun. In places where natural light is low at times, opt for these globes when you can during the day. There are also other globes on the market that replicate this natural light as closely as possible.
Spending all day underneath fluorescent light, without getting natural sunlight, and then spending the night on screens, which is not uncommon, is not good for your health. Many night shift workers in similar situations are also putting added stress on their bodies.
Overexposure to unnatural concentrations of these light spectrums can be harmful to our health.
Given the rise of technology and the amount of time we spend on screens that emit large amounts of blue light, it’s important to be aware of the risks of overexposure to blue light.
WHAT IS BLUE LIGHT?
Blue light is a part of the visible light spectrum with relatively short wavelengths and high energy.
It’s present in both natural sunlight and artificial lighting devices, including fluorescent and LED lights as well as digital and electronic devices.
How blue light affects your body, MIND, SLEEP AND HEALTH
We’ve established that sunlight contains all the colours of the visible spectrum, including blue light.
During the daytime, exposure to natural sunlight provides a substantial amount of blue light, which is essential for regulating our circadian rhythms, boosting alertness, and supporting overall well-being.
While all visible light is required for good health, spending a lot of time on devices or under other sources of artificial light can expose us to excessive blue light.
Prolonged exposure to blue light from artificial lighting devices, particularly before bedtime, can interfere with sleep quality and circadian rhythm regulation (i.e. our sleep cycle by disturbing the production of melatonin) and can cause disrupted sleep patterns; we all know the importance of good sleep on our health.
Prolonged exposure can also cause digital eye strain and potential long-term risks to eye health.
Overall, while blue light is essential during the day for its role in alertness and regulating our internal clock, it's important to manage and control exposure to artificial sources of blue light, especially in the evening, to support healthy sleep patterns and overall well-being.
And here is how to do it!
REDUCING/BLOCKING BLUE LIGHT EXPOSURE
CONTROL OVER LIGHTING:
For nighttime light exposure, we want to minimise the amount of blue light and maximise the use of light on the warmer end of the spectrum (think yellow/amber/red).
Bright or blue-rich lighting in the evening can disrupt our circadian rhythms and interfere with our ability to fall asleep.
Unlike blue light, which can suppress melatonin production and disrupt one's sleep cycle, red light has a longer wavelength that's more gentle on the eyes and actually helps promote sleep.
Studies have shown that red light therapy can improve sleep quality, reduce insomnia, and increase feelings of relaxation and calmness. [7, 8] I will go into further detail on red light in upcoming articles.
The ideal situation for light exposure would be pure natural light during the day and then candlelight or pure red light at night to promote sleep. However, we all know this is almost impossible for most people.
If you use LED globes, you want to decrease the amount of blue light exposure as much as possible. Opt for warm white or low-blue LED lights to signal to your body that it's time to wind down.
And if using fluorescent lights…. Ditch them.
BLUE LIGHT FILTERS, SOFTWARE AND APPS:
Software and apps that block blue light are created to minimise the blue light emitted by screens.
They usually alter the display's colour temperature, shifting it towards warmer, reddish hues in the evening to lessen eye strain and promote improved sleep.
Many modern electronic devices come with built-in features or settings that enable users to apply these blue light filters.
Here are some common terms used by various operating systems on the devices you may be using.
Night Shift (iOS):
Apple devices, such as iPhones and iPads, have a feature called “Night Shift”.
This feature automatically adjusts the display's colour temperature towards the warmer end of the spectrum in the evening to reduce blue light emissions.
Night Mode (Android):
Android devices often have a Night Mode or Night Light feature.
Similar to Night Shift, this feature reduces the amount of blue light emitted by the screen during specified times, making the display warmer.
Night Light (Windows):
Windows operating systems have a ‘Night Light’ feature.
This feature can be customised to adjust the display's colour temperature and reduce blue light during the evening.
Blue Light Filter (macOS):
Mac computers running macOS include a Blue Light Filter feature.
Users can enable this feature, often called "Night Shift," to reduce blue light emissions and make the display warmer during specified hours.
Third-Party Apps & Physical Filters:
In addition to built-in features, you can also choose to install third-party apps or software that provide blue light filter functionality.
These apps often offer additional customisation options for users who want more control over their display settings.
Furthermore, there are also screens that can be purchased online that block blue light, which sit over your screens.
As I write this here at night in a cafe in Kuala Lumper, I just looked up to see a lady sitting across the room, with a night light facing her computer screen, and her screen as dimmed as possible. I have not seen this before, but it comes at a good time for writing this article.
Glasses for blue light: WHAT ARE BLUE LIGHT GLASSES?
And now, onto my new favourite way to block blue light. The use of blue light-blocking glasses.
These glasses are specially designed eyewear that have lenses with coatings or materials that filter out or block a portion of blue light emitted by digital screens and artificial lighting.

By wearing these glasses, you can reduce eye strain, improve comfort during screen time, and, by minimising exposure to blue light in the evening, support better sleep.
I struggle with dry, red eyes when I increase my screen time. To the point I find it hard to work, and it can last for days until I control my screen time.
If you look closely enough, you may even spot it in my videos (shhh don’t tell anyone). And I notice a difference big difference in my sleep quality when I am on screens before bed.
Unfortunately, with the work I do, it’s not possible most of the time for me to avoid the screens at these times.
Previously, I purchased some glasses online and did not feel they did anything.
It was only until a company named Bon Charge, which specialises in blue light-blocking glasses and other light-related products, reached out to me and said they’d send me a pair of blue light-blocking glasses.

Me in my glasses : )
I liked what Bon Charge was about, and as an Australian company that now sells worldwide, I took up their offer.
This was when my view on wearing blue light-blocking glasses changed.
Although they took a little while to adjust to, I have loved these glasses from Bon Charge, and I use them every time I am on a screen.
They are good quality, comfortable (I don’t notice I’m wearing them), and my eyes don’t strain. My sleep isn’t affected when I use a screen before bed, and I sleep well. They are a darker shade of orange than others I have used, so this could be it.
I often get asked what products I recommend with certain things, and when it comes to Blue Light Blocking glasses and other light-related gear, I recommend Bon Charge.
They are a great company with quality products, deliver worldwide and often run promotions sales. You can also get 15% off sitewide (when they are not running sales) by using code “morelifehealth” at checkout. CLICK HERE to go to the BON CHARGE WEBSITE.
Oh, and they also do prescription lenses for the glasses.
In addition to managing blue light exposure, another crucial aspect of promoting a good night's sleep is incorporating a screen detox routine an hour or two before bedtime.
By engaging in relaxing activities such as reading a physical book (or an E-reader without a backlight), practising meditation, or enjoying a warm bath. This screen detox allows the body to transition into sleep mode more effectively, as the absence of screen-based stimuli helps signal to the brain that it's time to prepare for rest.
BALANCING BLUE LIGHT EXPOSURE CONCLUSION
As we’ve seen, blue light is NOT bad light. It’s required for various reasons, and we can’t escape it.
However, in our modern day and age, overexposure can harm our health.
To strike a balance, do your best to get indirect natural light as much as possible over other forms of light during the day, spend enough time outdoors, where you can manage screen time, use blue light filters, adjust indoor lighting, establish screen curfews and prioritise your sleep!
Do you do your best to decrease screen time before bed or use blue light-blocking devices? What other tips do you have regarding light? Let me know in the comments below.
STAY TUNED FOR THE NEXT PART OF THIS ARTICLE, DELVING DEEPER INTO LIGHT AND YOUR HEALTH!

Why I Embarked on the More Life Health Journey | My Personal Motivation
ver since starting More Life Health, I’ve wanted to share more about myself, and why and how More Life Health started.
I’ve actually had the bulk of what I am sharing in this email sitting there for years, I just never got around to finish it & sending it out…
So without further ado, here is how it all got started…
Why did I start More Life Health?
Ever since starting More Life Health, I’ve wanted to share more about myself, and why and how More Life Health started.
I’ve actually had the bulk of what I am sharing in this email sitting there for years, I just never got around to finish it & sending it out…
So without further ado, here is how it all got started…
I was born in Sydney, Australia.
I went to school in Sydney, Australia. And also went to university in Sydney, Australia to study Physiotherapy.
That’s a good summary... but a bit more has happened in between…
After finishing school, I knew I wanted to go to university, but to be honest, I had no idea what I really wanted to do with my life.
I applied for university.. and studied a degree in applied science (exercise and sports science) at the University of Sydney.
I finished the degree, but I still had no clue what I wanted to do and my options were limited. One of the common paths taken after this degree is a Masters in Physiotherapy, which sounded alright to me.
However, the first time around, with limited places, I did not get an offer for the course. Now what?
I wasn’t sure..
I decided to continue working as a concierge at a luxury hotel on a beach in Sydney and save enough to travel around the world; Europe and Egypt mainly. I had this strong feeling after doing this I’d get in when I reapplied the following year.
And I did!
After university I got offered a place in a popular hospital in Australia on rotation through different wards for a year. I liked this hospital. I would have gained great experience. However, something seemed off about me taking it…
I felt there were bigger things out there, I wanted more adventure.
One day whilst working on a placement during university a friend told me that there were great jobs in the Northern Territory of Australia with great pay rates.
To me, this sounded great.
I loved exploring new places, I loved adventure.. seeing more of Australia with better pay whilst learning from many broad aspects of health.. I got excited!
I immediately told another Physiotherapist friend about it, and he said he’d be keen to come also.
I said, “Okay, I’ll go home tonight and see if there is a job advertisement looking for two young lads in Darwin…”
I went home that night not thinking there would be a job ad like this on the website, but I checked for jobs and I saw this title, “Bring a mate to Darwin”...
I read on…
“We are a Physiotherapy Clinic looking for two New Graduate Physiotherapists to join our team…”
The ad seemed like it was written just for us.
To cut this story shorter, we applied for the ad. Got the jobs and drove up to the Northern Part of Australia to start my Physiotherapy career.
Here is a photo that was taken on the way!

I gained experience working in:
Private practice…
Hospitals (a bunch of different wards)...
Palliative care…
Nursing homes & community centres…
Working in Indigenous communities…
And with sporting teams (mainly Australian football, and field hockey)…


Then, after years doing this I decided I needed a change, and a friend asked me to move into working with older adults. I took the job and ended up working all over Australia for 7 years working with seniors in local communities and residential care.
By this time I had developed many skills & had a wide range of experience of working with so many older adults in different settings.
I wanted to help more people on a larger scale – and felt I could bring my skills online…
So I did, and More Life Health was born.
Nowadays, I now live on the South Coast of South Australia, but this will probably change soon. I like moving around and exploring new places.
I enjoy exercising, getting out in nature, swimming, surfing, reading, meditating, scuba diving, nutrition and travelling.
My goal is to help as many people improve their health & the lives of as many people around the world as I can.
Thanks for being on this journey with me.
- Mike

How To Engage Your Core - Essential Exercises for Over 60
As we age, it becomes increasingly important to maintain a strong and stable core, which is essential for overall functional fitness and everyday activities.
A strong core not only improves posture and balance but also supports daily activities and reduces the risk of injuries.
A simple technique to engage the core is to "draw the belly button to the spine."
Building a Solid Foundation: Core Strengthening TipS fOR SENIORS
The core is composed of a complex group of muscles that work together to provide stability, support, and movement for the entire body.
Core Muscles
The Deeper Core Muscles
The primary muscles of the core include the rectus abdominis, obliques (internal and external), transverse abdominis, and erector spinae.
The rectus abdominis, commonly known as the "six-pack" muscles, run vertically along the front of the abdomen and help flex the spine.
The obliques, located on the sides of the abdomen, aid in rotation and lateral flexion of the trunk.
The erector spinae muscles run along the length of the spine and assist in extending the back.
Lastly, the transverse abdominis (TrA) is a deep muscle that wraps around the torso like a corset and plays a crucial role in core stability and spinal support. We will be focusing more so on this muscle today.
As we age, it becomes increasingly important to maintain a strong and stable core, which is essential for overall functional fitness and everyday activities.
A strong core not only improves posture and balance but also supports daily activities and reduces the risk of injuries.
A simple technique to engage the core is to "draw the belly button to the spine."
Drawing the Belly Button to the Spine:
This is a cue frequently used to activate the deep abdominal muscles, particularly the transverse abdominis.
To engage your core using this technique, follow these steps:
a. Begin by sitting or standing tall with good posture. Or alternatively, you can do this lying with your knees bent and your feet flat on the floor
b. Find your neutral spine position - Ensure you are not slouched or your back is not over-arched.
c. Now gently draw your belly button in towards your spine.
d. Breath Naturally - Maintain a steady, controlled breath while keeping your abdominal muscles engaged.
d. Hold this position for a few seconds and release.
e. Repeat the exercise for a certain amount of repetitions, gradually increasing the duration of the hold.
For a video on this technique, click here below (or HERE):
>>>>> WATCH VIDEO <<<<<
IS THIS THE SAME AS SUCKING IN THE STOMACH?
"Sucking in your stomach" typically refers to the act of pulling in or tightening the abdominal muscles superficially, often for aesthetic purposes or to create a slimmer appearance.
This action primarily engages the external abdominal muscles, such as the rectus abdominis and external obliques, without necessarily activating the deeper core muscles.
On the other hand, "bringing your belly button to your backbone" or "drawing the belly button to the spine" is used to engage the deep core muscles, specifically the transverse abdominis. You’re bringing your muscles in towards your spine.
This technique emphasises activating the muscles that lie deeper within the abdomen, closer to the spine.
It provides greater stability and support to the core, promoting better posture and functional movement.
While both actions involve some level of core engagement, the latter technique of bringing the belly button to the spine focuses on activating the deep core muscles, which offer more substantial benefits for overall core strength and stability.
Other Terms for Core Engagement:
Drawing the belly button to the spine is a popular cue to engage the core.
However, you have most probably heard other terms and techniques to help you to engage the core effectively.
Here are some alternatives:
1. Core Compression:
This involves contracting the muscles around the abdomen, including the rectus abdominis, obliques, and transverse abdominis.
Imagine compressing your midsection inward as if you were wearing a tight corset. This cue emphasizes activating the entire core area.
2. Hollowing the Stomach:
Hollowing the stomach refers to pulling the abdominal muscles inward while maintaining a natural curve in the lower back. Imagine hollowing out your belly, drawing it towards your spine without holding your breath or squeezing too tightly.
3. Bracing:
Bracing involves tensing the abdominal muscles as if you were preparing to take a punch. This technique provides stability and support to the core, similar to how a brace supports a structure.
Core-Strengthening Exercises for Seniors:
Now that you are familiar with various ways engage the core, for core strengthening exercise videos for seniors (including seated videos), click HERE.
Engaging the core is an important exercise to maintain stability, balance, and overall functional fitness and these techniques above can be practiced anywhere!
Whether you prefer the cue "drawing the belly button to the spine" or other terms such as core compression, hollowing the stomach, or bracing, the goal is to activate and strengthen the deep core muscles.
By incorporating core-strengthening exercises into your fitness routine, you can improve your posture, enhance balance, and enjoy an active lifestyle with reduced risk of injury.
Have you heard these cues for strengthening your core? Maybe you have heard others? If so, let me know below!

How To Progress Your Exercise - Gradually!
You would have heard me say in my videos at times, the importance of progressing exercises, gradually.
Now any exercise is great! If you’re overwhelmed by it all. Keep it simple.. some is better than nothing.
However, if you stick to exercise, you ARE going to make improvements; you’ll find yourself becoming stronger, balancing better, moving better. Things will start becoming easier.
This is great, and to continually make improvements you want to make the exercises a little more challenging.
There are several ways you can progress exercises to make them more challenging and continue to improve your fitness levels. The principles are the same at any age!
Here are some common methods to progress your exercises:
PROGRESSING YOUR EXERCISE
You would have heard me mention in my videos (and writing) about the importance of progressing exercises gradually.
If you stick to exercise, you ARE going to make improvements. You’ll find yourself becoming stronger, balancing better and moving better, amongst other things. It will all will start becoming easier.
This is when you want to make the exercises a little more challenging so you continue to make improvements.
Now any exercise is great! If you’re overwhelmed by it all. Keep it simple. Some exercise is better than nothing.
But once you start getting on top of it all, you’re staying consistent, and it’s all making sense, now is the time to progress the exercises.
Here are some common methods to progress your exercises:
Increase repetitions or sets
As you become stronger, you can increase the number of repetitions (reps) or sets you perform for each exercise. For example, if you were doing 5 reps of an exercise, you can aim to increase it to 10 or 12 reps. Similarly, you can add an extra set to your workout routine. If you’re only able to do 1 set, progress to 2 and then 3.
Increase resistance or weight:
If you're performing strength training exercises, gradually increase the amount of weight or resistance you're using.
This could involve using heavier dumbbells, resistance bands with higher tension, or adding weight plates to a barbell.
To purchase the resistance band I recommend, click HERE:For more on Strength training, read my in-depth guide HERE:
Modify the exercise position:
Altering the position or form of an exercise can add difficulty. For example, if you're doing push-ups, progressing from performing them on a wall or bench or on your knees to performing full push-ups on your toes is a way to advance the exercise. I explain this about pushups in this video HERE, and this article HERE.
I also explain how to do this with balancing on one leg HERE.
Change the exercise tempo:
By manipulating the speed at which you perform your exercises, you can make it more challenging.
Slowing down the movement, particularly during the eccentric (muscle lengthening) phase, increases time under tension and can lead to greater strength gains.
In these videos, we work out at a slower tempo.
For walking, you can increase your speed.
Increase range of motion:
Gradually working towards a greater range of motion in exercises can increase the difficulty. For instance, in a squat, you can aim to squat deeper after starting with a partial squat.
How to perform the PARTIAL SQUAT.
How to perform a DEEPER SQUAT.
Incorporate unilateral exercises:
Instead of using both limbs simultaneously, you can progress to unilateral exercises that work one side of the body at a time. This requires greater stability and strength control.
Here is a video we do SINGLE-LEG STRENGTHENING.
Introduce instability:
Using unstable surfaces, such as a balance board or standing on a cushion, when doing the balance exercises.
We do this with different surfaces (such as a cushion) in many of the BALANCE VIDEOS. Click HERE for Balance Videos.
Remember to progress GRADUALLY and listen to your body.
It's important to find the right level of challenge without sacrificing proper technique of the exercise and risking injury.
If you're unsure about progressing exercises safely, it's always a good idea to consult with a Physiotherapist or qualified fitness professional.

Building Strength At Any Stage: Mastering Push Ups For Older Adults
Pushups are one of the best exercises to strengthen the upper body. More specifically, pushups strengthen the muscles of your chest, your shoulders, your arms and your core.
Unfortunately, pushups are not the easiest exercises to perform. If you struggle with them, or you just can’t do them, that’s ok!
You can still perform the pushup exercise, no matter your current strength levels, by modifying the exercise to suit your individual needs.
And here is how!
Pushups are one of the best exercises to strengthen the upper body. More specifically, pushups strengthen the muscles of your chest, your shoulders, your arms and your core.
Unfortunately, pushups are not the easiest exercise to perform. If you struggle with them, or you just can’t do them, that’s ok!
You can still perform the pushup exercise, no matter your current strength levels, by modifying the exercise to suit your individual needs.
And here is how!
Watch the video below to see how and scroll further for pushup exercise demonstrations.

WALL PUSHUPS
Wall pushups are a beginner-friendly variation of the traditional pushup exercise that can help build strength in the chest, shoulders, and arms. Here's how to do them:


Stand facing a sturdy wall, about arm's length away. Your feet should be shoulder-width apart.
Place your hands on the wall slightly wider than shoulder-width apart, at shoulder height.
Keeping your body straight, lean forward and bend your elbows to lower your chest toward the wall.
Pause for a moment when your chest is close to the wall, and then push yourself back up to the starting position.
Repeat the movement for the desired number of repetitions.
Remember to engage your core muscles throughout the exercise and maintain a straight line from your head to your heels.
Adjust the difficulty by changing the distance between your feet and the wall.
PUSHUPS OFF A BENCH (OR CHAIR)
Pushups off a bench, also known as inclined pushups, are a modification that makes pushups easier by reducing the amount of body weight you have to lift.
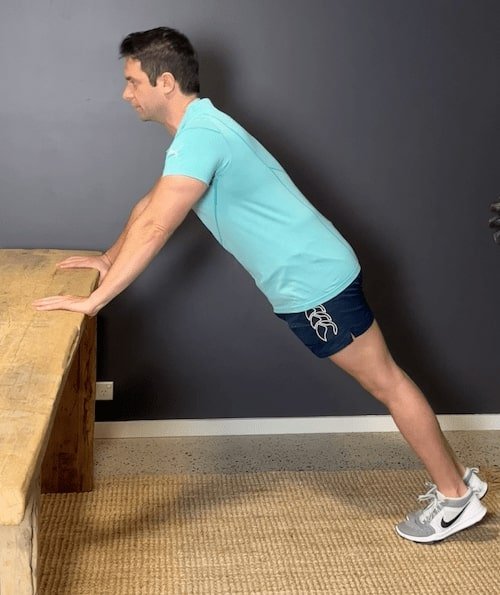
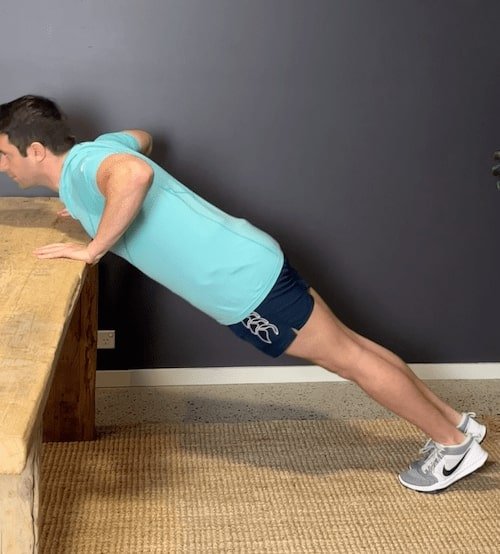
HOW TO:
Find a sturdy bench or elevated surface that is about knee height.
Place your hands on the edge of the bench, slightly wider than shoulder-width apart, and step back so that your body forms a straight line from head to heels. Your feet should be together.
Lower your chest toward the bench by bending your elbows, keeping your body straight and your core engaged.
Pause for a moment when your chest is close to the bench, and then push yourself back up to the starting position.
Repeat for the desired number of repetitions.
Make sure to maintain proper form throughout the exercise, keeping your body aligned and avoiding sagging or arching in the lower back.
Adjust the difficulty by changing the distance between your feet and the chair/bench, and by altering the height of the bench (pushing off a lowering height will increase difficulty).

Decrease height to Push off for increased difficulty

Decrease height to Push off for increased difficulty
PUSHUPS ON THE FLOOR
Pushups on the Floor on Knees:
Pushups on the floor on your knees, also known as knee pushups, are another variation that reduces the intensity of the exercise, making it more accessible for beginners or individuals with limited upper body strength.

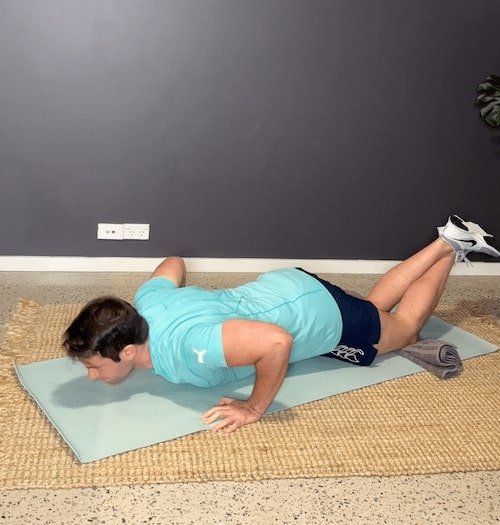
HOW TO:
Start by positioning yourself on the floor with your knees touching the ground and your hands placed slightly wider than shoulder-width apart, fingers pointing forward.
To decrease the strain on your knees, place a folded towel under your knees.
Walk your hands forward and place them directly under your shoulders.
Extend your legs back, keeping your knees in contact with the floor. Your body should form a diagonal line from your head to your knees.
Lower your chest toward the floor by bending your elbows, maintaining a straight line from head to knees.
Pause briefly when your chest is close to the ground, and then push yourself back up to the starting position by straightening your arms.
Repeat for the desired number of repetitions.
Focus on keeping your core engaged and maintaining proper alignment throughout the movement.
As you build strength, you can gradually progress to full pushups on your toes (next exercise).
STANDARD PUSHUP
The standard pushup is a compound exercise that targets multiple muscle groups, including the chest, shoulders, triceps, and core.


HOW TO:
Start by positioning yourself on the floor face down, with your hands placed slightly wider than shoulder-width apart, fingers pointing forward.
Extend your legs back and balance on the balls of your feet. Your body should form a straight line from your head to your heels.
Engage your core muscles, squeeze your glutes, and keep your neck in a neutral position.
Lower your body toward the floor by bending your elbows, maintaining a straight line from head to heels. Keep your elbows tucked close to your body rather than flaring them out to the sides.
Continue lowering until your chest is just above the ground or as far as you can comfortably go.
Pause for a moment in the lowered position, and then push yourself back up to the starting position by straightening your arms.
Keep your body straight and avoid sagging or arching in the lower back throughout the movement.
Repeat for the desired number of repetitions.
It's important to maintain proper form and control during the exercise.
If you're new to pushups or find them challenging, modify them by performing pushups as described above, and as you build strength you can progress to the next variation.

Vestibular Exercises: Exercises For Dizziness, Vertigo and Motion Sensitivity
As we age, it is not uncommon to experience symptoms of dizziness (lightheadedness and unsteadiness), vertigo (a sensation of spinning or whirling), motion sensitivity (motion sickness) and balance problems. These are all vestibular symptoms and can significantly impact daily activities and quality of life.
Fortunately, there are proven strategies that can reduce symptoms of vestibular issues.
In this article, we will look at the vestibular system so you can better understand what may be happening when you're experiencing these symptoms. We will also look at what can improve symptoms, including exercises and more.
EASING VESTIBULAR SYMPTOMS
As we age, it is not uncommon to experience symptoms of dizziness (lightheadedness and unsteadiness), vertigo (a sensation of spinning or whirling), motion sensitivity (motion sickness) and balance problems. These are all vestibular symptoms and can significantly impact daily activities and quality of life.
Fortunately, there are proven strategies that can reduce symptoms of vestibular issues.
In this article, we will look at the vestibular system so you can better understand what may be happening when you're experiencing these symptoms. We will also look at what can improve symptoms, including exercises and more.
NOTE BEFORE: It's important to remember that not all dizziness is caused by vestibular issues. Dizziness can have various causes, including neurological, cardiovascular, or metabolic conditions, medication side effects, dehydration, anxiety, and more. Therefore, please ensure you see your doctor or health care professional if you experience dizziness, especially if it's persistent or severe, to determine the underlying cause and receive appropriate treatment.
WHAT WE WILL BE COVERING IN THIS ARTICLE:
WHAT IS THE VESTIBULAR SYSTEM AND WHAT DOES IT DO?
The vestibular system is a sensory system of our body, which is predominantly situated in the inner ear, safe and protected inside the temporal bone. It sits adjacent to our cochlea, our organ of hearing.
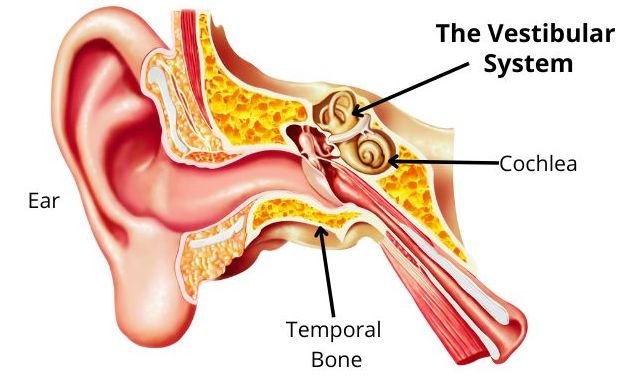
Diagram: The Vestibular System
It contains three canals, known as the semicircular canals, and two organs, the utricle and saccule, which are known as the otolith organs.
The semicircular canals are positioned at right angles to each other, allowing them to detect rotational head movements. They are filled with fluid (known as endolymph). When the head moves, this fluid flows into an area called the ampulla.
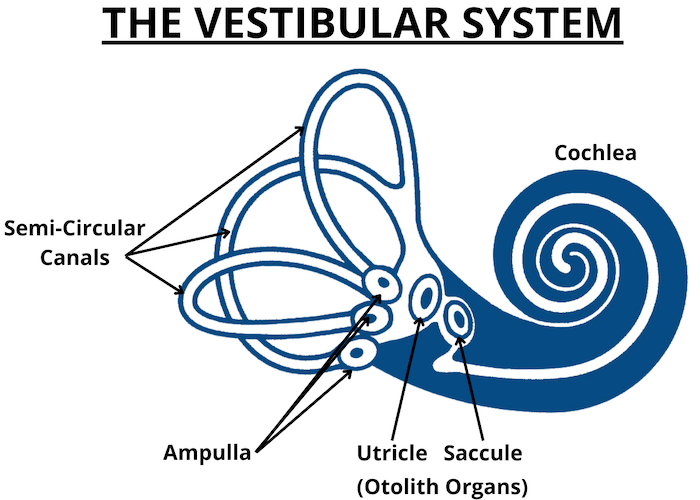
Diagram: A closer look at the Vestibular System
In the ampulla, the movement of the endolymph causes the movement of hair cells, which sends signals or information about the head movement to the brain.
The otolith organs (utricle and saccule) also detect movement. They are responsible for detecting linear acceleration of the head (which are changes in speed or direction in a straight line) and changes in head position with respect to gravity, such as when the head moves forward or backward or when the head is tilted up or down.
More specifically, the utricle is sensitive to horizontal head movement, e.g., moving forward or backward in a car. The saccule is sensitive to vertical head movement - moving up and down.
The otolith organs contain hair cells that are covered with tiny crystals of calcium carbonate called otoconia (or otoliths). When the head moves, the otoconia shift, and the hair cells' movement generates nerve impulses transmitted to the brain.
Together, the semicircular canals and the two otolith organs provide the brain with information about the position, movement, and orientation of the head and body, allowing us to maintain balance, coordinate our movements and provide us with a sense of where our body is in relation to the space around us (spatial orientation).
However, there may be times the vestibular system may not function as it should, leading to symptoms including:
Dizziness or vertigo
Imbalance, lightheaded or unsteadiness
Motion sensitivity or motion sickness
Nausea or vomiting
Sensitivity to light or sound
Tinnitus or ringing in the ears
The feeling of fullness in the ears
Imbalance or unsteadiness
Headaches or migraines.
VERTIGO IN SENIORS: DIZZINESS VS VERTIGO
A symptom of vestibular issues, which can occur among older adults, is vertigo.
Vertigo is a specific type of dizziness characterized by a spinning or whirling sensation.
Dizziness, on the other hand, is a more general term that can refer to a range of symptoms, including lightheadedness, unsteadiness, and feeling faint.
The most common cause of vertigo is Benign Paroxysmal Positional Vertigo (BPPV).
BPPV is a condition where the otoconia (the calcium carbonate crystals discussed above), typically embedded in a gel membrane, become displaced from the utricle and move into one or more of the fluid-filled semicircular canals where they shouldn't be.
How Vertigo Occurs.
This can cause the canals to become overly sensitive to head movements, leading to feelings of dizziness or spinning when the head is moved in certain positions.
BPPV is typically a self-limiting condition that resolves on its own within a few weeks to months, although it can recur in some individuals.
Treatment options for BPPV may include a series of specific head and body movements, known as canalith repositioning procedures (EG. Epley Maneuver) or vestibular rehabilitation exercises, to help move the displaced otoconia out of the semicircular canals and restore normal vestibular function. Medications and surgery are generally not recommended for BPPV.
POSTURAL HYPOTENSION: ANOTHER TYPE OF DIZZINESS
Another type of dizziness that is not uncommon when one gets older is postural hypotension.
Postural hypotension is dizziness or lightheadedness when going from lying or sitting to a standing position. Postural hypotension is caused by a drop in blood pressure.
With postural hypotension, vestibular exercises are not typically used as a treatment.
Postural hypotension is usually managed by addressing underlying medical conditions contributing to the problem, adjusting medications, and making lifestyle modifications such as drinking plenty of fluids, avoiding alcohol, and standing up slowly and standing to a walking aid if required.
However, vestibular exercises can help improve balance and reduce the risk of falls that may occur as a result of postural hypotension.
If you experience dizziness when going from a lying or seated to a standing position, let your doctor know.
Vestibular Exercises for Seniors (EXERCISES FOR DIZZINESS, VERTIGO & MOTION SENSITIVITY)
Vestibular exercises can improve balance, reduce dizziness and vertigo, and increase confidence in daily activities. These exercises can also help prevent falls and promote physical and mental health.
Studies have shown that vestibular exercises can improve the vestibular system's function and reduce symptoms of dizziness and vertigo. These exercises can also help improve postural stability and reduce the risk of falls. [1, 2, 3, 4]
A successful vestibular rehabilitation program should contain exercises of the eyes, the neck and the rest of the body.
Types of vestibular exercises that are commonly used in vestibular rehabilitation include:
Eye and Head Exercises: These exercises may involve moving the head in different directions while focusing on a stationary object or tracking a moving object with the head and eyes.
Gaze Stabilisation Exercises: These exercises involve fixing your gaze on a stationary object while your head is moving. This helps train your brain to interpret signals from your vestibular system better.
Balance Exercises: These exercises help improve your overall balance and reduce your risk of falls. Examples include standing on one leg, walking heel-to-toe, and standing on an unstable surface.
Habituation Exercises: These exercises involve exposing yourself to movements or situations that typically trigger your symptoms in a safe and controlled environment. Over time, your brain may learn to tolerate these movements or situations without causing symptoms.
Canalith Repositioning Manoeuvres: These manoeuvres involve moving your head and body in specific ways to help reposition tiny crystals in your inner ear that may have become dislodged, leading to vertigo.
Brandt-Daroff Exercises: These exercises involve repeatedly sitting up and lying down in a specific way to help desensitise your brain to movements that may trigger vertigo.
It's important to note that the prescribed exercises will depend on symptoms and diagnosis and should be guided by a healthcare professional trained in vestibular rehabilitation.
And it is essential to take precautions when performing vestibular exercises to reduce the risk of injury, including measures in place to prevent falls.
Always start with gentle exercises and gradually increase the intensity as you become more comfortable. If you experience any pain or discomfort, stop the exercise immediately.
Incorporate vestibular exercises into your daily routine to get the most benefit. Start with a few minutes of exercise daily and gradually increase the duration and intensity.
BEGINNER VESTIBULAR EXERCISES (VIDEO)
Join me for these slower-paced vestibular exercises that are perfect for seniors.
These vestibular rehabilitation exercises can be used to relieve symptoms associated with vestibular dysfunction, that being dizziness, vertigo and motion sensitivity.
Always make sure you see your doctor or Vestibular Physiotherapist before undertaking these exercises.
Beginner Vestibular Exercises
INTERMEDIATE VESTIBULAR EXERCISES (VIDEO)
Intermediate Vestibular Exercises
Other Tips for Preventing Dizziness and Vertigo in Seniors
In addition to vestibular exercises, there are other steps you can take to prevent dizziness and vertigo. These include:
Reducing stress can help prevent dizziness and vertigo by reducing tension in the body and promoting relaxation.
Practising relaxation techniques: Stress and anxiety can worsen dizziness and vertigo. Practising relaxation techniques such as deep breathing, meditation, or yoga can help reduce stress and improve symptoms.
Staying hydrated is required for good health and can help prevent dehydration, which can cause dizziness.
Eating a healthy diet rich in nutrients and low in processed foods and vegetable oils can help maintain overall health and prevent conditions that may lead to dizziness or vertigo.
Getting enough sleep is vital for overall health and can help prevent fatigue, which can contribute to dizziness and vertigo.
Improving general fitness may not directly decrease vestibular issues, but it can improve overall health and reduce the risk of certain health conditions that may contribute to vestibular problems. Additionally, regular exercise can improve balance and coordination, which may help compensate for vestibular dysfunction and reduce the risk of falls.
Avoiding alcohol, tobacco, and other stimulants can help prevent dizziness and vertigo by reducing the risk of conditions that may lead to these symptoms.
Using caution with medications: Some medications can cause dizziness as a side effect. Talk to your doctor about any medications you're taking and whether they could contribute to your symptoms.
Managing underlying conditions: Certain conditions, such as migraines and inner ear disorders, can cause dizziness and vertigo. Managing these underlying conditions through medication or other treatments can help prevent symptoms.
References
For References used in this article, click here.

Keeping Up Your Exercise
Exercise and movement is medicine. Medicine that should be undertaken consistently each week (preferably daily in some way) to get the benefits and keep the benefits.
Getting started with exercise or another new habit is usually relatively easy. However, when motivation wanes or something comfortable tempts us, it can be challenging to override this in the moment and stick to what we had originally planned.
Our minds will find ways to justify why we don’t have to exercise. We miss a session, and then one missed session turns into two missed sessions, then maybe three or four. And then more. Until it gets to “I haven’t exercised for a while”.
Welcome to 2023! The first article of the year from me.
I hope you had a good Christmas if you were celebrating, and a good New Year. I definitely did!
I’m a week late on this article, I did sit down to write something to help get your year off to a good start last week. However, nothing I wrote I felt was worthy of sharing.
So I turned my laptop off and now, a week later, here I am again trying to think of something good to write that will help KEEP you moving this year.
I put the “KEEP” in capitals because this is the most challenging part when it comes to exercise and other healthy habits. I want you to be exercising throughout the year and for many years to come.
Exercise and movement is medicine. Medicine that should be undertaken consistently each week (preferably daily in some way) to get the benefits and keep the benefits.
Getting started with exercise or another new habit is usually relatively easy. However, when motivation wanes or something comfortable tempts us, it can be challenging to override this in the moment and stick to what we had originally planned.
Our minds will find ways to justify why we don’t have to exercise. We miss a session, and then one missed session turns into two missed sessions, then maybe three or four. And then more. Until it gets to “I haven’t exercised for a while”.
Unfortunately, if we don’t keep up our exercise, we eventually start losing what we’ve gained.
There will always be times when motivation dips or something unexpected gets in the way. So we want to ensure we have some ways to deal with these times that we don’t feel like exercising.
Here are some steps you can take:
COMMIT to exercise.
Unless there is good reason not to, commit to some exercise or movement at least three times each week.
Remember “WHY”.
Everyone has different reasons as to exactly why they’re exercising. You will have your specific reasons also. Think of these reasons, and think about how you will feel after making progress with your exercise versus if you don’t exercise. Remember, when you exercise today, your future self will thank you.
SHOW UP.
If you’re demotivated to exercise, start by just taking steps to show up to the exercise.
For example — put on an exercise video and sit in front of it. Once you’ve done this, there’s a high chance you’ll start following along.
Or, if you know you should go for a walk, just put your exercise clothes on and tie up your walking shoes. Now start taking steps out the door. When you’ve done this, you’re likely going to keep walking.
After some time into it, you’ll most probably find it’s not so bad. And when done, you’ll feel better after.
You don’t have to go all out. Start small, make it easy, have fun with it. Even if it’s not the best session, that’s ok! Don’t beat yourself up. Aim to do better next time.
REPEAT.
Get back to it the next day or the day after, and do your best to improve on your last session (it’s ok if you don’t improve, and even if it’s a slight improvement, that’s great!).
So there are four steps you can follow when you feel your motivation slipping.
I do the same when I don’t feel like exercising. I still make sure I get to the gym. I start with exercises I enjoy and gradually build on this during the session. Most of the time, after some time of the exercise, I get into it. If it’s not a good session, I know I will get back to it tomorrow or the next day. So it’s ok!
I also did the same for my writing last week. Every cell in my body did not want to write, but I know this resistance is normal, So I committed, sat down in front of my laptop and wrote. What I wrote last week was no good, but here I am back to it.
You may have tips to stay consistent with your exercise or other habits. If so, I’d love to hear them. You can let me know by placing a comment below..
I look forward to hearing about your progress with your health and exercising throughout the year.
If you don’t know how, or where to start, create a plan with the exercise videos here.
You can create a playlist of your favourite exercise videos by following this link here.
And if you’re stuck or have questions, join the More Life Health Facebook Support Group (click to join), which is an amazing, supportive group.
I will be writing an email each week to help you on your health and fitness journey. So I will see you again next week! Make sure you’re signed up to the mailing list, you can do so here morelifehealth.com/join …. And more exercise videos to come.
Looking forward to a happy, healthy and exercise-filled year with you!
2023 is going to be a great year!
Stay moving!
- Mike

Exercises To Do Before Knee Replacement Surgery
Includes VIDEO ON PRE-Knee Replacement SURGERY ExerciseS
So you’re booked in for an upcoming knee replacement surgery.
You most probably have been given a list of exercises to do before this surgery (and other pre-operative instructions) by your surgeon. This will ensure your legs are strong as possible before your surgery, which will help with the recovery.
As a Physiotherapist who has helped many people in your exact situation, I want to help you by going through the exercises in a video so you can follow along to them.
Before we get into this, however, let’s go through a few other things you can do to allow for better recovery following surgery.
Preparing For Knee Replacement Surgery
MENTAL PREPARATION
Undergoing any kind of surgery can be daunting, but it's important to remember that knee replacement surgery is very common and typically has a successful outcome. Still, it's normal to feel some anxiety about the procedure. Here are a few tips to help you mentally prepare for your surgery:
Talk to your surgeon: If you have any questions or concerns about the surgery, be sure to voice them to your surgeon ahead of time. This will help put your mind at ease and ensure that you understand everything that will happen during the procedure.
Educate yourself: Learning as much as you can about knee replacement surgery will also help reduce your anxiety. Talk to your surgeon, read books or articles, and watch videos about the surgery so that you know what to expect.
Find a support system: Whether it's friends, family, or a support group for people who are undergoing knee surgery, having a supportive network will help you feel more comfortable going into the procedure.
You will find many people who have undergone this surgery in the MORE LIFE HEALTH SUPPORT GROUP - which you can join HERE
PHYSICAL PREPARATION
In addition to preparing mentally for your surgery, it's also important to take some steps to prepare physically. This will help ensure a smooth recovery and decrease your risk of complications. Here are some things you can do:
Lose weight: Carrying extra weight puts more strain on your knees. Not only will losing weight help with the pain prior to surgery, it will also allow for a smoother recovery. Speak to your doctor about weight loss techniques.
Quit smoking: If you smoke, it's important to quit at least six weeks before your surgery. Smoking can delay healing and increase the risk of complications. Speak to your doctor about weight loss techniques.
Get healthier - Start introducing healthier habits into your life - eating a healthier diet, getting optimal sleep and reducing stress are some great ways to improve your health.
Exercise: Strong muscles help support your joints, so it's important to exercise regularly prior to your surgery. This will help you stay strong and improve your overall health. We will cover exercise in the next section.
Get your home ready: Before your surgery, you'll need to make some changes to your home to accommodate your recovery. This may include: making sure you have someone to help, setting up a comfortable place to sleep, removing any rugs or other trip hazards, and stocking up on easy-to-prepare meals.
Knee replacement surgery is a major procedure, but if you take the time to prepare both mentally and physically, you can help ensure a successful outcome. Talk to your surgeon about any questions or concerns you have, and be sure to follow their instructions for a safe and smooth recovery.
I also cover more on what you can do (plus exercises), in the video below.
EXERCISES TO DO BEFORE KNEE REPLACEMENT SURGERY
Exercises to do before Knee replacement surgery