The Steady Senior: The Complete Guide To Great Balance Over 60
FIRST PUBLISHED: 22/5/2017. LAST UPDATED: 10/2/2024
Good balance is essential to keep you steady on your feet, prevent falls and ensure you get the most out of life!
With good balance, you can go about your days effortlessly!
As we get older, however, it's common for our balance to worsen, which means life becomes harder (and not to mention more dangerous)!
But, BALANCE IS A SKILL! A SKILL THAT CAN BE RE-TRAINED AT ANY AGE!
And,
YOU CAN IMPROVE YOUR BALANCE, NO MATTER YOUR CURRENT CAPABILITIES!
In this guide, I will teach you all you need to improve your balance, show you how you can test your current balance and give you all that is required to begin balance training and keep you balancing well, for life!
All in the comfort of your own home!
You don't need special equipment, and you don't need to join a gym.
It's easy, and it can be enjoyable.
Oh, and by applying what's in this guide, not only will you build great balance, the same exercises help you get stronger, fitter, look better, feel better and increase your confidence!
We are going to make some real progress!
So let's get balancing well!
WHAT WE WILL COVER IN THIS GUIDE:
PART 1: ALL ABOUT BALANCE FOR SENIORS
1.2 HOW YOUR BODY KEEPS YOU UPRIGHT
1.3 WHY BALANCE WORSENS WITH AGE
PART 2: HOW TO TEST YOUR BALANCE
2.1 EQUIPMENT TO IMPROVE AND TEST YOUR BALANCE
2.3 HOW TO KEEP TRACK OF YOUR BALANCE
PART 3: HOW TO IMPROVE YOUR BALANCE OVER 60
STEP 2: DO SPECIFIC BALANCE EXERCISES
THE BEST BALANCE EXERCISES FOR SENIORS
STEP 3: ALWAYS CHALLENGE YOURSELF
STEP 4: HOW TO BE MORE MINDFUL
Before we get started, remember, this guide will only help you if you apply these strategies. Just reading what's here and trying the exercises maybe once will not help you improve your balance.
If you want to improve your balance, read the article and undertake what's set out in this article.
Pledge to incorporate at least 5-10 minutes of balance work into your life a few times each week. Make it simple. Make it fun!
To make it easy for you; I create workouts for mailing list subscribers. So make sure you join up!
PART 1. ALL ABOUT BALANCE FOR SENIORS
1.1 WHAT IS BALANCE
If you had to guess what balance is, most would probably guess something along the lines of “being able to stand upright, without falling”.
Which is good, and all you need to know! However, a better definition is this:
“BALANCE is the ability to maintain the line of gravity of a body (vertical line from the centre of mass) within the base of support with minimal postural sway” [1].
Let’s break this definition down, so it’s easier to understand.
When you gain a better understanding of balance, you know why we do the exercises to improve balance and why we could, or do, fall.
Diagram 1: To lose balance my sway has to move past my limits of stability.
1) Centre of Mass – The easiest way to think of our centre of mass is the point where our weight is concentrated most (orange circle in diagram 1). The lower our centre of mass, the easier it is to stay balanced.
2) Base of Support (BOS) - The area beneath a person that includes every point of contact that the object or person makes with the supporting surface [2, 3].
In this photo (yellow line), my feet are together- a reduced base of support, which means less stability.
A wider base of support increases our stability.
Standing with our feet apart makes standing a whole lot easier because it increases our stability.
Using a cane or a walker makes us sturdier, why? Because we have increased our base of support by increasing the area within the support surface (that being the floor).
3) Sway - The horizontal movement (red arrows at the top of diagram 1) between each side of the centre of gravity (green line) even when a person is standing still [1].
What happens when we are trying to balance in challenging positions? We sway from side to side.
Here is another picture to help you understand everything a little better:
Diagram 2: By standing on one leg my base of support is decreased. Less sway is required for me to become unstable and lose balance.
By decreasing our base of support, (standing on one leg), we decrease stability. It is much easier to sway outside of the limits of stability (blue lines). It now becomes easier for us to lose balance and fall.
We can also decrease the base of support in exercises, to make them more challenging, which, over time, will help improve balance.
To increase our base of support, we can hold onto the chair in front of us to provide more stability and lessen our chance of falling.
There are two types of balance; static balance and dynamic balance.
1) Static Balance - The ability to balance while at rest, e.g., standing still on the spot. (The diagrams above are examples of static balance.)
2) Dynamic Balance - The ability to balance while moving, e.g., walking or reaching forward.
Both types of balance are equally important and both need to be practised to have great balance.
Your aim should be to become as stable as possible by doing balance exercises consistently, without having to rely on any assistive devices (walker, cane, etc.).
An aim that is entirely possible by putting in the work of doing the correct balance exercises.
[Note: Only stop using an assistive device if it is safe to do so. Always get a professional opinion to decide on this].
1.2. HOW OUR BODY KEEPS US UPRIGHT
So how does our body keep us upright? Notice I didn't say "how do we stay upright?"! That's because balance is usually an automatic process (unless compromised in some way).
For every task we undertake, our body automatically receives information from our senses. This information is from our muscles, joints, ligaments and other sensory receptors such as touch, pressure, temperature and pain.
Sensory information also comes from our visual system (our eyes) and our vestibular system (our ears).
This sensory information is sent to our Central Nervous System (CNS) to be processed.
The CNS then cues our musculoskeletal system (system for our muscles, bones, ligaments, joints) into action to perform the appropriate movement.
When we are walking (or undertaking any other tasks), our central nervous system continually sends signals to our musculoskeletal system.
If we were to come across uneven terrain or obstacles or were to trip, for example, during our walk, our musculoskeletal system will receive the information via our CNS and make the correct postural adjustments to maintain our balance and keep us from falling.
This is an automatic process that all happens very, very fast, but slows as we age!
As this process slows, combined with the loss of other factors, e.g., decreased leg strength or proprioception (perception or awareness of the position and movement of the body), it becomes increasingly difficult to maintain balance.
When you train balance and improve balance, this process becomes more effective, ensuring you stay on your feet.
Decreased eyesight (or closing your eyes) or conditions of the inner ear (vertigo, Meniere's disease, ear infections, or prolonged dizziness), also affect balance.
Additionally, certain medications and hypotension (low blood pressure) - leading to dizziness and lightheadedness - can also affect our balance.
1.3 WHY BALANCE WORSENS WITH AGE
As I mentioned above, the process of maintaining our balance slows or deteriorates as we age.
There are factors out of our control that we must accept.
That is, changes in our body (physiological changes) do happen because of ageing itself. We will never be like our young 20, or 30-year-old selves.
However, the good news is, the primary contributor to these physiological changes is not due to ageing in itself, but because we do less as we age.
As we start reaching adulthood, the pressures of life take hold, and we find ourselves with more obligations.
We also get into some poor habits (e.g., sit more often in lousy postures), and we do less and less activity.
A lot of us put these physical changes we see (such as decreased balance, posture and strength, etc.) down to ourselves getting older.
However, the majority of the time, these changes occur because we do less activity throughout the years.
It’s simply because we sit more and move less, that we see a lot of these changes in our physical condition.
We are creatures of comfort designed to do what is most comfortable and, after time, it becomes increasingly difficult to do more activity.
These physical changes we see from lack of use include:
Generalised weakness throughout the body.
A generalised decrease in fitness (our whole body becoming less fit, leading to faster muscle fatigue and shortness of breath).
Decline in posture, changing our centre of mass.
Decreased reaction time.
Decreased balance.
It’s time to accept that the main reason staying active and upright has become tougher and you are not moving as well as you could be is not because of ageing itself but because we have progressively done less and less activity.
You must get it out of your head that decreased balance and, also falls, are a normal part of ageing. This is a myth.
Your BALANCE CAN BE IMPROVED, and FALLS CAN BE PREVENTED
Now that we know this, we should do everything in our power from now on to improve our balance and keep it that way for the many benefits it will bring us.
PART 2: TESTING YOUR BALANCE

You do not need to go to a Professional (e.g., a Physiotherapist) or join a gym to get your balance tested.
You DO, however, have to be careful and take the correct steps for safety reasons.
And... You can also get a more comprehensive test when getting your balance tested by a professional. It is also a good idea so you can rule out any vestibular or visual issues as the cause of any balance problems.
However, when done safely (with a helper and the correct equipment), testing your balance at home is a great way to take your health into your own hands and start making changes.
I've chosen some simple tests you can do to test your balance, and I'll show you how to do them as safely as possible, in the comfort of your own home.
2.1 HOW TO TEST YOUR BALANCE
There are many tests we can use to measure balance.
The aim of testing your balance is to get a rough guide on how well you can balance, and then use these measures as a guide of progress after doing balance training.
I have chosen four tests to give you a rough guide of your balance.
However, before we get into the tests, there is some basic equipment you will need:
EQUIPMENT YOU WILL NEED:
To test and train your balance sufficiently, I recommend the following:
· A tape measure
· Masking tape - Preferably coloured as it is easier to see.
· Timer - You can use the timer on your mobile phone.
· Chair – Standard chair with arms. Not a couch.
· Sturdy piece of furniture - (e.g., kitchen bench, rail, etc.).
· A Wall.
· A helper – grab a family member, friend, exercise partner, whoever to help take measures.
BALANCE TESTS
Now let's get into the testing.
TEST 1 - FOUR POINT BALANCE TEST
Equipment For Test: You will need a timer and a chair
Details of Test:
This first test is a test of our static balance (balance while stationary). This test will challenge your balance in four increasingly difficult foot positions.
How To Perform The Test (photos below):
1. Standing next to the back of a chair or a rail or sturdy piece of furniture, (e.g., kitchen bench) for safety reasons.
2. Starting by holding onto the chair and taking up the first foot position of the test (see below).
3. When you are ready, take your hands off the chair and start the timer.
Do this test without holding onto the chair.
4. During the test, you can move your arms to retain balance (holding onto the surface if required). Once your feet move out of position, the test is stopped and the time recorded in the chart below.
5. If you can safely manage the position for 30 seconds, you can continue on to the next challenging foot position and continue until the final (4th) foot position.
Alternate feet for the single feet stances.
6. Record your results in the table following this section.
NOTE: If you are unable to manage 30 seconds for this foot position, stop the test and record your time.
If you are unable to maintain 30 seconds for foot positions 1 and 2, keep practising these movements, train these movements each day, until you can safely manage 30 seconds for each before continuing.
If you are not improving, see your doctor or Physiotherapist for a more personalised program.
FOOT POSITION 1) Feet Side by Side:
Feet as close together as possible, side by side.
Chair or rail close by for safety reasons.
Hold for 30 seconds, or as long as possible.
If you can hold for 30 seconds, safely move on to the next position.
FOOT POSITION 2) Semi Tandem Stance:
Standing with the big toe of one foot in the arch of the other.
Toes facing forward.
Chair or rail close by for safety reasons.
Hold for 30 seconds, or as long as possible.
If you can hold for 30 seconds, safely move on to the next position.
Alternate Feet.
FOOT POSITION 3) Tandem Stance
Standing with heel on one foot touching toes on other.
Chair or rail close by for safety reasons
Hold for 30 seconds, or as long as possible.
If you can hold for 30 seconds, safely move on to the next position.
Alternate Feet.
FOOT POSITION 4) Single Leg Stance
Standing on one leg.
Chair or rail close by for safety reasons
Hold for 30 seconds, or as long as possible.
If you can hold for 30 seconds, safely move on to the next position.
Alternate Feet.
Understanding Your Results:
Scoring 30 seconds on each test means your balance is good for this test.
No matter your capabilities, you can always be improving. To do this, you must challenge your balance even further by making the balance training harder (discussed later).
There is always work we can do.
Scoring less than 30 seconds on any of the tests, do not be hard on yourself; it just means you need to be practising your balance more so.
Do not be concerned if you score less on one side compared to the other side (i.e., your left foot vs your right foot); this is common.
If you are over 60 and score less than 10 seconds on the tandem stand, you are at increased risk of falling.
No matter your results, write them down with an aim to improve them after your training period.
TEST 2 - STANDING REACH TEST
Equipment For Test: You will need a chair, a bare wall, a tape measure and a helper for safety reasons.
Note before: You can stick a tape measure on the wall to make this easier for you.
Details of Test:
The standing reach test is used to assess our balance when standing and reaching for objects [4].
How To Perform The Test:
1. Standing perpendicular to a wall, place a piece of tape on the wall at the level of your shoulder. This is to reference your start position.
2. Keep a chair within reach for safety reasons.
3. Now stand perpendicular to the piece of tape and roughly 15 cm from the wall, facing straight ahead and feet hip-width apart.
4. Now with the arm closest to the wall, lift your arm to 90 degrees, parallel to the floor. Keep your hand in a fist and stay relaxed, with your feet or torso not moving out of position.
Mark the position of your knuckle on the wall, with a piece of tape. This is the start position (position A).
5. Now reach out in front of you as far as safely possible, keeping your arm parallel to the floor.
Ensure you remain balanced without your feet coming out of position. This is the final reach position (position B).
6. When you have reached out as far as you can, have the person helping you mark where the knuckle of your fist is with a piece of tape.
Ensure you don't overreach and lose your balance.
A - B = Reach Distance
7. Using the tape measure, measure the distance from the two tape points and record the results in the table following this section.
8. Complete a practice run and then have three attempts of this test.
9. Average the results of the three tests and record your results for later use.
Understanding Your Results:
Scoring less than 18.5 cm indicates you have an increased risk of falling.
No matter your results, write them down with an aim to improve them after your balance training.
TEST 3 - TIMED UP AND GO (TUG TEST)
Equipment For Test: Chair, Tape Measure, Tape, Helper
Details of Test:
The TUG is another test of our balance and our mobility.
In this test, you will stand from a chair, walk 3 metres over a line, turn around, walk back to the chair and sit down.
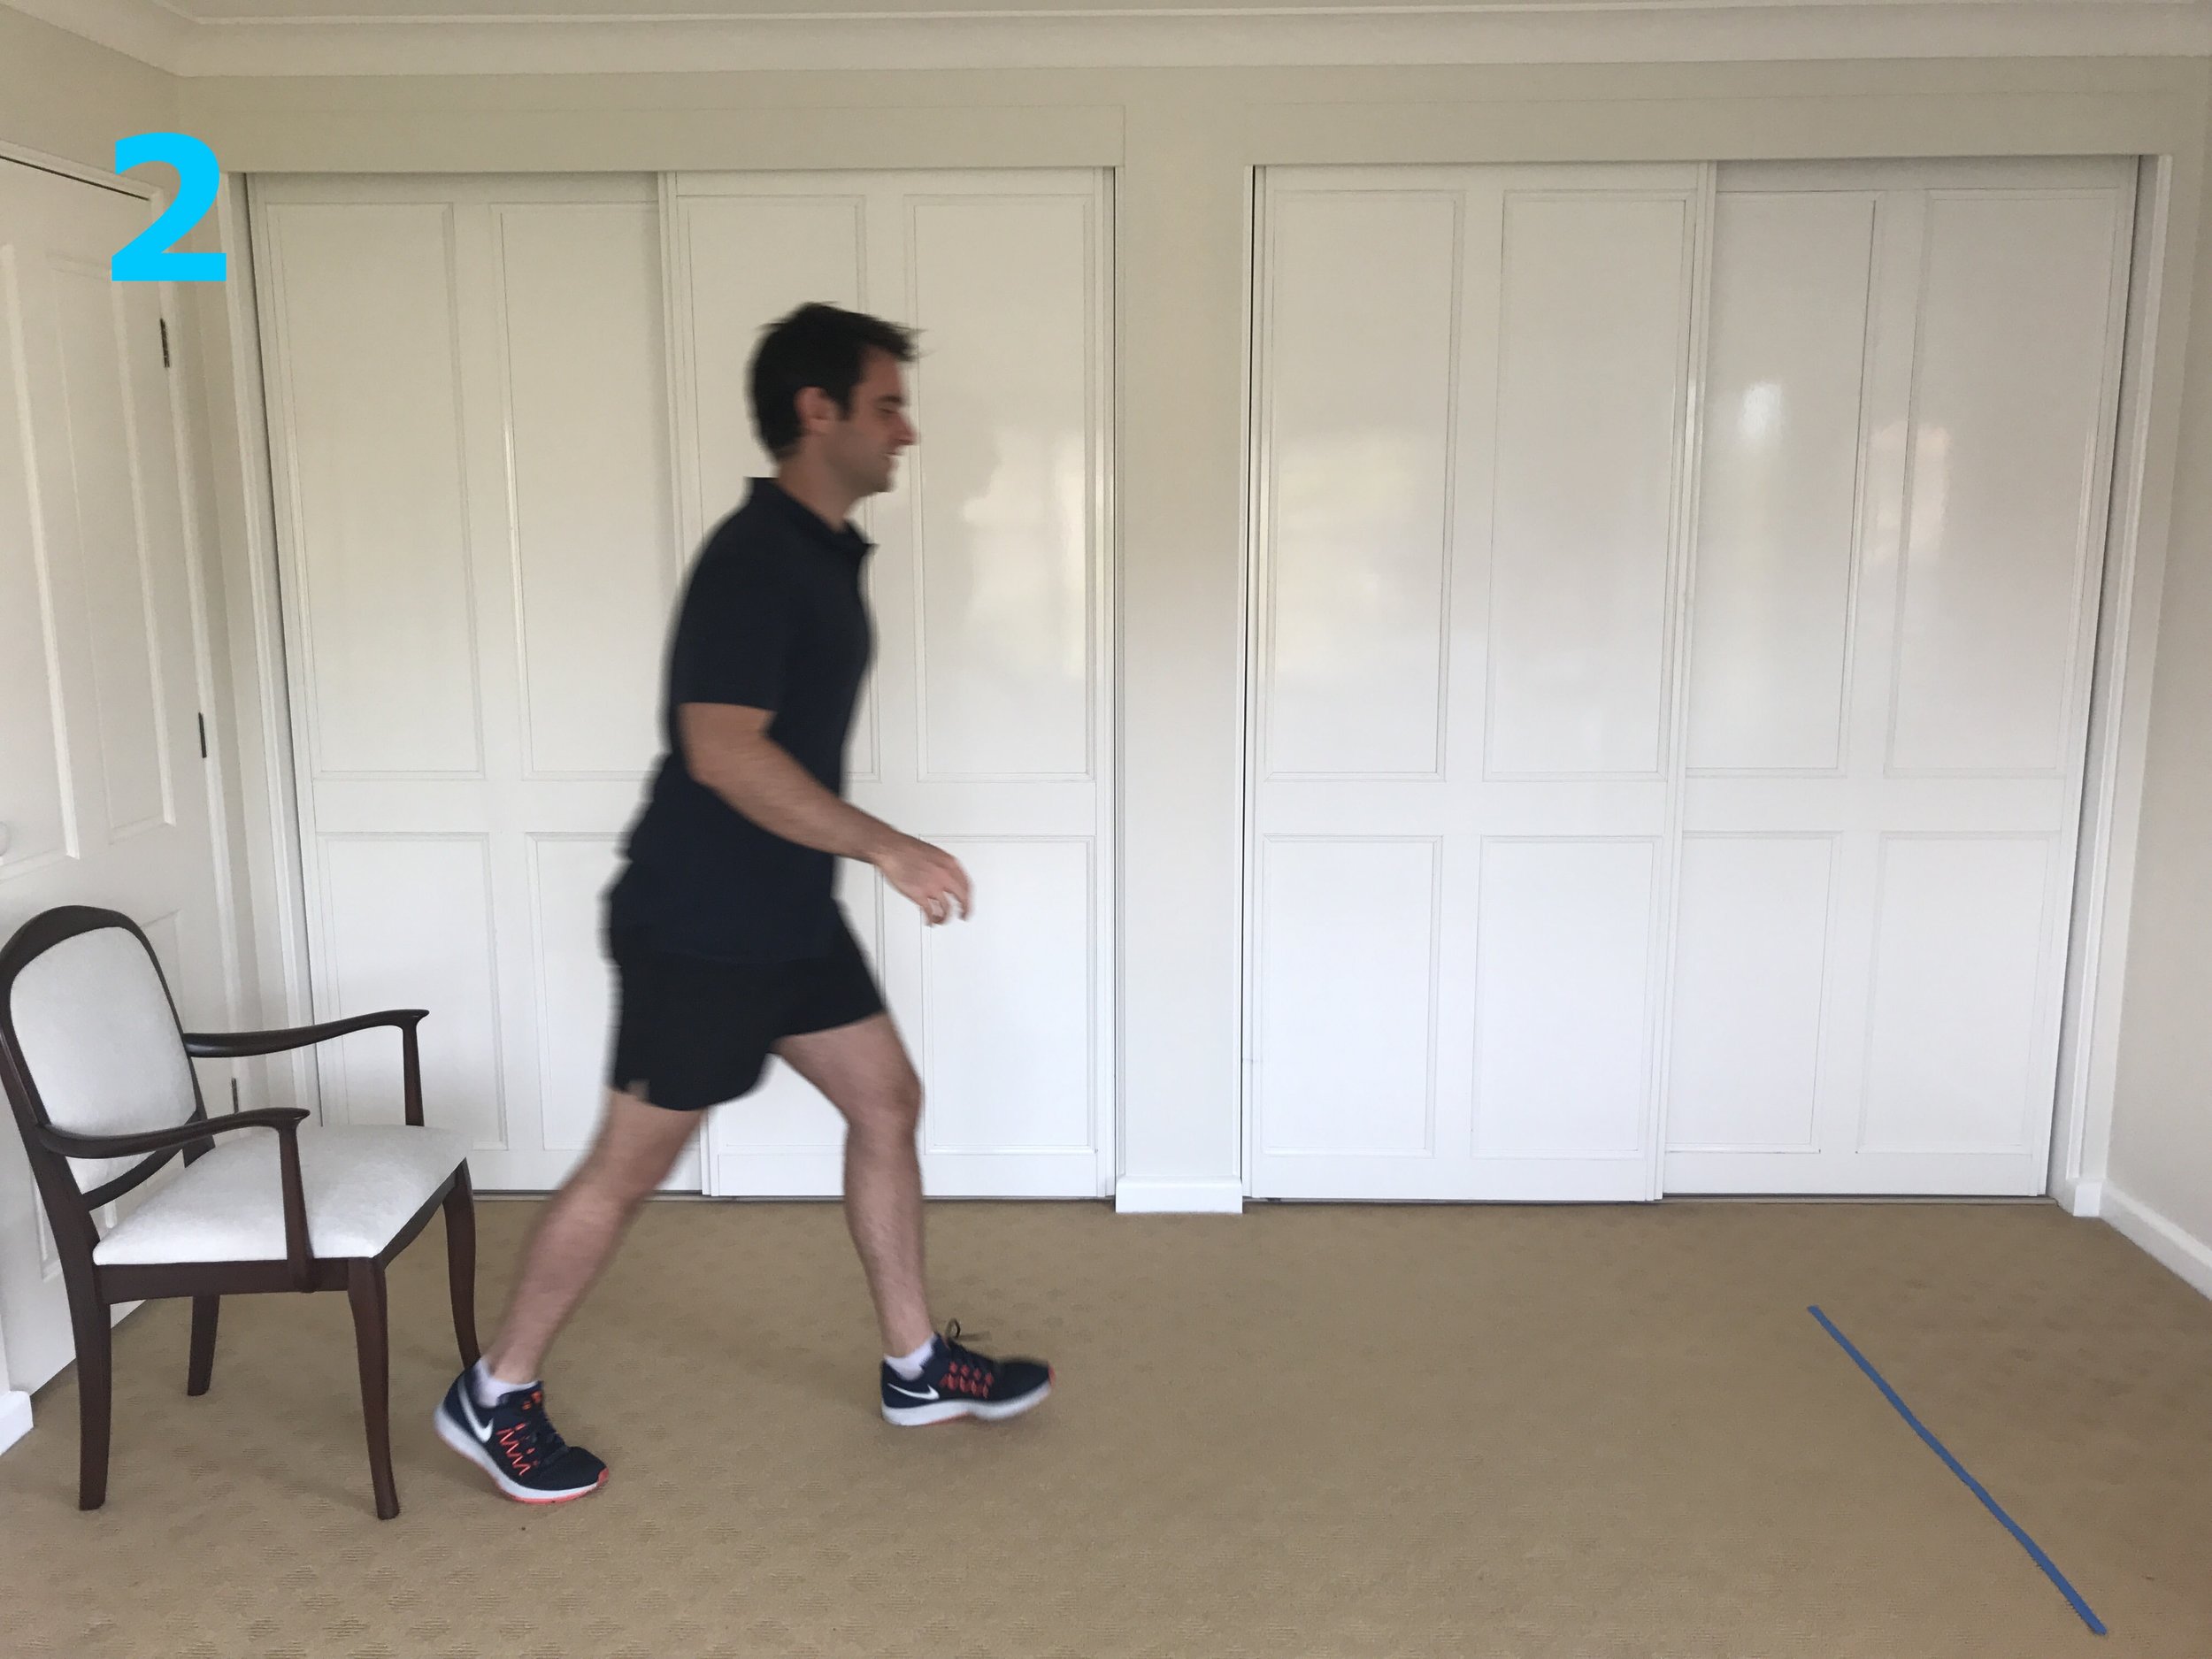
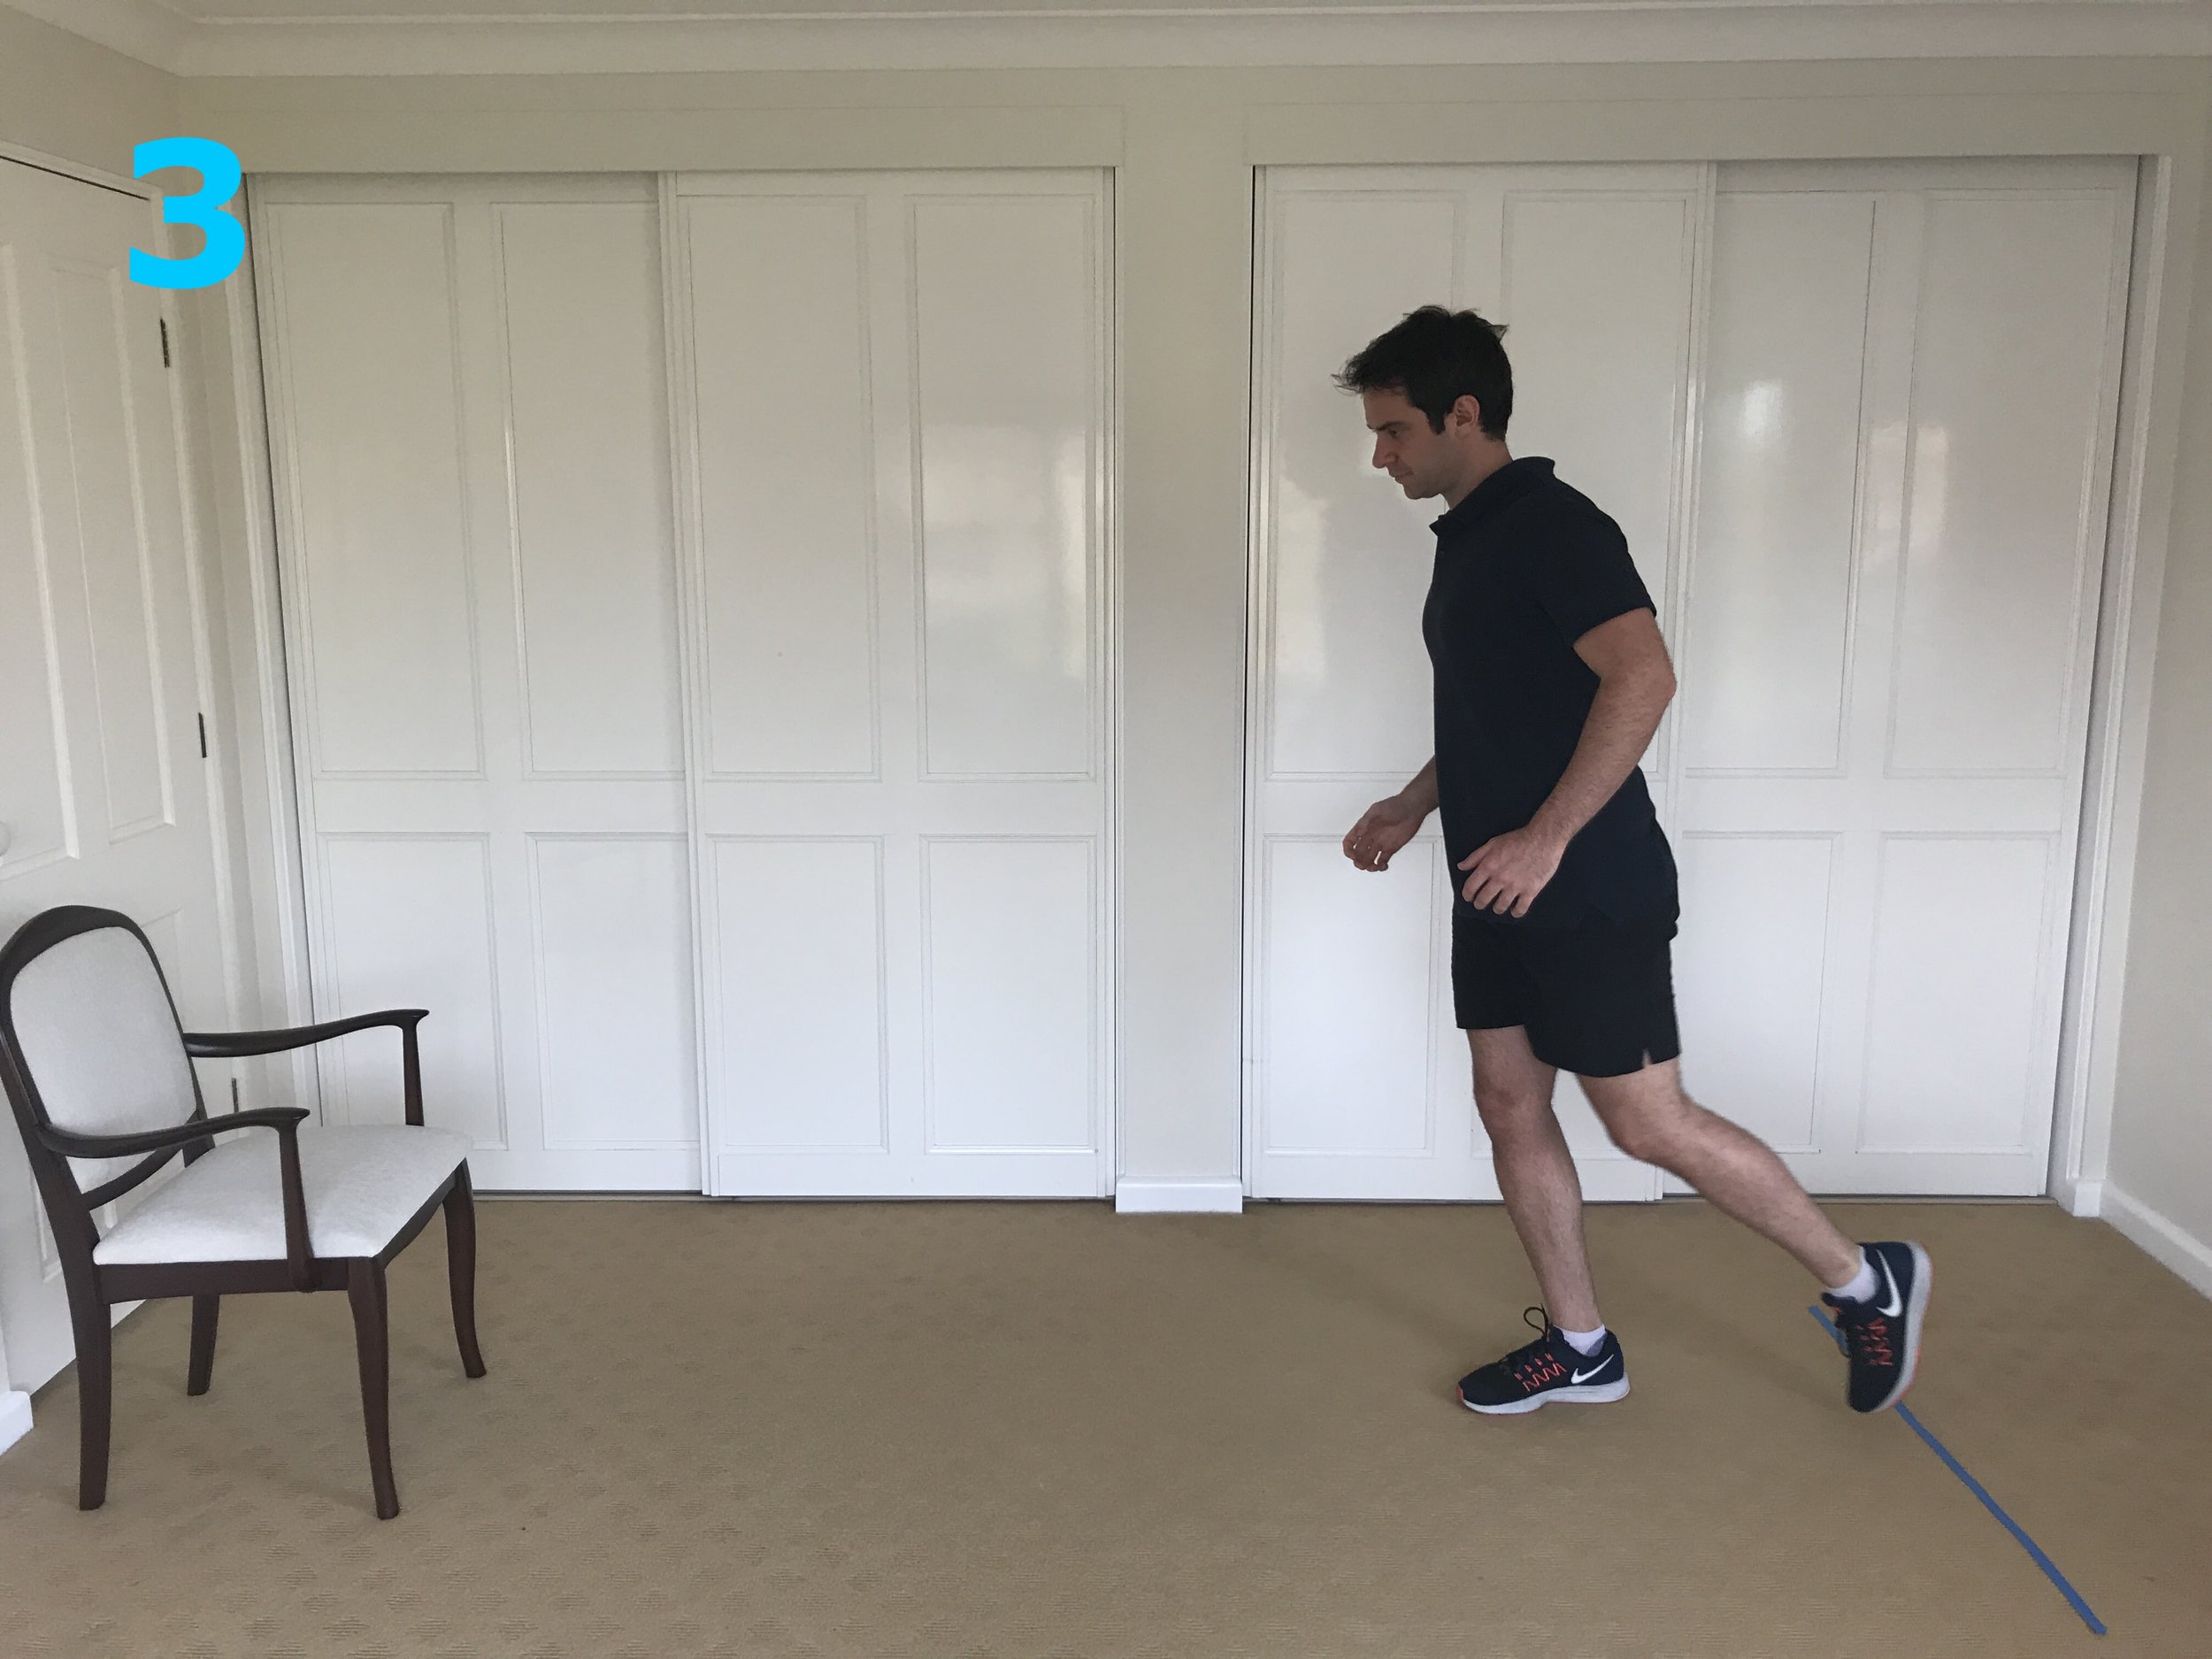
How To Perform The Test (photos below):
1. Ensure you have a friend or family member with you to help you with this test.
A friend can take a more accurate reading of the time it takes you to do the test and, additionally, if your balance is not so good, it’s good to have them there for safety reasons.
As with all balance tests, ensure they do not assist you with any parts of the test, but it is a good idea to have them standing alongside you.
2. Place your chair in an open area of your house, on flat ground without any obstacles or trip hazards in the way.
3. Using your tape measure, mark 3 metres from the chair and place a piece of tape to mark this spot.
4. Start seated in the chair, with your hands on the armrests and back against the backrest.
5. Your helper will say “GO” and will start the timer. You are to stand from the chair, walk to the line, turn around, walk back to the chair and then sit back down. Walk at your normal pace.
6. Once your buttocks have touched the chair, the test is complete, and your helper will stop the timer.
7. Complete a practice run of the test to get the hang of the test but give adequate rest before the scoring test to ensure you are not tired.

8. Perform this test twice and average your results.
Note: If you usually use a walking aid of some sort (for example walking stick, walker), use this during the test.
Understanding Your Results:
Studies have shown that if your time is over 13.5 seconds, you may be at a greater risk of falling [5].
No matter your results, write them down with an aim to improve them with balance training.
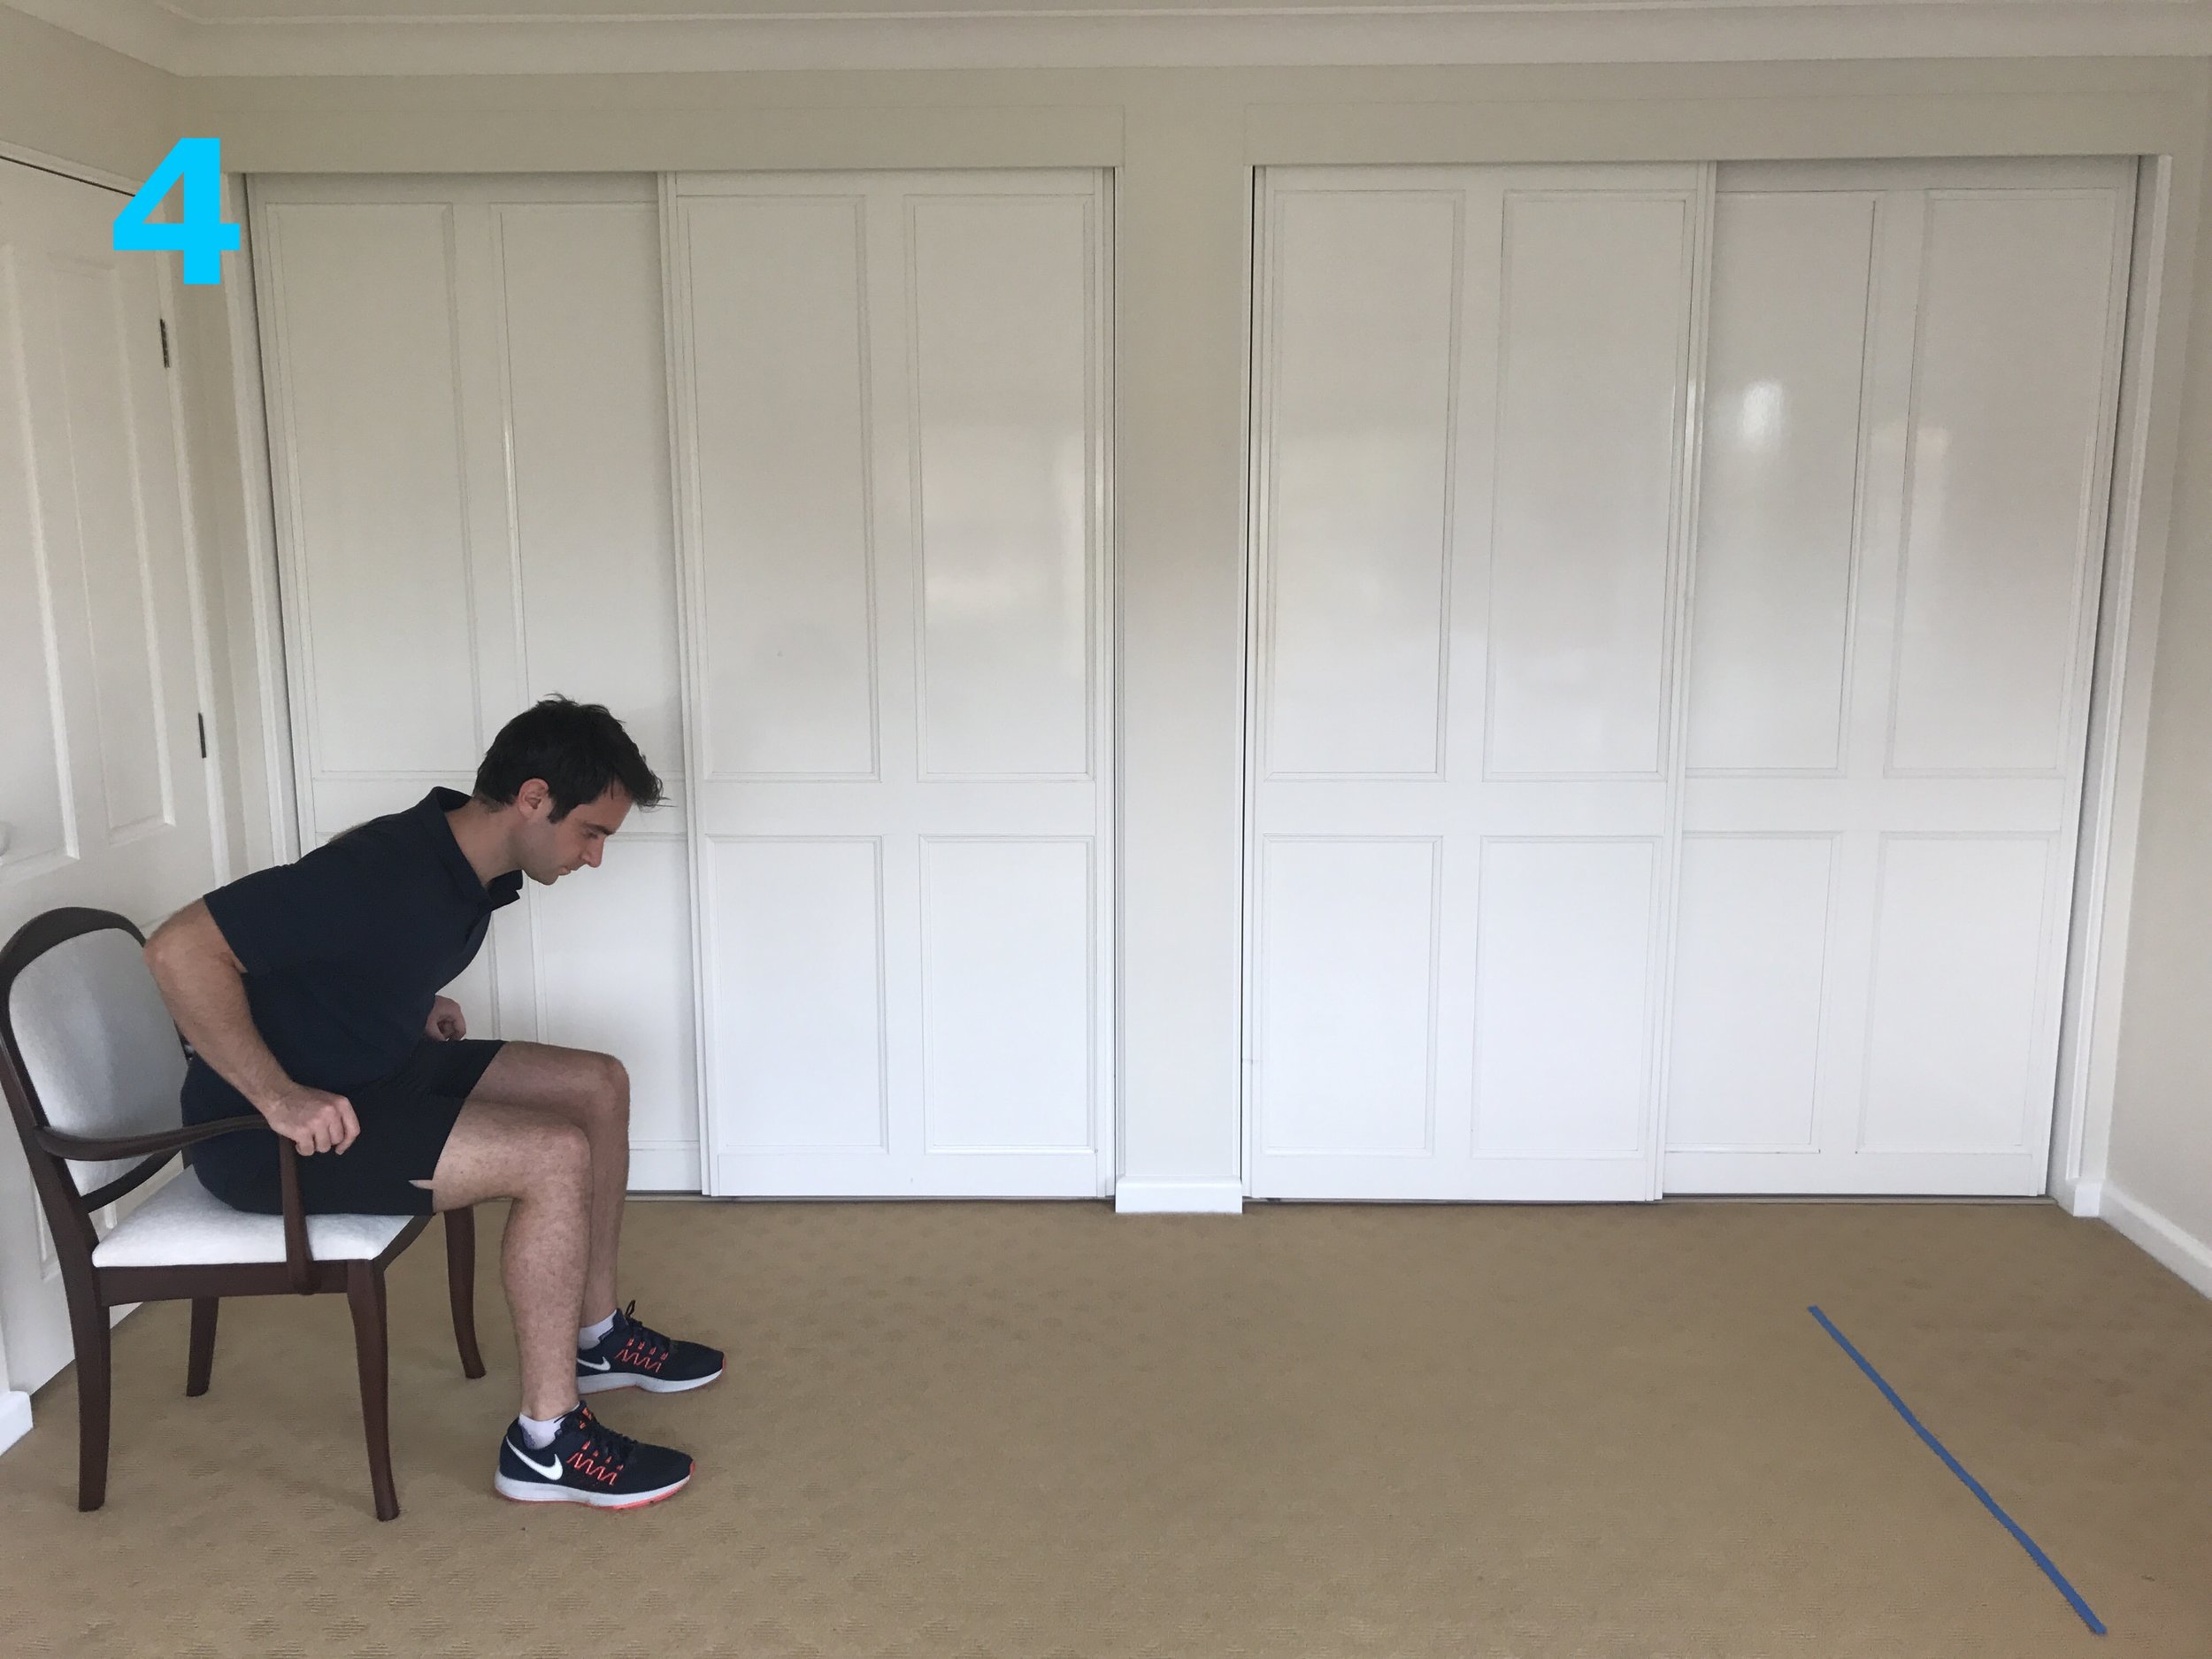
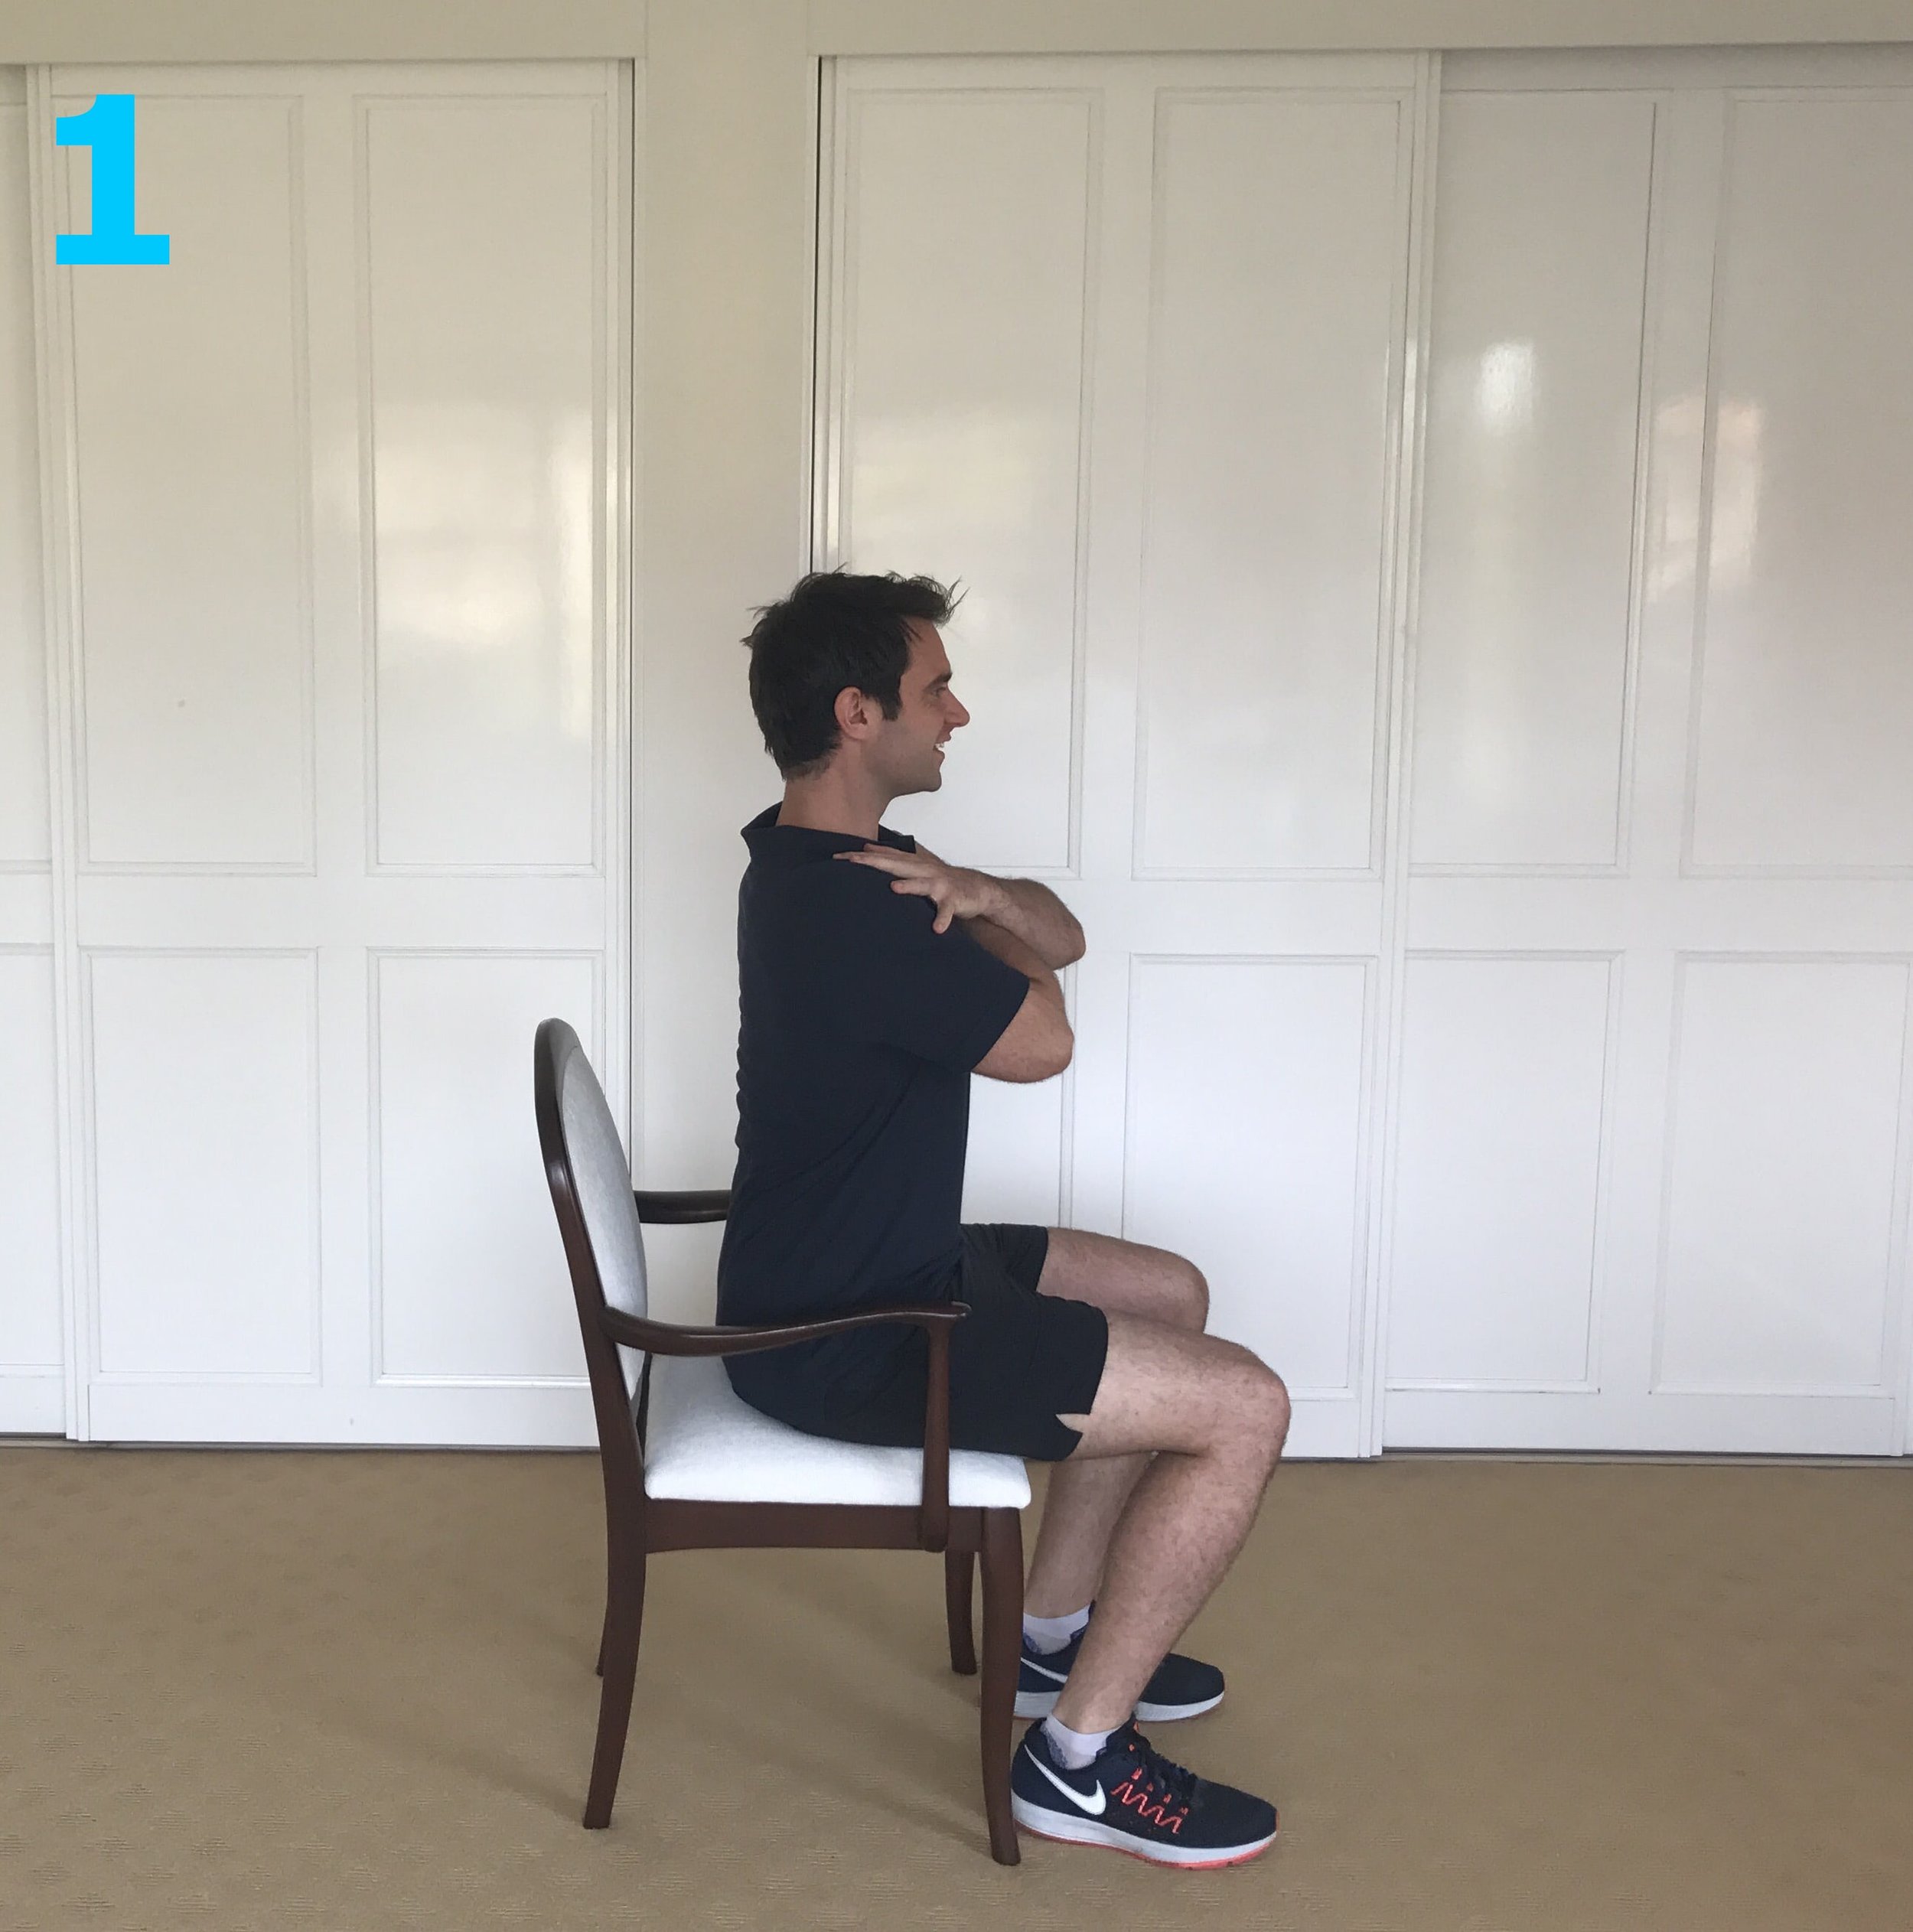
TEST 4 - Sit to Stand For Five Test
Equipment Needed For Test: A Chair, A Timer, A Helper.
Details of Test:
This test is used to test our lower limb strength and power. It is a functional test as sitting and standing from a chair is something we do many times during the day.
This test measures how long it takes you to stand up and sit down five times.
How To Perform Test:
1. Have a helper to time you or hold the timer in your hand.
2. Start seated on the chair.
3. You’re going to time how long it takes you to stand up and sit down [You will start the test (and the timer) as soon as your buttocks leave the chair. And stop the timer (finish the test) when your buttocks are on the chair after the fifth stand].
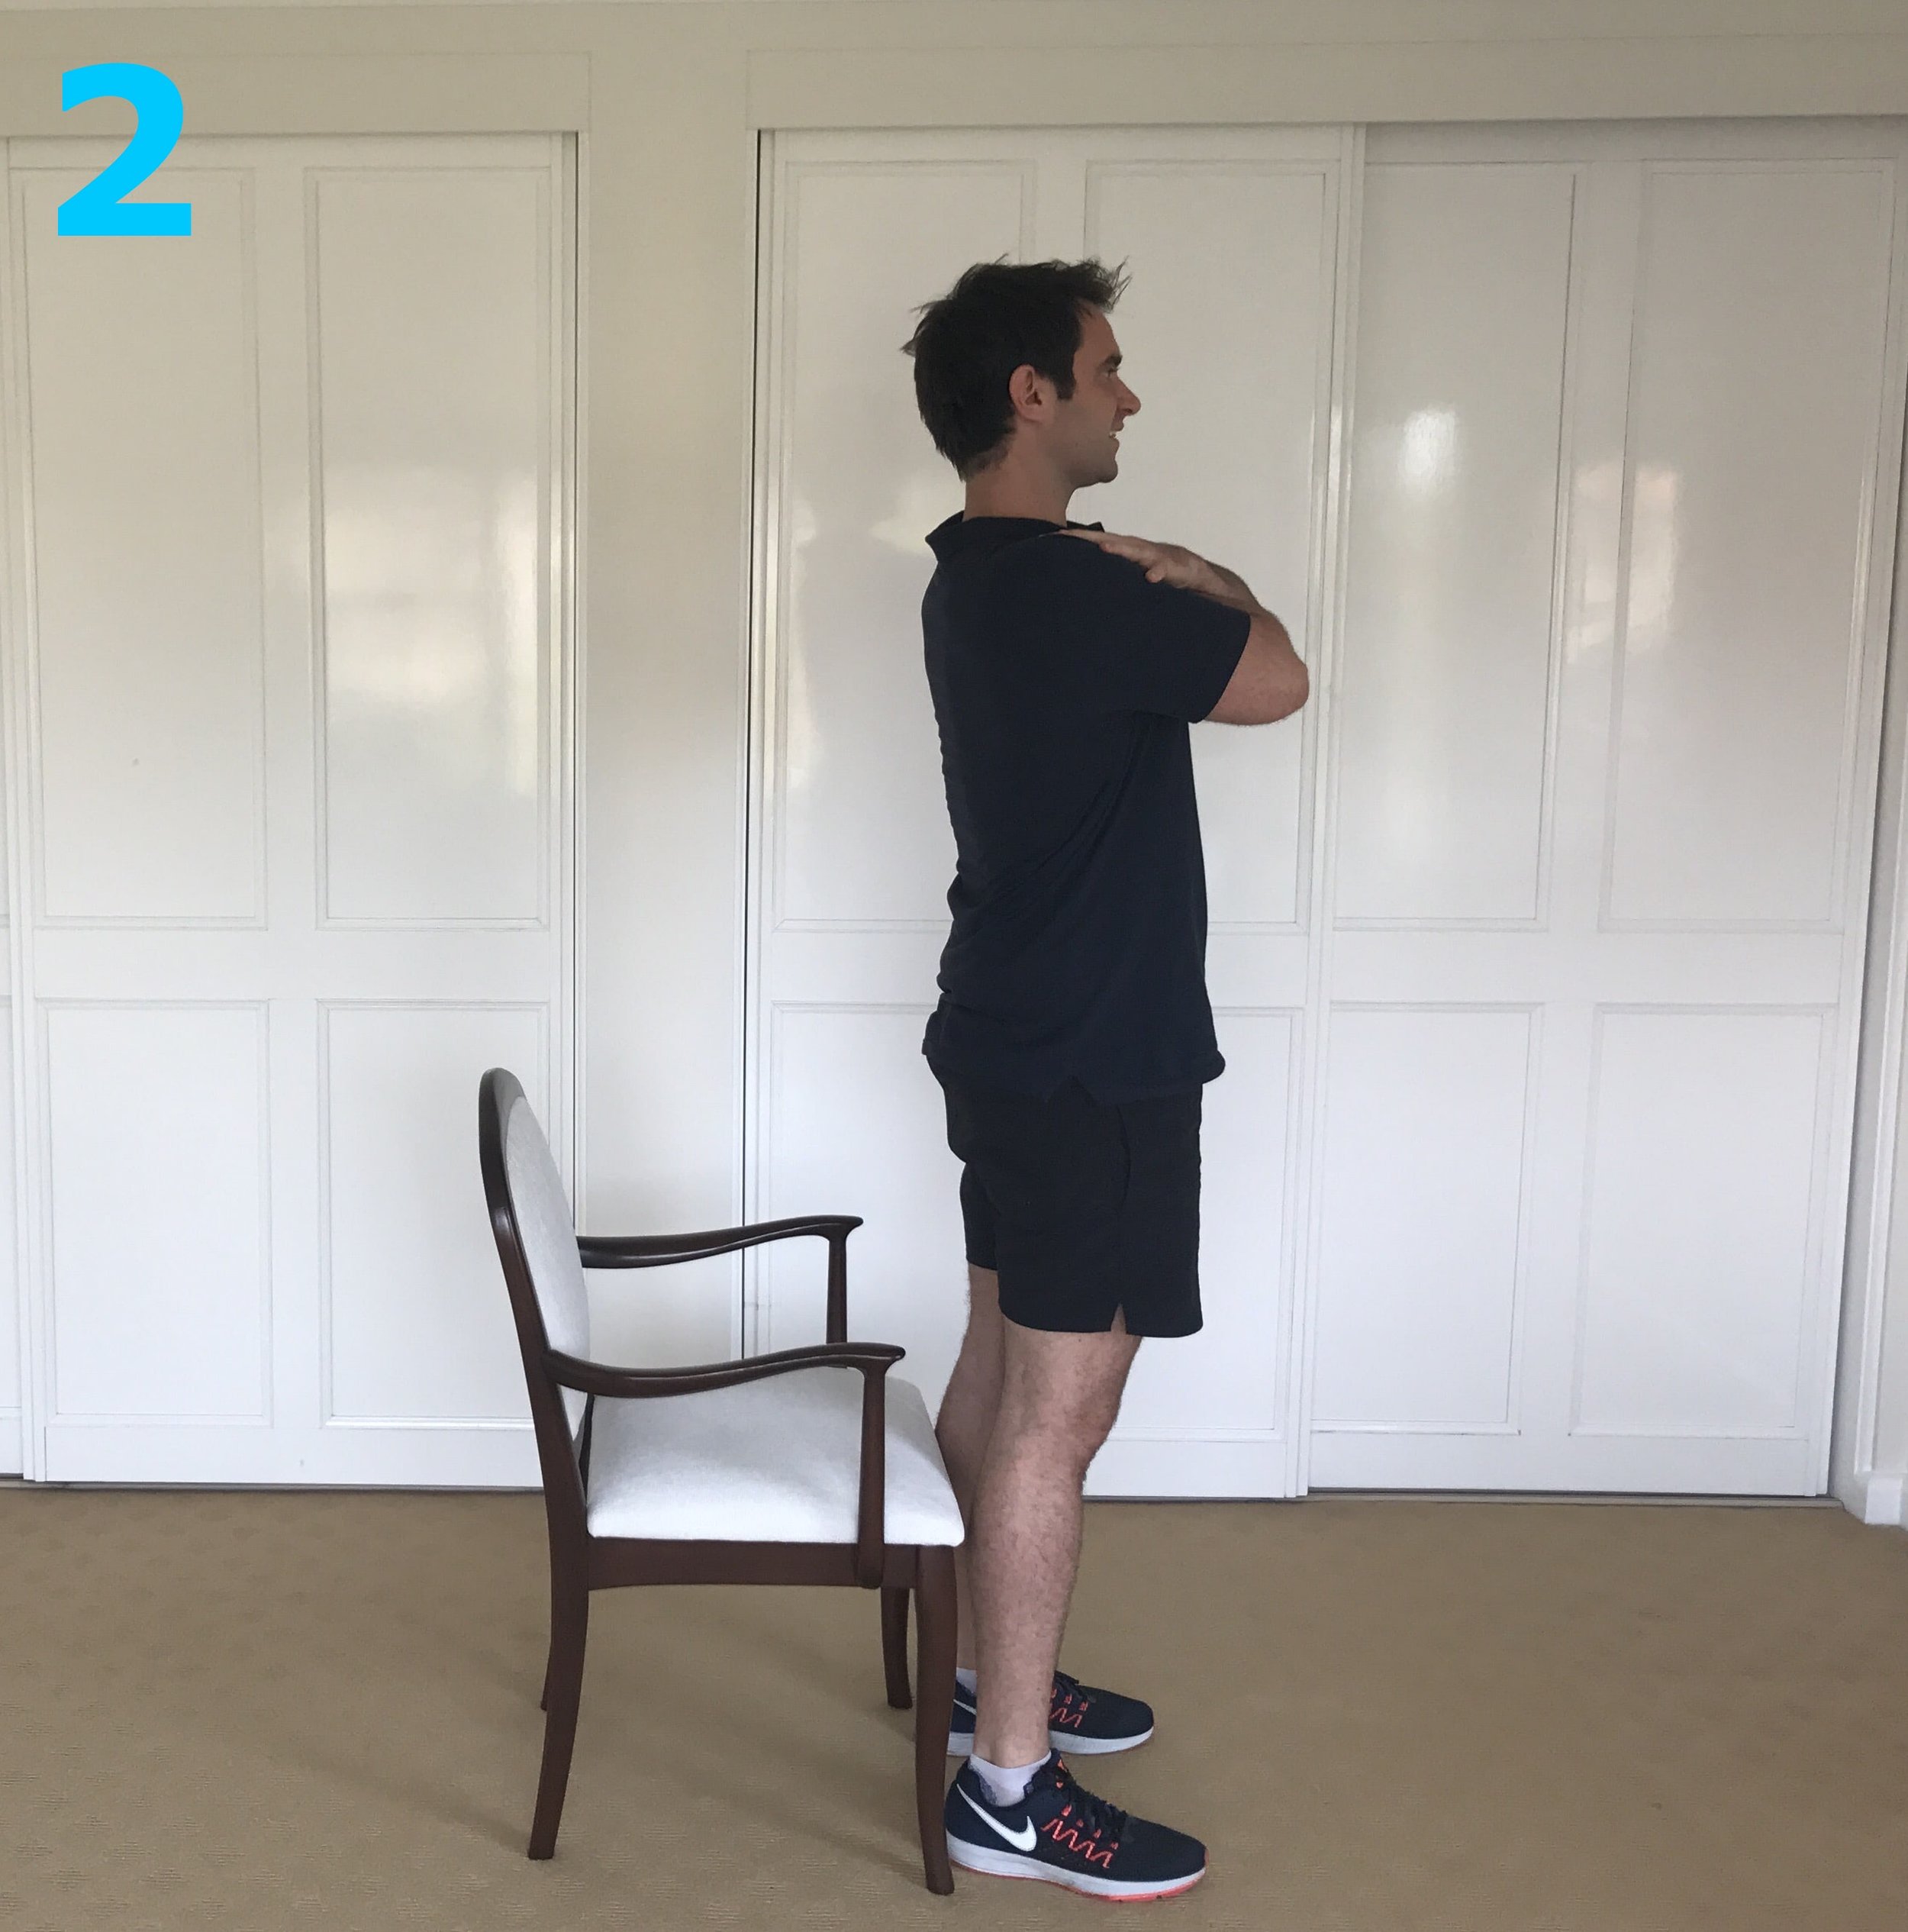
4. Place your arms across your chest, not holding onto the armrests. Feet hip-width apart.
[If you need to hold onto the armrests, this is fine. However, note it down. You will most probably find after training and improving your balance and strength you will not need to hold on anymore.]
5. When standing up - ensure your knees and hips are straight, and the back of the knees aren’t touching the chair.
6. Ensure when you sit down it is in a controlled manner, not flopping down into the chair.
7. Practice one stand and sit before commencing the five attempts, to get the hang of the test, but do not tire yourself.
7. Perform this test and record all results for later use.
Understanding Your Results:
The normal measures for age ranges are as follows [6]:
60 to 69 years old: 11.4 seconds to complete the test.
70 to 79 years old: 12.6 seconds to complete the test.
80 to 89 years old: 14.8 seconds to complete the test.
No matter your results, even if you can’t perform one sit to stand. Write it down with an aim to improve them after training your balance.
2.3 TRACKING YOUR BALANCE
When you start performing balance exercises consistently, you will begin feeling the differences in many ways.
You'll be more confident going about your day and movement will be effortless.
However, if you are super keen and want to track how much you are improving with your balance, I have created a table to help you track your results. To download this table, click the button under the video below.
After training (next section), you can then retest and compare your results to see how you are progressing.
If you found you had some trouble with these tests, this is fine. These tests are only a guide to check your balance and track your progress.
On the other hand, some of you may find the tests very easy and scored quite well in them.
Great. It means your balance is at a level where you can function well in your day-to-day life. However, this doesn't mean you shouldn't do balance exercises.
No matter what stage you are at with your balance, there are always ways to challenge yourself and be improving. With exercise comes many benefits.
For an easy to follow balance tracking video, watch the video below.
Also, you can track and record your balance by downloading the below.
Now we’ve got an idea of where your balance is at, let’s now start improving your balance!
PART 3: HOW TO IMPROVE YOUR BALANCE FOR SENIORS
STEP 1 - GET MOVING
The first and most important step in improving our balance and our quality of life is to get active. You need to get off the couch and get your body moving.
Movement is health. Movement is medicine.
Being active or exercising doesn't have to be boring or a chore.
Do what you can to make it easy. Do what you can to make it fun. Do whatever it takes to ensure you'll stick to moving more. Consistency is what's most important.
Go for a walk in nature, go for a swim, try a new activity if you can (examples - Tai Chi, lawn bowls, ten pin bowling, aqua aerobics, golf, tennis) the ideas are limitless, just get moving, within your capabilities.
My recommendation is to go walking every day outdoors for at least 10 minutes.
Have fun with it. Mix it up. Go on different walks. Attempt different terrains. Walk up stairs. Down stairs. Walk on grass or in shallows, and sand of your local beach. Go bushwalking. Walk faster. Slower.
Have fun and find the inner child we all have inside of us. Get outdoors and enjoy what mother nature has to offer.
Don't get carried away and do too much too soon, however. Don't try anything out of your capabilities.
If you're walking up many stairs for the first time in a long time, take breaks, use the rail and ask a friend or family member to come along for safety and to have some company. Take your walking aid if you need to.
Hurting yourself or falling would make both of us unhappy.
So make sure you slowly progress your walks, mix it up and continue to challenge yourself each week.
Yes, you're at higher risk of falling by getting off the couch, but done safely and when you enjoy the activity, you stay consistent.
There are many reasons why staying active is essential for better balance and better physical health.
You are training your heart which will make you fitter; you are training all the muscles in your body which will make you stronger (even the little ones that help with balance), you are ensuring your joints don't stiffen up, you are training your body to respond to different terrains. You will be decreasing your falls risk and improving your balance.
START NOW!
Get the all-clear from your doctor and begin with at least 10 minutes a day of some physical activity that you enjoy. Only 10 minutes, you can do it!
Always be thinking of ways you can incorporate more activity, or exercise, into your life.
STEP 2 - DO SPECIFIC BALANCE EXERCISES
Now we are moving more; we are going to incorporate some balance exercises into our life to directly improve our balance.
When performing these exercises, ensure you focus on proper technique; this is the golden rule for any exercise.
Quality is more important than how many of the exercises you can do, how fast you do them or how much weight you lift (if doing some resistance training).
With that in mind, if you feel the exercises do not feel right, causing pain or at first sign of fatigue, stop them.
You want to ensure you are performing the exercises correctly, working within your capabilities and, at the same time, challenging yourself, so you are getting the most out of the exercises and hence, improving your abilities.
THE BEST BALANCE EXERCISES FOR SENIORS
Specific balance exercises are essential to improve your balance and you want to be performing the best exercises to make greater improvements in a shorter time.
CLICK HERE FOR THE BEST BALANCE EXERCISES FOR SENIORS
Make sure you have read this entire article, from the beginning, before progressing to these next steps.
Additionally, for videos you can follow along with to improve your balance, head to the balance section of this website (click here) and follow along with the balance videos.
STEP 3 - ALWAYS CHALLENGE YOURSELF
For some of you, performing these balance exercises may be too difficult. For others, they could be too easy.
A one size fits all program is not possible. We are all unique people with different capabilities.
The good news is, by understanding more about your balance and your base of support, you can modify the exercises to make them easier or more challenging depending on your capabilities.
Remember that if we increase our base of support, we are more stable. When we decrease our base of support, we are less stable.
If any of the exercises are too hard and you find yourself swaying too much, we can take it back a little and make it easier by increasing our base of support.
If you find the exercises are too easy, it’s time to make them harder, to challenge yourself.
Always take note of your support base for each exercise as it’s a good way to see how much we can progress and improve each week.
Here are some ways to vary our base of support to make it easier and harder.
Each variation starts at less challenging to more challenging:
Using Walking Aid: e.g. - Walker, Four Point Cane, Single Point Cane
Change Upper Body Supports: e.g. - Two Hands, One Hand, One Finger, No Hands
Change Feet Position: e.g. - Legs Wider Apart, Legs Closer Together, Semi Tandem, Tandem, Single Leg Stance
Change Surface: e.g. - Stable Ground, Foam Pad, Pillow, Cobble Surface, Wobble Board
Other ways we can challenge our exercises are by:
Challenging our hearing systems (vestibular) and visual systems.
Challenging Hearing System – Turn Head from side to side.
Challenging the Visual System – Close Eyes.
Add challenges/tasks: e.g., catching a ball, solving problems, holding a glass of water, turning your head, adding resistance bands or dumbbell, adding a foam board.
Examples:
If you find the single-leg stance too easy, you can close your eyes or turn your head to each side during the exercise. This will make it more challenging.
You can also add in a pillow or a foam board.
If you are finding the single-leg stance too hard, you can make the exercise easier by holding on with one hand and working up to the time required.
STEP 4 - HOW TO BE MORE MINDFUL
I want you to think for a second and tell me, are you one to lose things?
Are you easily forgetful? Have you been known to be clumsy? Bump into things?
If so, I hate to break it to you, but you have a busy mind.
When our minds are busy, we are less present, and we tend to do careless things.
We've always got bruises because we bump into things. We can never find our wallet or keys. We trip because we didn't see that garden hose in front of us.
We are away with the fairies and mindfulness is our tool to bring us back.
Mindfulness is not usually something thought of when trying to improve our balance.
However, it is something I want you to really think about and take seriously.
Mindfulness techniques are growing in popularity, and it's not just a modern trend. There is increasing evidence of the benefits of mindfulness to wellness and other areas of life. In short, it works.
As with everything else I've mentioned on your journey to good balance, you must ensure you are doing what you can to decrease stress and have a clear head/calm mind, every day.
Stress directly affects our balance.
Higher stress levels can cause a decrease in balance performance. Additionally, many patients report an increase in dizzy symptoms during periods of stress.
In a calmer mind, there is less resistance; we are stronger, everything feels easier. When we have a busy mind, everything is harder.
Calm the mind, and we become more aware of our body and our environment around us. Our balance improves and our chances of falling will decrease.
It took me a long time to get into meditation myself to decrease stress. Once I began, stayed consistent and noticed results, I got hooked.
Consistency is the key to any mindfulness practice and 10 minutes is the perfect place to start.
I recommend 10 minutes of meditation each day from now on. You will still get improvements in balance without the meditation and by just doing the exercises; but if you want to make improvements in all areas of your life, this is a great tool to improve your health.
MINDFULNESS TECHNIQUES:
There are plenty of apps and guided meditations online.
Alternatively, here is a mindfulness technique you can use:
When alert, not sleepy, sit in a comfortable chair with your feet flat on the floor. Get comfortable but do not lay down. You don't want to fall asleep.
Set a timer for 5-10 minutes of undistracted time. No distractions, whatsoever. Complete focus. I meditate for 20-minute sessions, but when I first started, I did 10 minutes for quite some time. When you start seeing the benefits and enjoying meditation, you will want to increase the time you sit down.
Play soothing music or sit in silence during your session. A simple YouTube search can help with this.
Ok, now you're ready to go. Start by taking a deep breath all the way in through the nose, and all the way out through the mouth. Repeat this five times with your eyes open
It's now time to close your eyes.
Now take slow controlled breaths in through the nose and out through the mouth. Nice and slow. Continue these slow, controlled breaths.
Continue to focus on the breath. Your mind will wander, this is ok. Do your best to bring your attention back to the body, focusing on relaxing all areas of your body and letting go of any tension or resistance.
Once you start to feel yourself relaxing, shift your focus to the top of the head and slowly move your attention all the way throughout the body, to your feet and back. Focus on relaxing each and every part of your body.
Repeat with the focus on your breath and relaxing all areas of your body for the time set.
Note: It does not need to be perfect. Don't worry if you are struggling. Sit in silence, relax and just enjoy the quiet time. Over time, you will get better.
If you are having a difficult time concentrating, spend the first couple of sessions (maybe a week) just sitting down in silence and processing your thoughts. Listen to them; let them go.
This whole process will get easier with consistency, so vow to make it a daily habit, and you WILL see the results.
ENDING NOTE
There we have it, the guide to improving your balance.
By incorporating all these strategies into your life, you'll begin seeing significant changes in your balance. Stay consistent with the exercises, and it won't be long before you have great balance and are doing more each day, getting more out of life and also decreasing your falls risk.
Good luck on your journey to better balance!
- Mike
SUMMARY TO IMPROVE YOUR BALANCE
To ensure you are on your way to great balance and to make sure you have covered everything, tick the boxes below when done.
🔲 Learn what's necessary to improve your balance.
🔲 Test your balance.
🔲 Include more physical activity in your daily life.
🔲 Perform balance exercises weekly (preferably daily) and make sure you follow along with my exercise videos.
🔲 Become more mindful daily.
🔲 Ensure you are eating and sleeping well.
🔲 Challenge yourself with your balance as you make progress, be patient and stay consistent.
Do you need to improve your balance?
Have you improved your balance by performing these exercises?
I’d love to hear from you.
Leave a comment below, or join the More Life Health Facebook Support Group.
SOURCES
TO VIEW ALL SOURCES USED IN THIS ARTICLE AND FOR ADDITIONAL RESOURCES, CLICK HERE.