Inspiring Seniors Health Stories: Pam’s Story - Reversal Of Heart Disease
I want to do this to give hope and inspiration to people going through any health battles and to highlight that by taking control of our health, we can prevent health issues from occurring.
In today's email, I want to get the 'Inspiring Stories' section started by sharing with you a short story I received from a reader/viewer named Pam.
Pam shares how, after following a heart attack leading to heart failure, she took control of her health and in the process, reversed the heart failure.
Here is the email:
"Hi Mike,
I just wanted to say how much I appreciate all of the work you do and the time you are giving to help us oldies to continue keeping fit and healthy.
I am 86 years young next month although my doctor says she always does a double-take when she sees me, expecting to see someone much older.
I joined a gym in 1991 and continued until last year (27 years), only giving up after damaging my shoulder and elbow needing two months of physio and was also becoming bored with the gym.
I had a heart attack in 2006, resulting in heart damage and consequent heart failure. I had six months of cardio rehab and then continued at the gym. After two years, I had another echocardiogram to discover I no longer had heart failure. My cardiologist was amazed. So continuous exercise for me was my saviour.
Exercising is what I have done all these years and wanting to carry on at home I did a Google search and found your videos on YouTube. I try to follow one each day.
So, Mike, thank you for all you do to help us oldies continue to live healthy, active lives.
Kind Regards
Pam"
As you can see from Pam's story when she had the cardiac event, she decided to make changes to turn her life around and reaped life-saving benefits.
For those going through a health battle of some sort, I hope you get some inspiration from Pam's story.
With the right mindset and attitude, and when we perform the right actions that are conducive to good health, we can make significant changes to our health and our life.
Think positive, choose the thoughts that feel best and take the right action, and you'll go a long way to improving your health. Don't limit yourself or let anyone place any limitations on you! Also remember, age is just a number!
FOLLOW UP QUESTIONS TO PAM:
What do you feel could have been the cause of the heart attack? (if you feel it was something(s) in particular)
I am not sure of the cause of the heart attack, but my cholesterol was discovered to be very high at the time. I had known for years that it was above normal and so had then changed my diet, cutting out animals fats etc. Another cause could have been a long period of stress two months prior to the attack, or perhaps it was a combination of both.
What were your health habits like prior to the heart attack?
I had always been healthy prior to the attack apart from developing osteoarthritis and was a good weight.
I decided to take early retirement from a very stressful job in 1991 and after losing my partner to cancer. I joined a gym 3 or 4 months later. It was very unusual at that time for people of my age (58), so I was a bit of a curiosity!!
Can you explain your typical exercise routine? (e.g. cardio, weights, stretching etc.)
From 1991 until my attack in 2006, my exercising started with varied gym classes, which included step, pump and stretching etc. and then after a few months started doing my own thing, 30 minutes of cardio, 30 minutes resistance machines and weights. I included yoga classes also for about a year and In 2003 joined a Tai Chi class, but always continued with cardio and resistance machines until my attack in 2006. I exercised three times a week.
After 5/6 months of cardiac rehab at the hospital, I returned to the gym again doing cardio, resistance machines and weights as before and also continued with Tai Chi for a short while, until last year.
I still mow my lawns and keep busy with my garden.
What dietary changes did you make following the heart attack?
The only dietary change made since the attack was cutting out salt where possible and in the past few years have cut out sugar except for the odd Tim Tam now and again.
How do you eat nowadays?
I believe I eat healthily. Mostly chicken and fish, no red meat, lots of fruit and vegetables. I include a homemade curry once a week and pasta once or twice a week.
Is there anything else you do, or feel is helpful for your health along with the diet and exercise? (e.g. stress reduction techniques, etc.)
I keep my mind active, read quite a lot, am a sudoku addict. I believe a healthy brain means a healthy heart. I do get stressed at times and if it is during the day, depending on the weather, I will get outside into the garden or will try reading. I have been told that reading a book can eliminate 30% of stress. If the stress keeps me awake at night, I try the breathing and relaxation techniques. It works sometimes.
For anyone going through something similar, what advice or message would you give them? Anything else that you would like to add.
I think we have to try and stay positive. Just keep moving, don't give in, don't become invalid and try to enjoy the things you did before.
I was sent home from the hospital with a booklet on "How to live with Heart Failure". That was really scary. It took several days for it to really sink in. Then I decided that if I had only a couple of years then I didn't want to sit around feeling miserable.13 years have now gone by, and I'm still here
Pam, (Originally from England, now living in New Zealand since 1964)
You Are Never Too Old!
“ YOU ARE NEVER TOO OLD TO SET ANOTHER GOAL OR TO DREAM A NEW DREAM” ~C.S Lewis
What are you looking forward to?
What are your goals?
What do you dream?
WHAT ARE YOUR GOALS AND DREAMS?
What are you looking forward to?
What are your goals?
What do you dream?
Whether it's walking a certain amount of steps, travelling to a new place, learning a new skill, the birth of a new grandchild, seeing a long lost friend, or doing something you've always wanted to do!
Whatever it is....
Create that excitement for the future. Set those goals, for this chapter in your life.
Being excited about the future is healthy.
Have Fun and Keep Moving This Week! 😄
- Mike
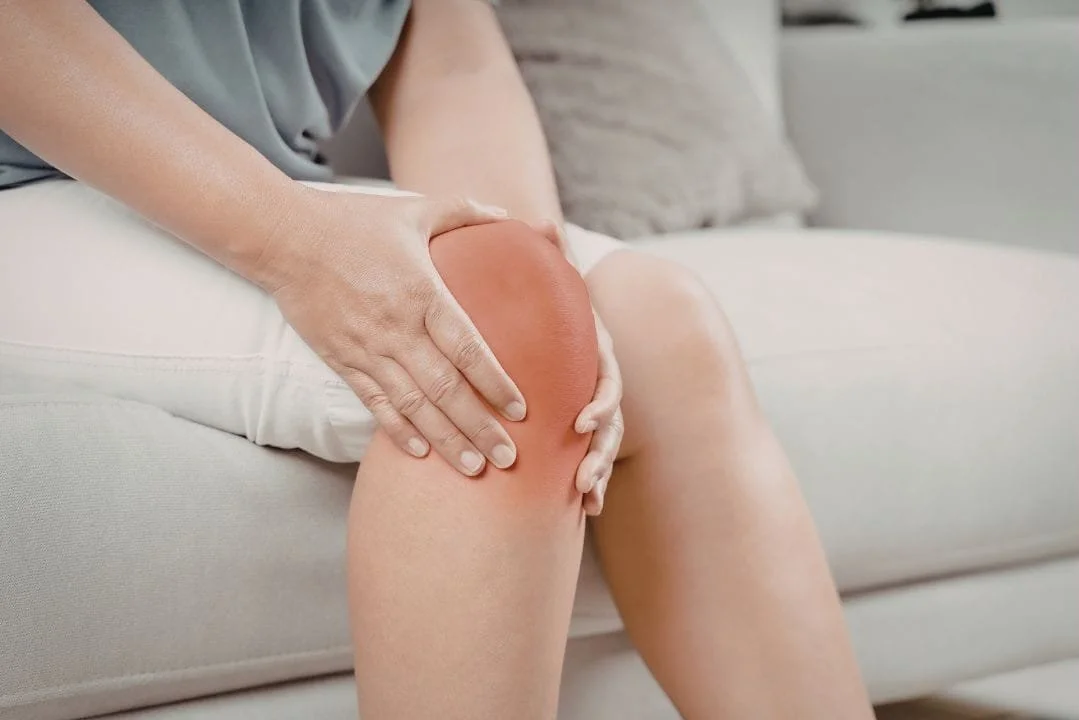
Why We Get Sore After Exercising (or Doing Physical Activity)
Have you ever completed a new workout, or a new activity for the first time, gone to sleep maybe just a little tired all over from the workout and then woken up the next day to feel your muscles aching?
Maybe this has happened during an activity you haven’t done in a while (like getting out in the backyard to the garden)?
Sometimes it can happen when you didn’t think you worked that hard at all! But the soreness lets you know it.
DELAYED ONSET MUSCLE SORENESS (DOMS) IN SENIORS
Have you ever completed a new workout, or a new activity for the first time, gone to sleep maybe just a little tired all over from the workout and then woken up the next day to feel your muscles aching?
Maybe this has happened during an activity you haven’t done in a while (like getting out in the backyard to the garden)?
Sometimes it can happen when you didn’t think you worked that hard at all! But the soreness lets you know it.
I’m sure we’ve all felt this soreness at some point!
This after exercise/activity soreness is known as DOMS or Delayed Onset Muscle Soreness.
DOMS is thought to be caused by little micro-traumas to the muscles when they lengthen during the exercise/activity.
This soreness usually starts the next day after the exercise/activity, peaks at 48 hours and can continue up to 72 hours (and beyond) depending on how hard you have worked your untrained muscles.
As some of you know, I used to work remotely in indigenous communities here in the outback of Australia. This was where my most rememberable story about DOMS occurred.
My job was to get the towns exercising more and eating better to help prevent and treat chronic disease. With the change in lifestyle, these diseases are now rampant in the indigenous populations.
It was a job I absolutely loved! It was a great adventure, and I fell in love with the people and their culture.
One of the towns (known as Lajamanu) where fish apparently fall out of the sky, was where I spent most my time. It had a small population, and not much there. There was a school, a community hall, a medical clinic, a shop, their houses, an Australian football field, an airstrip (the field and the airstrip were just cleared land of red dirt). And there were a few other buildings.

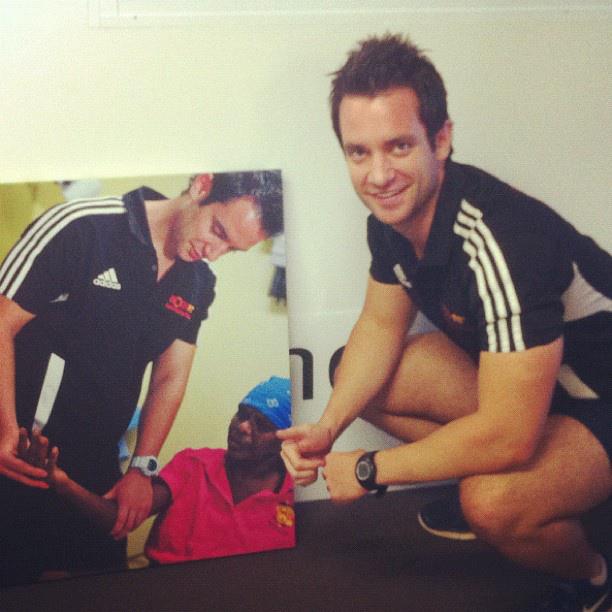
There was surprisingly a gym in this little remote town. By chance, the school principal who used to work there had happened to be a bodybuilder and put a lot of money the School had into one of the best gyms I have ever seen. (That no-one really used).

One day I decided to take a couple to the gym. It was the first time they had ever done specific exercises, and they had a great time. However, I forgot to mention to them the next day they may be a little sore.
The next day when I rocked up to the clinic, I had one of the nurses tell me the couple I had been exercising with came into the clinic worried they might have caught a disease due to pains all their body. The nurse let them know it was from the exercise and after hearing this, I went to their home to reassure them, and they were back the next day ready to exercise again!
Unless you’ve really, really worked your muscles too hard to the point of a condition called Rhabdomyolysis (not uncommon in military-style boot camps and Cross-Fit Workouts)- DOMS is nothing to worry about.
Your body is regenerating stronger, more resilient muscles as a result of the stress from the exercise. Once recovered, it is now better equipped to deal with it again.
When you get back into the exercise/activity once your muscles are feeling better, you’re not going to experience that soreness again (unless of course, you leave it too long between the workouts/activity).
DOMS can be avoided to a great extent by easing your way back into activity or exercise.
When getting back into exercise after some time of inactivity, don’t overdo it… Do less and progress your way back into it. Do half the distance you are walking, lift less weight/resistance, go at a slower pace, have more rest.
Exercise/Physical activity is medicine and something we should regularly be doing.
So when we are in this for the long run, why wouldn’t we ease back into it?
This will help decrease DOMS and also help prevent any injuries.
Take it slow, allow your body to adapt and most importantly, have fun!! :)
What To Do For DOMS (When in Pain)
As said above, what you want to be doing is preventing any DOMS from occurring in the first place. If you have found yourself the next day in pain after doing too much activity/exercise(the dreaded DOMS), the best thing you can do is rest and wait for time to pass. as your muscles heal.
Relaxation and heat, for example in a hot bath, a hot shower or heat packs can help take the pain, temporarily, away.
If the pain is quite unbearable, speak to your doctor about a suitable analgesia.
Finally, know that this pain is temporary, and the next time you get back into the activity or exercise, it’s not going to be so bad. :)
- Mike

Flexibility Exercises For Seniors: A Comprehensive Guide to Regaining Flexibility
Flexibility is an essential component of good health and fitness, and is especially important for seniors.
I don’t mean the kind of flexibility of being able to do the splits, or turning oneself into a human-like-pretzel.
I mean being unrestricted in your movements, being able to move all your joints as they should be moved and getting about easily in your day-to-day life, without feeling the painful niggles that comes with tight muscles and inflexible joints.
In this article, we are going to be covering everything you need to know about regaining flexibility after 60. Read it all, learn it all, put in the effort by doing it all, stay consistent and watch yourself become more flexible. Just like your younger days!
Enjoy the guide and the journey to a flexible you!
HOW TO IMPROVE FLEXIBILITY AFTER 60
No matter our age, we all want to be flexible!
Flexibility is an essential component of good health and fitness and is especially vital for seniors.
I don’t mean the kind of flexibility of being able to do the splits or turning oneself into a human-like-pretzel.
I mean the type of flexibility of being unrestricted in your movements. Being able to move all your joints fluidly and getting about with ease in your daily life. All without feeling any painful niggles that come with tight muscles and stiff joints.
You may think back to your earlier days when you could touch your toes with ease. Maybe you were capable of doing the splits. Or, perhaps you even were a human-like-pretzel.

Nowadays, you might be noticing you’re just not as flexible as you once were.
The tasks in your daily life may be getting more difficult to do, like bending down to (or getting up off) the floor. Or, reaching high above, or behind your head.
Or maybe you’re just noticing your joints aren’t straightening or moving, in the way they once did.
Our bodies are going to age; it’s inevitable.
With an ageing body comes decreased flexibility, especially if we forget what’s necessary to keep ourselves flexible and moving well.
However, just like all components of fitness, regardless of our age and current physical capabilities, you CAN make BIG improvements…. You CAN regain your flexibility at ANY age!
By improving your flexibility, not only will you be improving the range of motion in each of your joints, but you’re going to find yourself moving around with greater ease. All those daily movements will seem so much easier, and you’ll feel yourself becoming free of painful niggles.
You’ll have improved posture, improved balance and also decrease your chances of picking up a future injury.
Not only this, we all know how good we feel after we stretch out our body.
Stretching can help in decreasing tension and stress, resulting in a positive mindset, relaxed body and feeling good!
In this article, we are going to be covering everything you need to know for regaining flexibility after the age of 60.
Read it all, learn it all, put in the effort by doing what’s contained within, stay consistent and watch yourself become more flexible. Just like your younger days!
Enjoy the guide and the journey to a flexible you!
Mike
WHAT THIS GUIDE WILL COVER:
1 - BECOMING A FLEXIBLE SENIOR
2 - THE SENIORS' STRETCHING PLAN
3 - START STRETCHING NOW - STRETCHING EXERCISES FOR SENIORS (WITH PICTURES + VIDEO DEMONSTRATIONS)
How Flexible Are You?
Quick, Functional Flexibility Tests For Seniors
To test your flexibility, here are a few simple at home tests you can do to determine how flexible you in areas important for everyday tasks.
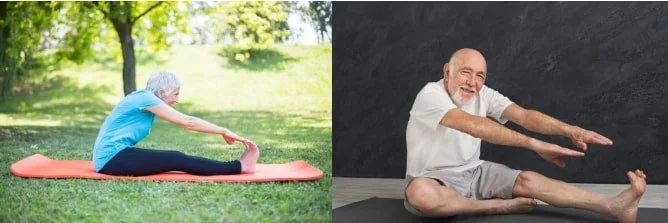
Sit & Reach Test: This test measures the flexibility of the hamstrings and lower back. While sitting, extend one leg, and slide your hand down towards your foot. The closer your hand gets to your foot, the better your flexibility. This flexibility is vital for walking, balance, reducing back pain, and preventing falls.
Tying Shoelaces Test: This everyday task requires significant flexibility in the hips and lower back. There are three common positions for tying shoelaces: seated with the leg out in front, seated with one leg crossed over the other, or kneeling. Difficulty in performing this task in any of these positions indicates decreased flexibility in these areas, which can make the task challenging.
Scratch Your Back/Brush Your Hair Test: This tests the flexibility of the upper body and shoulders. Try reaching over your head with one hand and behind your back with the other, attempting to touch your fingers. The closer your fingers are, the better your shoulder flexibility. This is essential for reaching objects in high places, grooming, and dressing.
These tests help seniors understand their flexibility levels, important for daily functions. However, it's crucial to consult a doctor before starting any exercise regimen to improve flexibility. This guidance ensures safe and effective practices tailored to individual health conditions and needs.
1 - BECOMING A FLEXIBLE SENIOR
Why Are My joints Stiff?: Why We Lose Flexibility As We Age!
As with most of our physical capabilities, like our strength, balance and muscle size that decreases as we age, flexibility, unfortunately, is no exception.
Our once flexible and limber bodies are going to become more rigid and stiff with age. It’s inevitable, and the research shows this! [2, 3, 4].
So, why does this happen? Why do we lose flexibility as we age?
In simple terms, flexibility is having the full range of motion in the joints of our body.
For a joint to be flexible and move through its full range of motion, it is dependent on the soft tissues (the surrounding muscles, tendons, ligaments and even our skin) and the joint capsule.
Sometimes, certain factors get in the way impeding this movement, such as an abnormal condition in, or surrounding, the joint (For example, Osteoarthritis, Rheumatoid Arthritis, or Frozen Shoulder).
Or, in the majority of cases causing lack of flexibility, the joint can be completely healthy, but our muscles and the surrounding tissues become tighter, secondary to our lack of movement. [2, 4, 5, 6].
In technical terms, this immobility or lack of exercise/movement leads to cross-linking of the structural proteins (collagen) of our soft tissues, and a decrease in our strength and size or our muscles, which further decreases flexibility. (8)
As we get older, we tend to live less active lives. We substitute exercising with watching TV, outdoor excursions with indoor coffees and cakes, we can find all our entertainment within arms reach from our phone or tablet.
Everything we need and want takes much less effort to obtain. We simply sit more and move less.
Contrast the majority of the time you spend seated today to your younger days. Or, go back even further to how our ancestors lived, and you’ll find we spent a whole lot more time up and moving, and less time seated throughout our lives.
All of these changes impact our health and our bodies, and the more we persist in this sedentary lifestyle, the more consequences we will soon have to deal with.
However, the good news is……. We can do something about it!
With the loss of flexibility that comes with ageing being caused by lack of use, we can turn it around.
By becoming more active and doing the right exercises, we can regain our flexibility.
I have seen, and helped, this happen many times over my career as a Physiotherapist and the research shows that with the right exercise and activity, age-related LOSS OF FLEXIBILITY IS REVERSIBLE. (2,5,6,7).
Even in the presence of underlying abnormal joint conditions (such as the ones mentioned above), it’s usually the combination of this joint condition with lack of activity and exercise that affects the movement, decreasing flexibility.
Even in the presence of a joint condition, e.g. arthritis, we can still make significant improvements in our flexibility!
In simpler terms, and something I know you’ve heard many times before… WE HAVE TO ….. USE IT OR LOSE IT.
How Seniors Can Improve Flexibility
[Yoga, Pilates, Swimming, Tai Chi, Dancing, Massage, Foam Rolling, Stretching]
When most of us think about improving our flexibility, we usually think solely about stretching.
Yes, stretching is essential in improving your flexibility, and later in this article, I am going to show you exactly how to stretch all parts of your body (with pictures AND videos) which will help you regain your flexibility.
However, to improve your flexibility, there is a more important step we must do before we get stretching, and it is……
GET MOVING MORE

The first step in improving your flexibility is to get moving more each day.
Even just walking more is going to set those wheels in motion to improve your flexibility, as demonstrated in a study by Buccola & Stone. “An improvement of flexibility of the trunk and of the lower limbs was seen in people, between the age of 60 and 70, with their participation in a walking and jogging program that lasted 14 weeks."
Start spending more of your day on your feet, doing the activities you enjoy. Get outside, go swimming, do whatever it takes to ensure you are getting in more movement.
Activities that work your whole body. This can be anything from walking more, getting in the garden more, hiking, lawn bowls, golf, mix it up.
By doing this, you are going to be using your body in the ways they are meant to be used. You will be stretching out those hips and backs caused by tightened muscles from too much sitting and being in bad postures.
Some activities are going to be better than others to improve your flexibility, but the majority of us face daily willpower battles to move away from our sedentary, comfortable lifestyles.
So by doing activities you enjoy doing and find less of a chore to do, is the key to staying consistent and getting great results.
Here are other activities to consider which are great for flexibility and your health.
YOGA
Yoga is getting more and more popular, especially with older adults and for good reason.

Yoga is a gentle type of exercise, and that is great for flexibility, strength and mental wellbeing.
Yoga does not solely focus on specific body parts, but utilises movements which focus on the body as a whole, while targeting other aspects of our being. Emotional, spiritual and mental.
PILATES
Pilates is another form of exercise that can significantly help in improving one's flexibility levels. This type of gentle exercise has proven to be quite a useful tool for seniors looking to become more agile.
In Pilates gentle movements, low-impact poses, light stretches and the use of individual pieces of equipment are utilised, to improve physical capabilities.
SWIMMING
Swimming, or even just getting into a pool, moving around and doing exercises and stretching is a great way to improve flexibility.

Although it will not be as effective as doing set stretches, yoga or Pilates, swimming is a great way to lengthen the muscles.
Additionally, with swimming, we have the added advantage of less weight on our joints due to the buoyancy. This can be helpful with certain painful conditions placing less strain on the joints.
Another bonus of swimming is doing them in a heated pool. The heat has a relaxing effect on the soft tissues of our body, helping improve range of motion. Additionally, the heat can provide relief from painful conditions, which can also help with movement.
DANCING
Dancing is another great way to get you moving, which will help improve flexibility, get you stronger, fitter and help improve many other aspects of your health.

So dust off your old dancing shoes and get moving. There would be plenty of dancing classes around your area so keep an eye out for them
If a dancing class isn’t for you, put on your favourite music and dance around your house as if nobody is watching.
Dancing is not only great for the body but also great for the mind!

TAI CHI
Tai Chi is a gentle, slow and flowing form of exercise for both the body and the mind that originated in China many, many years ago.
This gentle form of exercise is great to not only improve flexibility but also to improve coordination, strength and decrease pain.
MASSAGE
Who doesn’t love a good massage? Massage can help with flexibility by releasing tight muscles and helping relieve tension.
Massage is also great to reduce stress, improve circulation and decrease pain.
Although I would not recommend massage to be used on its own to improve flexibility if you’ve got the luxury of being able to add in regular massages to your daily life, for the many health benefits, go for it!
USING A FOAM ROLLER.

As the name suggests, foam rollers are quite simply tubes of compressed foam that are used to self-massage certain areas of the body.
They are used by people of all ages and fitness levels as a way of improving blood circulation and relaxing contracted muscles, as well as providing other therapeutic benefits.
When massaging, the foam roller compresses the specific body area relieving tension in the process.
Foam rollers have been shown to improve overall flexibility and mobility.
STRETCHING
Along with getting moving more overall, by finding physical activities and exercise we enjoy doing, the next step to regaining our flexibility is stretching.
When most of us think about stretching, we usually think about holding our muscles in certain positions, which are usually uncomfortable, for a period of time (usually 20-60 seconds or more). This type of stretching is known as static stretching.
Along with static stretching, there is another type of stretching, known as dynamic stretching.
Dynamic stretching refers to active stretches; movements that are done repeatedly (for repetitions) in a short period of time, allowing your muscles to loosen up gradually.
Dynamic stretches are usually practiced prior to working out, as they’re a great way to warm up the muscles and prepare them for more challenging exercises.
They can also be completed in a set routine, consistently, to improve flexibility.
The third type of stretching I want to cover briefly is known as PNF stretching or Proprioceptive Neuromuscular Facilitation Stretching. (Long fancy words, I know!!)
This is basically just performing a stretch with a contraction of the muscle added in while doing it.
All these methods have shown to improve flexibility [10, 11, 12, 13]. However, PNF stretching requires a partner and does not increase flexibility any more so than static or dynamic stretching (14).
So in this article, we will be focusing on dynamic and static stretching.
While performing specific stretches, the muscles and tendons in your body become elongated, helping you increase your range of motion.
The body tends to adapt to the range of motion you frequently use, so if you only use your muscles for sitting on the couch, your muscles won’t have the need to bend differently.
This is why it’s important to focus on stretching the whole body and not just focusing on a single part of your body.
After a certain period of time of practising these stretches, you’ll start noticing the changes in your flexibility.
In order to regain flexibility, we must get stretching; however, before we do that, let’s get a rough idea of how flexible you are.
2 - THE SENIORS' STRETCHING PLAN
Now we can delve deeper into what exactly is required to regain flexibility.
Doing stretches every now and then isn’t going to get you the results you require, it involves knowledge on how long to hold stretches for, how often to stretch, how to stretch correctly and what to avoid when stretching in order to ensure you are performing them safely.
It also takes patience and a consistent effort.
So in this section, I will be covering all of this, and I’ll share some insights into how to maintain consistency with stretching.
How Long Do I hold Each Stretch?
For dynamic stretches, we perform the stretch for just a few seconds for each repetition as we feel the stretch. Aim for 8-12 repetitions with each area taking roughly 30-60 seconds.
For static stretching, there is no clear evidence for how long each stretch should be held for.
The general notion is that the more time you spend stretching the area, the more of a result you are going to get.
What I have found works best are 30-60 seconds and up to 2 minutes. If we are going to be stretching all areas of our body, and stay consistent, who has time to hold the stretches for longer than this?
By stretching for a number that isn’t going to overwhelm you each day, the more likely you are going to stick to it and the better results you will get. If you’re a keen bean and want to hold each stretch for longer, provided you don’t get any pain, go for it.
Always use your body as a guide on how you feel, and allow your muscles to adapt to the stretch gradually. Don’t overstretch and cause yourself pain.
Ease into the stretches by holding them for less time, to begin with, with less of a stretch of the muscle and build it up over time, by increasing the stretch and holding for a longer time.
How Often Should I Stretch?
To put things simply, unless you have a certain condition that makes stretching not such a good idea (E.g. hypermobile joints) there’s no limit to how frequently you stretch.
Stretching is always a good idea and can be done anytime and anywhere.
Now, if you haven’t made a habit of stretching so far as we do with all exercise including the time we hold each stretch, it’s a good idea to take things slow and start with doing some basic stretches at least 2-3 times a week.
Once you start feeling comfortable and ready to increase the amount of stretching you are doing, feel free to add additional stretches and perform them more frequently, to about 4-5 days per week and then even up to every day!
Basically, you can stretch how often you feel inclined.
If you’ve been sitting for an extended period of time and feel a bit stiff, simply do a few basic stretches to wake your muscles up.
Similarly, if you’re feeling tense or stressed, a few minutes of stretching can do wonders for your emotional and mental health.
What Should I Avoid When Stretching?
While stretching is an integral part of an active lifestyle and extremely beneficial to one’s health, it’s important each stretch is done correctly and safely.
In order to do, it’s a good idea to know what to avoid when stretching.
One of the most crucial things to remember is never to stretch an injured muscle.
Depending on the severity of the injury, you might cause an even more significant problem to the area, and/or delay tissue healing, which is why it’s necessary to always consult with your Doctor or Physiotherapist before undergoing any exercise.
This might seem obvious, but whatever you do never push a stretch to the point of pain. A stretching feeling is fine, but you should never experience any pain while stretching. You might be impatient and eager to improve your flexibility rapidly, but pushing into pain is not the answer. Be patient!
Same goes with something I commonly see, and that is bouncing at the end of a stretch, to increase the stretch.
This is known as ballistic stretching, and I do not recommend seniors perform ballistic stretching. Seniors should never bounce when stretching, as it increases your chance of injury. [15]
Another often overlooked aspect of stretching is breathing or - the lack of it.
Many people tend to hold their breath while stretching and exercising, and while this might seem easier or more convenient, the truth is that your muscles need oxygen to function correctly.
So, relax into each stretch with a nice relaxed breath and remember not to hold your breath.
Finally, Never perform stretches cold and always ease into each stretch. Make sure you perform some movements, or a warm-up, to ensure you are ready before performing your stretches.
Why Can't I Stay Consistent With My Stretching?
Have you noticed that every time you make a habit of stretching regularly, somehow you end up slacking off until you eventually stop stretching altogether?
Or, do you know it’s a good idea to stretch regularly to avoid injury, but you rarely do it?
We are aware that if we focus mainly on cardio routines that we’ll burn more calories, lose weight and increase our endurance. In the same way, we know that if our exercises consist of mostly strength exercises, we’ll tone up and become stronger.
But what do we know about flexibility?
We have learned, throughout the years, that flexibility, like a good night’s sleep and a plate full of veggies, is good for us.
We have also learned that maintaining good flexibility is an essential part of life and that we should implement different stretches into our daily routines.
But how many of us do this? How many of us prioritise stretching over other forms of exercise?
The truth is that we don’t put a big emphasis on flexibility as we don’t see immediate results from it.
It’s here where a paradigm shift is necessary.
We have to start thinking about flexibility in a much broader sense. We have to start thinking about our health in the long run.
No, flexibility won’t show on your body with stronger arms or a toned stomach. And no, you’re not going to get that feeling like you’ve had a really good workout.
But good flexibility from a consistent stretching routine will grant you the ability to use your body in ways you could never before and keep you moving well for life.
What we should also remember is that good flexibility is an asset just as valuable as any other kind of training. It’s with flexibility where our journey to a better, fitter, healthier, and injury/pain-free self begins.
So know the importance of good flexibility and start by putting ‘improving your flexibility’ up your list of priorities.
3 - START STRETCHING NOW - STRETCHING EXERCISES FOR SENIORS
If you complete my usual workouts, we do perform some dynamic stretches throughout and in the warm up videos (Standing Warm-Up Video and Seated Warm-Up Video).
I have also created other stretch videos you can follow to help improve your flexibility. Here is an Upper Body Stretch Video (click to access) and here is a Lower Body Stretch Video (click to access).
The Best Neck Stretches For Seniors
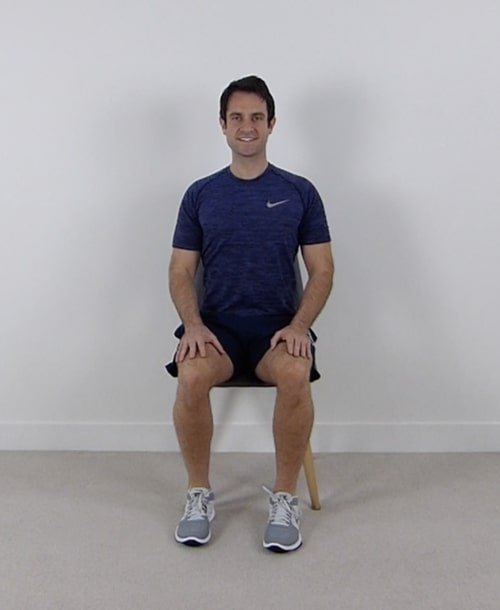
STRETCH 1: NECK FLEXION STRETCH
HOW TO:
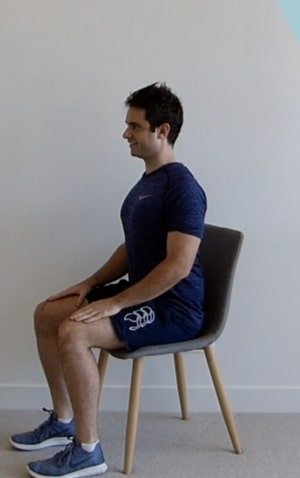
Sitting up tall in your chair with your shoulders back and down.
Bring your chin down to your chest as far as you feel comfortable. You will feel a stretch in the back of the neck.
To increase the stretch place your hands on the back of your head and apply a gentle pressure.
Hold for the set time.


HOLD FOR: 30-60 seconds
For Video Demonstration of This Exercise: Click here.
STRETCH 2: NECK EXTENSION STRETCH
HOW TO:
Sitting up tall in your chair with your shoulders back and down.
Bring your head straight back, looking up to the ceiling and going as far back as you feel comfortable. Do not push into any pain.
Hold for the set time.

HOLD FOR: 30-60 seconds
For Video Demonstration of This Exercise: Click here.
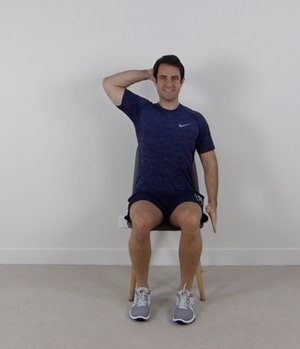
STRETCH 3: NECK SIDE FLEXION STRETCH
HOW TO:
Sitting up tall in your chair with your shoulders back and down.
Bring your ear down to your shoulder. Do not bring your shoulder up to your ear, leave your shoulder relaxed. Go as far as you feel comfortable.
To increase the stretch place your hand on the side of your head and apply a gentle pressure.
Hold for the set time and alternate sides.


HOLD FOR: 30-60 seconds
For Video Demonstration of This Exercise: Click here.
STRETCH 4: NECK ROTATION STRETCH
HOW TO:
Sitting up tall in your chair with your shoulders back and down
Look over to one side, as far as you feel comfortable.
Hold for the set time and repeat on the opposite side.


HOLD FOR: 30-60 seconds
For Video Demonstration of This Exercise: Click here.
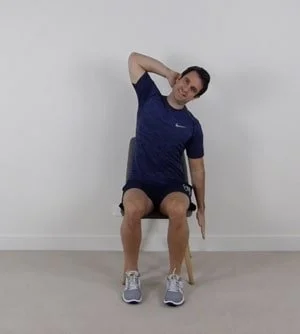
STRETCH 5: LEVATOR SCAPULAR STRETCH
HOW TO:
Sitting up tall in your chair with your shoulders back and down.
Place the hand of the side you are stretching behind the shoulder to stabilise your shoulder blade. If unable to do this, just perform the exercise without placing one hand behind your shoulder.
Turn your head to roughly 45 degrees to one side and bring your head down as if you are looking at your knee on that side. You will feel a stretch on the opposite side you are looking behind the neck and shoulder. (This muscle is known as Levator Scapular)
To increase the stretch place your hand on the back of your head and apply a gentle pressure.
Hold for the set time and repeat on the opposite side.


HOLD FOR: 30-60 seconds
For Video Demonstration of This Exercise: Click here.
The Best Shoulder & Arm Stretches For Seniors
STRETCH 1: UPPER ARM & SHOULDER STRETCH
HOW TO:
Sitting up tall in your chair with your shoulders back and down.
Place one arm straight in front of your body and use your other hand to hug the straight arm to your body. This will increase the stretch.
Hold for the set time and repeat on the opposite side.

HOLD FOR: 30-60 seconds
For Video Demonstration of This Exercise: Click here.
STRETCH 2: SHOULDER & ARM OVERHEAD STRETCH
HOW TO:
Sitting up tall in your chair with your shoulders back and down.
Interlace your fingers and bring your arms up above your head.
Now turn your palms away from you, towards the ceiling and push up as far as you can.
Hold this movement for the set time, feeling the stretch in your shoulders and your sides.


HOLD FOR: 30-60 seconds
For Video Demonstration of This Exercise: Click here.
STRETCH 3: WRIST FLEXION (FOREARM) STRETCH
HOW TO:
Sitting up tall in your chair with your shoulders back and down.
Place one arm straight in front of your body with your palm facing down and your fingers facing up.
Drop your wrist, allowing it to become weak.
Using your other hand bend your wrist by applying a gentle pressure, on the back of the hand, pulling the hand and fingers towards the elbow. Ensure you maintain a straight am throughout the stretch.
Hold for the set time and repeat on the opposite side.


HOLD FOR: 30-60 seconds
For Video Demonstration of This Exercise: Click here.
STRETCH 4: WRIST EXTENSION (FOREARM) STRETCH
HOW TO:
Sitting up tall in your chair with your shoulders back and down.
Place one arm straight in front of your body with your palm facing down and your fingers facing up.
Using your other hand bend your wrist by applying a gentle pressure, towards the elbow on the fingers. Ensure you maintain a straight am throughout the stretch.
Hold for the set time and repeat on the opposite side.


HOLD FOR: 30-60 seconds
For Video Demonstration of This Exercise: Click here.
The Best Back Stretches For Seniors
STRETCH 1: LUMBAR FLEXION STRETCH (SEATED TOE TOUCH)
HOW TO:
Sitting up tall in your chair with your shoulders back and down.
Place your feet slightly out in front of you and place your hands on your knees. Slowly slide your hands down your legs all the way to your feet.
Hold for the set time and slowly slide your hands back up.

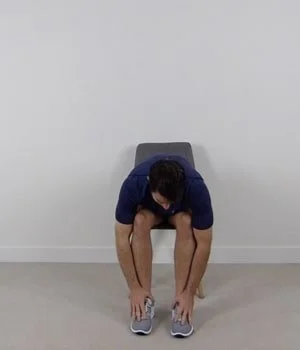
HOLD FOR: 30-60 seconds
For Video Demonstration of This Exercise: Click here.
STRETCH 2: LUMBAR SIDE FLEXION STRETCH
HOW TO:
Sitting up tall in your chair with your shoulders back and down.
Place one hand behind your head, and your other hand straight beside you. Slowly lean down to the side with the straight arm until you can feel a stretch on the opposite side. (If you have difficulty placing your hand behind your head, just keep it on your lap).
Hold for the set time and repeat on the opposite side.

HOLD FOR: 30-60 seconds
For Video Demonstration of This Exercise: Click here.
STRETCH 3: LUMBAR EXTENSION STRETCH
HOW TO:
Sitting up tall in the middle of your chair with your shoulders back and down.
Place the palms of your hands in the small of your back and lean your lower back into your hands, feeling a stretch in your lower back. (If you have difficulty getting your palms around to the small of your back, use the backs of your hands).
Hold for the set time.


HOLD FOR: 30-60 seconds
For Video Demonstration of This Exercise: Click here.
STRETCH 4: RHOMBOIDS (UPPER BACK) STRETCH
HOW TO:
Sitting up tall in your chair with your shoulders back and down.
Interlace your fingers and push your palms out away from you.
Now bring your arms up to 90 degrees (or parallel to the floor) and push your hands out as far as possible, whilst maintaining that upright posture. feeling your shoulder blades stretch apart.
Hold for the set time and return to the start position.


HOLD FOR: 30-60 seconds
For Video Demonstration of This Exercise: Click here.
STETCH 5: THORACIC EXTENSION (UPPER BACK) STRETCH
HOW TO:
Sitting up tall in your chair with your shoulders back and down.
Now place your hands behind your head, maintain an upright posture and extend your upper back over the chair. (If you have difficulty placing your arms behind your head, place them across your chest).
Hold for the set time.


HOLD FOR: 30-60 seconds
For Video Demonstration of This Exercise: Click here.
STRETCH 6: THORACIC ROTATION (UPPER BACK) STRETCH
HOW TO:
Sitting up tall in your chair with your shoulders back and down.
Cross your arms over your chest, and leading with your arms rotate around until you feel a stretch in your upper back.
Hold for the set time and repeat on the opposite side.


HOLD FOR: 30-60 seconds
For Video Demonstration of This Exercise: Click here.
The Best Leg (Hip & Knee) Stretches For Seniors
STRETCH 1: SEATED HAMSTRING (BACK OF THIGH) STRETCH
HOW TO:
Sitting up tall in your chair, shuffle to the front of your chair
Keeping your hands on the opposite leg, place one leg out in front of you
Now keep your leg straight and point your toes towards the ceiling
Ensure you remain upright with a straight back and lean forward at the hips
Hold for the set time and change legs.


HOLD FOR: 30-60 seconds
For Video Demonstration of This Exercise: Click here.
For Video Demonstration of This Exercise in Standing Position: Click here.
STRETCH 2: SEATED GROIN (HIP ADDUCTOR) STRETCH
HOW TO:
Sitting up tall in your chair, shuffle to the front of your chair
Place one leg out straight to the side, keeping your toes, on both feet firmly on the ground and facing towards the front.
You will feel a stretch on the inner thigh of your straight leg, to increase the stretch you can lean forward slightly
Ensure you remain upright with a straight back throughout the exercise.
Hold for the set time and change legs.


HOLD FOR: 30-60 seconds
For Video Demonstration of This Exercise: Click here.
For Video Demonstration of This Exercise in Standing Position: Click here.
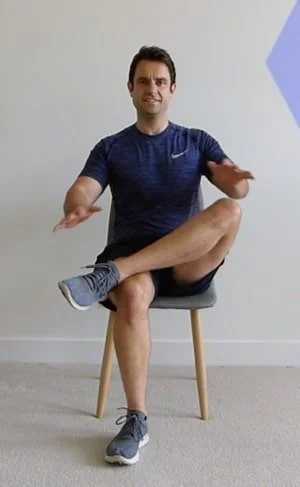
STRETCH 3: SEATED LATERAL ROTATION (HIPS, BUTTOCKS) STRETCH
HOW TO:
Sitting up tall, shuffle forward to the front of your chair.
Whilst continuing to hold onto the chair, extend your legs out and cross one leg over the other leg.
In a slow and controlled way, slide your heel up your shin until over the knee cap.
Now bend your opposite leg up, keeping your back straight and placing your hands on your shins.
Stay in this position and to add a little more stretch you can lean forward keeping your chest up and your shoulders parallel to the floor.
Hold for the set time and change legs.


HOLD FOR: 30-60 seconds
For Video Demonstration of This Exercise: Click here.
STRETCH 4: HIP FLEXION (BUTTOCKS) STRETCH
HOW TO:
Sitting up tall with your shoulders back and down.
Lift one leg up to your chest, bending at the knee, and hug the leg.
Hold for the set time and change legs.
Ensure your shoulders are back and down throughout the exercise.
Hold for the set time and change legs.


HOLD FOR: 30-60 seconds
For Video Demonstration of This Exercise: Click here.
STRETCH 5: STANDING QUADRICEPS (FRONT OF THIGH) STRETCH
HOW TO:
Standing up tall next to your chair, holding onto your chair with one arm.
Bring one leg behind you, holding onto your foot.
Ensure you maintain your straight posture throughout the exercise and try to keep your knees next to each other
Hold for the set time and change legs.

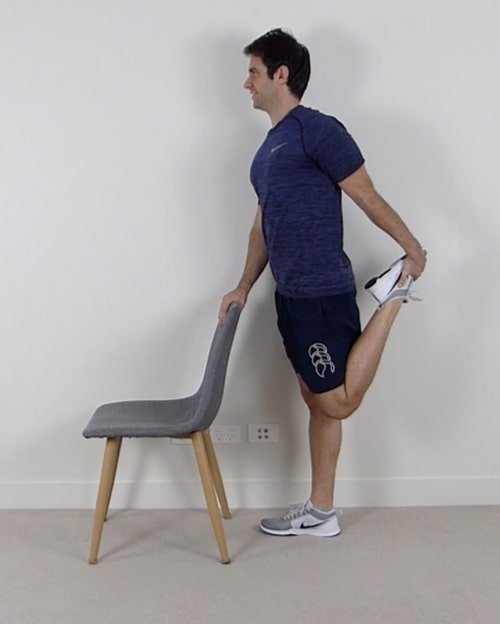
HOLD FOR: 30-60 seconds
For Video Demonstration of This Exercise: Click here.
STRETCH 6: STANDING CALF (BACK OF LOWER LEG) STRETCH
HOW TO:
Standing tall, holding on to your chair with both hands.
Step one foot back making sure your toes are facing forward throughout the exercise.
Now bring your front knee towards the chair ensuring that your heels remain in contact with the floor at all times.
Hold for the set time and change legs.


HOLD FOR: 30-60 seconds
For Video Demonstration of This Exercise: Click here.
The 10 Best Flexibility Exercises For Seniors - The Best Stretches For Seniors (With Pictures)
To make it easy for you to follow a simple routine to stretch out your muscles, I have compiled what I feel are the best stretches for seniors.
Follow along consistently, to start improving that whole body flexibility.
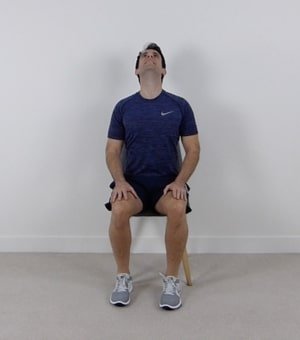
STRETCH 1: NECK EXTENSION STRETCH
HOW TO:
Sitting up tall in your chair with your shoulders back and down.
Bring your head straight back, looking up to the ceiling and going as far back as you feel comfortable. Do not push into any pain.
Hold for the set time.

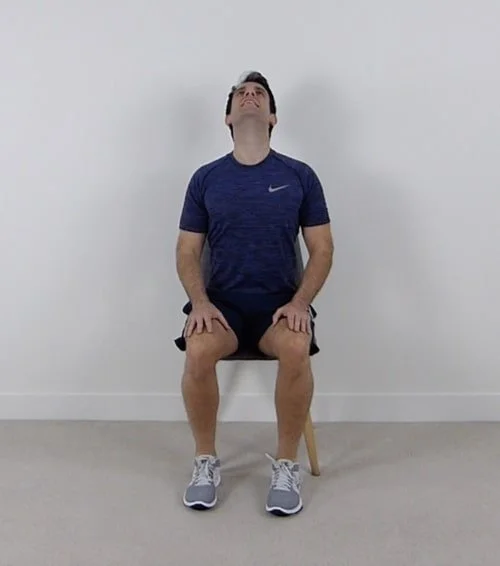
HOLD FOR: 30-60 seconds
WHY THIS IS A GREAT STRETCH FOR SENIORS: All of us spend a lot of our time in a head down tilt, looking at our phones, the ground, a computer screen etc. We don’t spend much time looking up, stretching out the front neck muscles and keeping the neck moving well.
For Video Demonstration of This Exercise: Click here.
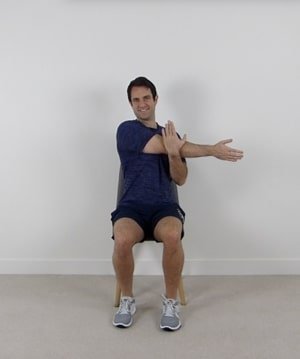
2. STRETCH 2: CHEST (+ POSTURE) STRETCH
HOW TO:
Sitting up tall in your chair with your shoulders back and down.
Place your arms up straight up in front of you, parallel to the floor.
Now bring your arms out to the side, pulling as farm back as you can and squeezing your shoulder blades together, whilst maintaining that upright posture.
If you have difficulty holding your arms at 90 degrees (or parallel to the floor) you can hold your arms lower (45 degrees).
Hold for the set time.

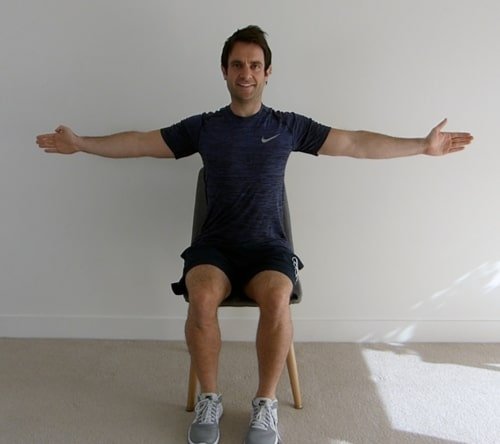

HOLD FOR: 30-60 seconds
WHY THIS IS A GREAT STRETCH FOR SENIORS: A great stretch to help open up the chest and improve posture.
For Video Demonstration of This Exercise: Click here.
STRETCH 3: THORACIC EXTENSION (UPPER BACK) STRETCH
HOW TO:
Sitting up tall in your chair with your shoulders back and down.
Now place your hands behind your head, maintain an upright posture and extend your upper back over the chair. (If you have difficulty placing your arms behind your head, place them across your chest).
Hold for the set time.


HOLD FOR: 30-60 seconds
WHY THIS IS A GREAT STRETCH FOR SENIORS: A great stretch for the upper back which also helps with rounded shoulders, improving posture.
For Video Demonstration of This Exercise: Click here.
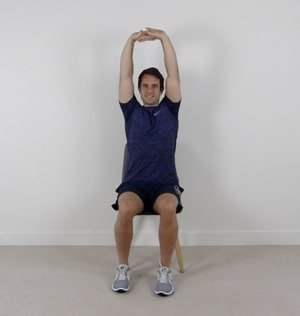
STRETCH 4: SHOULDER & ARM OVERHEAD STRETCH
HOW TO:
Sitting up tall in your chair with your shoulders back and down.
Interlace your fingers and bring your arms up above your head.
Now turn your palms away from you, towards the ceiling and push up as far as you can.
Hold this movement for the set time, feeling the stretch in your shoulders and your sides.
HOLD FOR: 30-60 seconds


WHY THIS IS A GREAT STRETCH FOR SENIORS: A great stretch that utilises the full range of motion in the shoulders, helping to keep them healthy. Also, this stretch, stretches the arms and muscles of the back surrounding the spine.
For Video Demonstration of This Exercise: Click here.
STRETCH 5: LUMBAR EXTENSION (LOWER BACK) STRETCH
HOW TO:
Sitting up tall in the middle of your chair with your shoulders back and down.
Place the palms of your hands in the small of your back and lean your lower back into your hands, feeling a stretch in your lower back. (If you have difficulty getting your palms around to the small of your back, use the backs of your hands).
Hold for the set time.


HOLD FOR: 30-60 seconds
WHY THIS IS A GREAT STRETCH FOR SENIORS: We spend a lot of time in our day in a forward position and also a slouched position when seated. This stretch helps stretch out the lower back in a way we usually don’t. Which helps relieve tension in the lower back.
For Video Demonstration of This Exercise: Click here.
STRETCH 6: STANDING QUADRICEPS (FRONT OF THIGH) STRETCH
HOW TO:
Standing up tall next to your chair, holding onto your chair with one hand.
Bring one leg behind you, holding onto your foot.
Ensure you maintain your straight posture throughout the exercise and try to keep your knees next to each other
Hold for the set time and change legs.


HOLD FOR: 30-60 seconds
WHY THIS IS A GREAT STRETCH FOR SENIORS: Although a more difficult stretch, this is a great stretch to stretch out the large muscles at the front of the thighs which commonly become tight. This exercise can also be done in side-lying, on a firm bed, if standing is too difficult.
For Video Demonstration of This Exercise: Click here.
STRETCH 7: HIP FLEXION (BUTTOCKS) STRETCH
HOW TO:
Sitting up tall with your shoulders back and down.
Lift one leg up to your chest, bending at the knee, and hug the leg.
Hold for the set time and change legs.
Ensure your shoulders are back and down throughout the exercise.
Hold for the set time and change legs.

HOLD FOR: 30-60 seconds
WHY THIS IS A GREAT STRETCH FOR SENIORS: A simple stretch to stretch out our buttocks, which can hold a lot of tension.
For Video Demonstration of This Exercise: Click here.
STRETCH 8: STANDING (OR SEATED) HAMSTRING (BACK OF LEGS) STRETCH
HOW TO:
Sitting up tall in your chair, shuffle to the front of your chair
Keeping your hands on the opposite leg, place one leg out in front of you
Now keep your leg straight and point your toes towards the ceiling
Ensure you remain upright with a straight back and lean forward at the hips
Hold for the set time and change legs.


HOLD FOR: 30-60 seconds
WHY THIS IS A GREAT STRETCH FOR SENIORS:
For Video Demonstration of This Exercise: Click here.
For Video Demonstration of This Exercise in Standing Position: Click here.
STRETCH 9: STANDING ADDUCTOR (GROIN) STRETCH
HOW TO
Standing tall, take one large step out to the side and face your toes outwards.
Shift your weight to one side, bending that knee.
You will feel a stretch on the inner thigh of the straight leg.
Keep a chair in front of you when performing this exercise.
Hold for the set time and repeat on the opposite leg.


HOLD FOR: 30-60 seconds
WHY THIS IS A GREAT STRETCH FOR SENIORS:
For Video Demonstration of This Exercise: Click here.
STRETCH 10: STANDING CALF (BACK OF LOWER LEG) STRETCH
HOW TO:
Standing tall holding on to your chair with both hands, step one foot back making sure your toes are facing forward throughout the exercise.
Now bring your front knee towards the chair ensuring that your heels remain in contact with the floor at all times.
Hold for the set time and change legs.


HOLD FOR: 30-60 seconds
WHY THIS IS A GREAT STRETCH FOR SENIORS:
For Video Demonstration of This Exercise: Click here.
Stretching Routine For Seniors | A Complete Program
Here is a static stretching routine with the best dynamic stretches to help you improve your flexibility.
I have also created other stretch videos you can follow to help improve your flexibility. Here is an Upper Body Stretch Video (click to access) and here is a Lower Body Stretch Video (click to access).
The Best Dynamic Stretches For Seniors - Dynamic Stretche Routine For Seniors
Here is a dynamic stretching routine with the best dynamic stretches to help you improve your flexibility.
Dynamic Stretches For Seniors
Stretching Exercise Videos
For more stretching videos click each video below or here for more.
4 - OTHER FACTORS TO CONSIDER
Mindfulness and Improving Flexibility.
Before we finish up this guide, there is another important, and often neglected, part of improving flexibility (and our health) which I wanted to touch on.
That part is working on our mental health! Or, in simpler terms decreasing the stress, we are under.
Our mental health has a great impact on our physical self. There is a strong connection between our bodies and our minds, and more and more people are starting to recognise this!
Scientific studies clearly show a strong correlation between stress and inflammation.
Conditions such as anxiety and depression, which generate high levels of stress are known to cause a biological response, elevating stress hormones and causing inflammation in our bodies.
Muscle tension causes the joints to stiffen up, making it more difficult to stretch, exercise and move altogether.
Working on minimising our stress levels by avoiding high-stress environments and taking time out daily to work on mental well-being, can do a great deal in improving your health and flexibility.
Through my continual learning of health and practice as a Physiotherapist, the more I see of the importance of eradicating stress for good health, through whichever way possible.
I also believe every one of us should practice a form of mindfulness to get on top of our stress levels and into good health.
Even something as simple as spending an hour a day doing the things you love, or spending time with people that make you feel good, can greatly affect your mood and help with reducing stress.
Once you manage to keep the stress levels under control or find a way to eradicate it, you’re going to be causing much less tension in your body.
With less tension comes that feeling of lightness, greater ease of movement, greater flexibility and the many other health benefits that come along with this.
As with the exercise, start incorporating a mindfulness practice into your life, and stay consistent. :)
ENDING NOTE
You now have ALL the tools to regain your flexibility.
There is a lot here to take in and do, but keep it simple, stay consistent and always keep progressing. These are the keys to success.
Don’t overcomplicate it, or overwhelm yourself by doing all the stretches you can in the thought of “more is better”! It’s not!!
Choose one of the full-body stretching videos and add it into your regular exercise routine.
Or, start by choosing the area you want to improve first and work on that.
Remember, movement is medicine. So when you get moving more and add in 10-20 minutes of stretching each day, (or at least three days a week), it won’t be long before you start seeing big improvements in your flexibility.
You’ll feel yourself moving around much easier in your day to day life and any pain you had easing up.
You’ll be able to reach for items in those hard to reach places.
You’ll start to see all of the many benefits that come with improved flexibility.
You’ll start feeling like a younger version of you!
Stay positive on the journey to a fitter, healthier and more flexible you.
Stay happy!
And keep on moving and stretching!
It won’t be long until you’ve regained your flexibility, and more!
Further references:
4. Smith, E.L. Exercise in the elderly to prolong and improve the quality of life. In: Future Directions in Exercise and Sport Science Research.J.S. Skinner, Et Al. Champaign, IL: Kinetics, 1989. pp. 259–266. 5. Adrian, M.J. Et Al Flexibility in the Aging Adult. In: Exercise and Aging: The Scientific Basis., eds. Hillside, NJ: Enslow, 1981. pp. 45–47. 6. Anderson, B., J.E. Beaulieu, W.L. Cornelius, R.H. Dominguez, W.E. Prentice, and L. Wallace. Flexibility. Natl. Strength Cond. Assoc. J. 10–22, 71–73. 1984.7. Heyward, V.H. Advanced Fitness Assessment and Exercise Prescription. (2nd ed.). Champaign, IL: Human Kinetics, 1984.9. Buccola, V.A., and W.J. Stone. Effects of jogging and cycling programs on physio- logical and personality vari- ables in aged men. Res. Q. Exerc. Sport. 46(2):134–139. 1975. 15. Medicine ACoS ACSM's guidelines for exercise testing and prescription. 7th ed. Baltimore: Lippincot Williams Wilkins; 2006 
Learning For a Sharper Mind & To Improve Memory!
It's Never Too Late To Learn Something New!
Remember this line, when you want to try something new and stop yourself!
“Everything that you can see happen in a young brain can happen in an older brain. The only requirement is that the person must have enough of the reward, or punishment, to keep paying attention through what might otherwise be a boring training session.” If so, the changes can be every bit as great as the changes in a newborn.“ ` Norman Doidge - The Brain that changes itself
importance of a sharp mind for seniors
It's Never Too Late To Learn Something New!
Remember this line, when you want to try something new and stop yourself!
I feel it’s very important to always be learning and trying new things, no matter your age!
Each year I always plan to try a new activity/skill and get reasonably good at it… My last was rock climbing, which you all know what happened with that :).. But I don’t plan to stop setting goals to try something new each year!!
Learning something truly new with good focus can keep your minds sharp.
It will allow you to lay down new memories and have a system that can easily access and preserve the older memories.
So along with the exercises, if you aren’t already… Why not learn a new skill which will sharpen up the mind?
It’s been shown that learning a new language, although not so easy, is great to sharpen up the mind.
I’ve always wanted to be bi-lingual, so I think my next goal is to become conversationally fluent in Italian.
Or why not learn a NEW dance. Notice I emphasise “NEW” …. Just doing the dances you learnt years ago won’t help your brains motor cortex stay in shape, so get moving with a NEW dance! (I’d make dance videos………….. but I’m yet to get good at dancing) 🕺😀
There are A TONNE of new hobbies out there you can try (and If you have any ideas for the group, post them below)
Don’t think those days are behind you.. Or that you can’t do it. You can!! Know that it's never too late!
“Everything that you can see happen in a young brain can happen in an older brain. The only requirement is that the person must have enough of the reward, or punishment, to keep paying attention through what might otherwise be a boring training session.” If so, the changes can be every bit as great as the changes in a newborn.“
Find something you’ve always wanted to do and do it! :)
Is there something you’ve always wanted to learn? Are you learning something new at the moment? Or do you have any ideas for new hobbies/skills? Let me know! 👇
[Reference: “Brain That Changes Itself - Norman Doidge]

Calcium in Older Adults: How Much Calcium Should You Get?
Calcium is a mineral seen in high amounts in... Yep, you guessed it! Our dairy products (our milk, cheeses and yoghurts).
Calcium is important for healthy bones and healthy teeth. It also plays a crucial role in other bodily systems, such as our nervous system and the proper functioning of our muscles.
Calcium is important in the role of falls, to keep our muscles strong, help us move more efficiently and keep our bones strong.
FIRST PUBLISHED: 03/05/2019. LAST UPDATED: 03/7/2022
How Much Calcium Do SENIORS Need?
Calcium is a mineral seen in high amounts in... Yep, you guessed it! Our dairy products (our milk, cheeses and yoghurts).


Calcium is a mineral seen in high amounts in... Yep, you guessed it! Our dairy products (our milk, cheeses and yoghurts).
Calcium is vital for healthy bones and healthy teeth. It also plays a crucial role in other bodily systems, such as our nervous system and the proper functioning of our muscles.
Our average weight is made up of about two per cent calcium. This calcium is primarily found in our bones and teeth. The rest is stored in our blood and tissues.
Low calcium intake is linked to osteoporosis, a low bone density condition most commonly seen in post-menopausal women.
It’s clear we are not getting enough calcium. Over half of the Australian population, aged two years and over had inadequate intakes of calcium.
This prevalence of inadequate calcium intake was higher amongst females than males, with almost three in four aged two years and over (73%) not meeting their calcium requirements compared with one in two males of the same age group (51%). [1]
Calcium is important in preventing falls, keeping your muscles strong, helping you move more efficiently and maintaining your bone strength.
HOW MUCH CALCIUM SHOULD OLDER ADULTS GET
According to the National Health and Medical Research Council, our recommended dietary intake (RDI) of calcium should be:
Women 50+ and men 70+: 1300mg/day
All other adults: 1000mg/day
WAYS TO GET MORE CALCIUM IN YOUR DIET
It is much better to get calcium from foods than from calcium supplements. Be guided by your doctor about whether you need additional supplements. As with any minerals, too much calcium can cause health issues.
CALCIUM-RICH FOODS
Milk, yogurt, cheese, canned salmon or sardines which contain bones rich in calcium, broccoli, mustard cabbage, Bok Choy, silverbeet, cucumber, celery and chickpeas
If you find it hard to get adequate doses of calcium, a natural way to get calcium is using a food product that you may dispose of regularly. That is eggshells.

Eggshells are a rich source of calcium carbonate (a form of calcium commonly found in dietary supplements); they also have a little strontium and some other bone-protective nutrients.
Using eggshells as a calcium supplement involves crushing the eggs into a fine powder. TO FIND OUT HOW TO MAKE EGGSHELL POWDER, CLICK HERE.
Ensure you are getting calcium-rich foods to improve your health, decrease falls risk and keep your bones strong. But make sure to not overdo it.
References:

Exercising Your Brain 🧠/ Memory Exercises for Seniors
We all know it’s important to exercise our body, to keep ourselves functioning well, but do you exercise your brain? 🧠
When we stick to brain exercises consistently, the same changes that occur in a much younger brain (even a newborn brain), when learning something new, can occur in an older brain.
Memory exercises for seniors - improve your memory & increase brain function
We all know it’s important to exercise our body, to keep ourselves functioning well, but do you exercise your brain? 🧠
I wanted to share a great website to get you exercising in a different way, backed with real research and created by neuroscientists.
It has easy to follow FREE exercises to help keep your brain sharp.
Here it is: www.brainhq.com.
There are courses that can improve the following
Focused attention
Increased brain speed
Memory
Alertness
Efficiency for everyday tasks
And even hearing
When we stick to brain exercises consistently, the same changes that occur in a much younger brain (even a newborn brain), when learning something new, can occur in an older brain.
Also, in a study performed on people undertaking the memory exercises on this website (aged between 60 and eighty-seven). After completing the exercises for 8-10 weeks, many turned back their memory clock ten or more years. Some 25 years.
I had a go at the exercises this morning, and it was kinda fun!
Sign up and have a go yourself and let us all know how you went. They also have an app which can be downloaded to your phone or tablet.
Another great way to keep our brain sharp is by learning a language.
What ways do you exercise your brain? You can let us all know in the Facebook Community.
Are Ankle and Wrist Weights Safe For Seniors?
long with dumbbells and resistance bands, ankle and wrist weights are also helpful for improving our strength.
Wrist weights make strengthening the upper body easier for those who have trouble gripping a dumbbell, or a resistance band. This may be due to weaker hand grip or decreased hand function (whether from arthritis or other conditions affecting the hands).
Additionally, unlike dumbbells which can only be held in our hands, ankle weights can be attached to our ankles. This allows us to add resistance to our knee and hip exercises which will assist in improving our leg strength.
However……..
Ankle & wrist weights - are wearable weights safe for seniors?
In the previous weeks, we looked and using dumbbells and resistance bands to improve strength and fitness.
On the topic of using dumbbells and resistance bands, I wanted to let you know my verdict on some others commonly used exercise equipment, that being wearable weights.
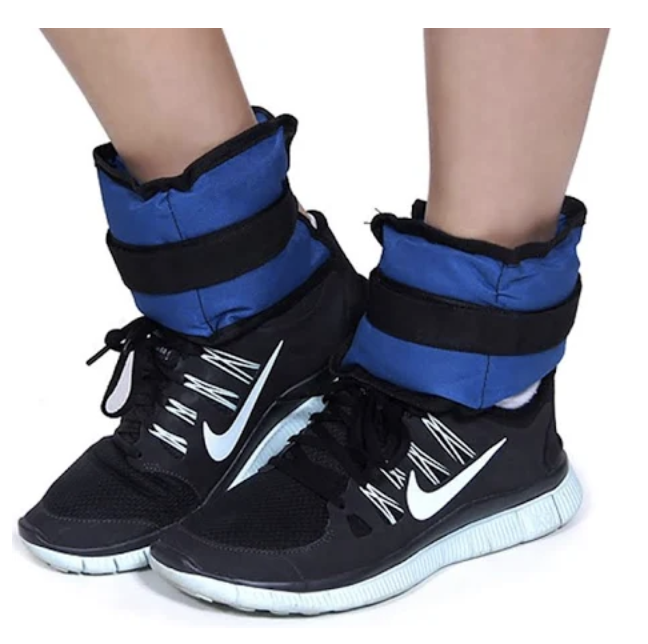
The most common types of wearable weights are ankle weights and wrist weights.
They look like this:


These weights usually start at 0.5kg and can go as heavy as 10kg (roughly 1 - 20lbs) and strap around our wrist or ankles with velcro.
Along with dumbbells and resistance bands, ankle and wrist weights are also helpful for improving our strength.
Wrist weights make strengthening the upper body easier for those who have trouble gripping a dumbbell, or a resistance band. This may be due to weaker handgrip or decreased hand function (whether from arthritis or other conditions affecting the hands).
Additionally, unlike dumbbells which can only be held in our hands, ankle weights can be attached to our ankles. This allows us to add resistance to our knee and hip exercises which will assist in improving our leg strength.
However, we don't want to be using the ankle or wrist weights beyond strengthening.
You may have seen people using wearable weights around their ankles or wrists when they are going for a walk or a jog, or maybe seen people carrying small dumbbells in their hands when doing this.
Wearing weights in this situation is not such a good idea!
Although it makes the exercise more challenging and by doing this we burn more calories, when wearing wrist and ankle weights (or carrying small hand weights) whilst walking or jogging, we tire faster. This puts more strain on our body, increasing the risk of injury.
When wearing these weights when going for a walk or a jog, our normal pattern of movement changes, putting extra strain on our joints, again leading to a greater risk of injury.
Additionally, wearing wrist and ankle weights can alter our centre of gravity and also cause us to fatigue much faster, which may affect our balance, increasing our falls risk.
IN SUMMARY
Wrist and ankle weights (along with dumbbells and resistance bands) are a helpful tool in improving strength and also fitness with certain exercises.
We should always start with lighter weight/resistance and slowly progress the amount as we continue to get stronger (and fitter).
However, using wearable ankle or wrist weights to perform continuous or cardiovascular exercise should be avoided for potential risks.
Always check with your doctor before beginning with any form of strength training.
Have you ever used ankle or wrist weights? Have they helped you in any way? You can let me know by pressing the reply button.
Components of Fitness - Part 1: Health
This week I wanted to get you thinking about the different components of your fitness which will improve your health and just make everything much easier.
Click in this article to see the different areas of fitness you can be working on:
I want to get you thinking about the different components of your fitness which will improve your health and make everything much easier.
Here are some ways to work each component:
1. Cardiorespiratory Endurance- Walking, jogging, swimming, dancing or riding a bike. By improving your cardiovascular fitness, you'll be able to perform more activity without shortness of breath.
2. Muscular Strength - Strengthening exercises, lifting weights or walking stairs. By improving your strength, daily activities such as carrying shopping bags, walking stairs and even standing up will be much easier.
3. Flexibility/Mobility - Stretching exercises, mobility exercises, yoga or foam rolling. With more flexible muscles and mobile joints, we can move as we should and help prevent any injuries.
4. Muscular Endurance - High repetitions with strengthening exercises, dancing, swimming, rowing. When we feel what's commonly referred to as 'lactic acid' build up in our muscles, this is our muscles fatiguing. When we improve our muscular endurance, we'll get less muscle fatigue for each activity.
When we are consistent with all of the above components of fitness ( and eating healthy), our body composition will improve.
I cover all components of fitness for health in my exercise videos. So pop on a video and get moving, or add some of the ideas above into your week.
Have fun with it!
Continue to Part 2: Components of Fitness For Skill

The Pain Series: Part 4 - Overcoming Pain
“Pain is an opinion on the organism's state of health rather than a mere reflexive response to injury. The brain gathers evidence from many sources before triggering pain”
~ Leading Neuroscientist - V.S. Ramachandran
In the last article of ‘The Pain Series' (Part 3: Managing Pain) we had a look at different ways to manage our pain.
We also identified that in chronic pain we must go beyond managing pain and look to overcome it.
In this article, we are going to do exactly that! I'm going to give you the tools to start overcoming your pain!
PART 4: OVERCOMING PAIN
"Pain is an opinion on the organism's state of health rather than a mere reflexive response to injury. The brain gathers evidence from many sources before triggering pain."
~ Leading Neuroscientist - V.S. Ramachandran
In the last article of 'The Pain Series' (Part 3: Managing Pain), we had a look at different ways to manage pain.
We also identified that in chronic pain, we must go beyond managing pain and look to overcome it.
In this part, we are going to do exactly that! I'm going to give you the tools to start overcoming your pain!
Now, in the majority of cases, pain can be overcome by stopping what is aggravating the area and by strengthening areas of your body that are weak and unstable, and improving mobility in areas that have tightened up.
However, sometimes improving your movement through strengthening and mobility work is not enough, and the pain still exists. This is when more is needed beyond exercises, which we will cover in this part.
Some of these tools presented here to start overcoming your pain may sound outlandish. You are probably going to be thinking, “how can something like this work?”.
It goes against everything you know about pain! And it really does take a new way of thinking.
But if you truly want to OVERCOME your pain, it’s time you put any scepticism aside and do what’s set out in this article.
We've seen in Part 1 and Part 2 of this email series that pain is different from what is traditionally believed, so it's time we take a different approach to overcome it!
From now on, your health becomes your priority, and it's up to you to make this happen!
Most of the steps to be healthy and overcome pain take an active approach. There is no magic pill, no cream, no heat pack, no new massage technique, or no new gadget.
No doctor or pill is going to make you get up and move more. No doctor or pill is going to put healthy food in your mouth and not let the bad stuff in. No doctor or pill can make the required changes in your life for the better.
If you really want to be pain-free, although a Doctor or another Health Professional can guide you, it's up to you to do the necessary work to be a happier, healthier you!
It does take some daily work, but it's work not only for overcoming pain but for better health and all the benefits that come with it. A stronger, healthier body. A less stressed, healthier mind. Moving better, looking better, feeling better and getting more out of each day!
When you start seeing improvements in all areas of your life, you'll see the worth in it.
Now, let’s get into it.
STEP 1: SHIFTING OUR VIEWS AND FOCUS
To do this, as we touched on earlier, we must shift our focus away from the pain and any 'abnormalities' we may have and shift it towards our health and wellness.
OVERCOMING PAIN TOOL # 1: CHANGING VIEWS ON PAIN
The first step in overcoming pain is changing the way we view our pain.
Here are eight new beliefs to hold, which will help you see your pain in a different light and help overcome it.
EIGHT NEW BELIEFS ON PAIN
My pain CAN be overcome.
To be pain-free, It's up to me!
Pain is formulated in my brain, not where I'm hurting most.
What is seen in medical imaging is NOT the cause of my pain.
If I'm hurting, it does not necessarily mean I am doing damage to my body.
Avoidance of activity is not the answer.
Pain is NOT a normal symptom of ageing.
It's NOT the end of the road.
Thus far, in 'The Pain Series' Articles, we've learnt that we CAN be pain-free with osteoarthritis or other physical 'abnormalities'.
We've also learnt that to overcome our pain; it's up to ourselves to do this!
We've debunked the commonly held belief that when there is pain, it's due to some underlying physical injury or 'abnormality'.
We now know that pain comes from the brain, is NOT the result of what is seen on medical imaging and the underlying 'abnormality' is the weakest part of our body where the pain is showing up.
If we think our pain is coming from the site of 'abnormality' and there's not much that can be done about it, it makes sense to think the pain is always going to be there.
By knowing pain comes from the brain, we free ourselves from the fear of thoughts such as "I will always be in pain because my (insert abnormality) will always be there".
Another commonly held belief that keeps us stuck with our pain is that if we are in pain, we must be doing harm, or damage, to our body.
When pain comes from the brain and NOT the area of 'abnormality', we can safely say that when we are hurting, it does not necessarily mean we are doing damage to our body.
By viewing pain in this way, we can stop avoiding any activities due to pain and the associated fear of 'doing damage'. We can begin progressive activity and get ourselves moving the best we can, which is exactly what our body needs!
In chronic pain, avoidance of activity is NEVER the answer. (This will be discussed in a later section of this article).
And finally, we should never put anything down to 'ageing'.
There IS a large correlation between age and pain and many other physical ailments (I.E., decreased strength, decreased balance, falls, etc.), but 'ageing' is never the cause.
No matter how old you are, your pain can be overcome, and you can get in great physical shape. It is not the end of the road.
When we change our views on our pain by installing these eight new beliefs, we can then do what's required to start making progress with our pain and improve our health.
DAILY TASK: Write down the eight new beliefs of pain. Really think about, and feel, each belief when you are writing them down. (Time to complete = 5 minutes).
"Mary Fasano at age 89, earned her undergraduate degree from Harvard. David Ben-Gurion, the first Prime Minister of Israel, taught himself ancient Greek in old age to master the classics in the original. At ninety the architect Frank Lloyd Wright designed the Guggenheim Museum, at seventy-eight Benjamin Franklin invented bifocal spectacles. When Pablo Casals the cellist, was ninety-one years old, he was approached by a student who asked, "Master, why do you continue to practice?" Casals replied, "Because I am making progress." We might think "What for?" Who am I fooling? Am I at the end of the road? But that thinking is a self-fulfilling prophecy, which hastens the mental decline of the use-it-or-lose-it-brain."
~ 'The Brain That Changes Itself' - Norman Doidge
Pain is not something you "just have to live with". It's never too late to overcome your pain, get fit, get healthy and be excited about the future. Which is exactly what we will do in Overcoming Pain Tool # 2.
OVERCOMING PAIN TOOL # 2: MOVING FOCUS AWAY FROM PAIN TOWARDS HEALTH, WELLNESS AND A FUTURE THAT EXCITES YOU.
It can be much easier to focus on what's wrong in our life or the health conditions that we have.
Especially when we are in pain, everything going well in our life takes a back seat.
We can be so affected by our pain that our daily life begins revolving around it.
We can have thoughts that arise, such as "this pain is only going to get worse", or "the condition is going to get worse", or "there is not much that can be done", or “This pain may end my ability to walk.
We may also have heard stories of someone going through suffering, or even worse seen a loved one, such as a parent, go through suffering. We then may fear the same will happen to us.
We start to see our future as looking grim.
We may lose motivation; we can become less happy, start moving less and stop doing what's required to be healthy. All recipes for pain getting even worse.
But, this all stops, NOW!
An important key to health is having a future that looks exciting to you, no matter your age or what condition you find yourself in. And the good news is... How your future can look is up to you!
In this step, we are going to start planning how you want your future to look and just by doing this; you set yourself in the right direction to make it happen!
Right now, no matter where you are, no matter how much pain you are in, or how your health currently is, start thinking about how you want your future to look.
Allow yourself to move your focus away from the pain you have and to think of what life could be like without pain.
Think about what would make you happiest, what you would like to do, how you would like to move, how you would like to feel. What activities you'd like to do or keep doing.
Allow yourself to let go of any fears you may have about your future and start getting excited about the things you want to be doing.
Last week a reader, Marilyn, wrote to me and said: "I am a very active grandmother of 5 very energetic grandchildren. I attend the majority of their sports events all year. I live in a two-story home with lots of stairs and continue to do all of my own yard work. It is all so much fun, and I want to be able to continue with this lifestyle for many years to come."
I love this! And Marilyn will be doing these things for many years to come.
These are the type of activities we want to be keeping our focus on, whilst keeping our focus away from any fear-based future.
We are changing our focus away from the pain and instead focusing on where we want to be.
We then do the work to keep us in good health and moving towards where we want to be!
No matter what situation you find yourself in, you can focus on a better future. If you’re stuck, start small and keep it up!
GRATITUDE

Another way of changing focus away from pain and to the good in life is to be grateful.
You can be grateful for anything. Your husband/wife. Your children. Your grandchildren. Your television. The computer you are reading this on. The glass of water you just drank. The chair you are sitting on. The sun. The air you just breathed. Just being alive. I could go on and on. Everyone has something to be grateful for, find them
Each day lets think about 3-5 things to be grateful for and write them down. When writing them down, make sure you feel the feeling of gratitude.
DAILY TASK: 1) Change your focus - Do your best to focus on the good in your life now and how you would like it to look in the future. Write down how you would like your life to look. What you would like to be doing. How you would like to feel. How you would like to move.
As you write it down, spend time feeling what it would feel like if this was to happen. Whenever your thoughts move to the negatives in your life, do your best to bring it back. (Time to complete = 5 Minutes)
2) Write down three-five things you are grateful for (Remember to feel the feeling when doing this). (Time to complete = 3 Minutes)
There we have the first two tools for overcoming pain for the first step in overcoming pain; we now move to step 2.
STEP 2: FREEING FROM STRESS
We have now established healthier beliefs about pain and have moved our focus towards living a life that would make us happier.
It's now time to analyse our current situation and decrease the stress in our life, which we know can intensify our pain symptoms.
Which leads us to...
OVERCOMING PAIN TOOL # 3: CHANGING YOUR SITUATION
In Parts 1 and 2 of these Pain Series articles, we established that increased stress causes and intensifies, our pain experience.
Which means a necessary step to decreasing our pain, to eventually overcome it, is to remove stress in our life.
This could be physical. I.E. you continue to re-aggravate the area by doing too much physical activity of some sort on the area (for example too much golf), on an area which could already be weak. If you feel this is the case, it’s best to see a Physiotherapist in person. Or sign up for an online 1:1 consultation to get to the bottom of your pain.
Or it could be emotional stress.
There are many reasons why stress can show up, and because we have all lived, and are currently living, different lives to each other, it shows up for different reasons in each of us.
It's up to YOU to find the reasons for your stress and do what is necessary to change your situation.
There could be a certain someone bothering you. The place you live may be causing you stress. You may not be happy with your current state of health and/or fitness. Your hobbies, or work, could be causing you stress. The situation you have found yourself in could be bothering you, or the thought of just crossing a busy road could be making you feel uneasy.
These are all a handful of examples of stress we could be dealing with, and they are all stresses we technically can do something about.
If the stress is something physical, you can stop the activity causing you pain. This will allow the body tissues to heal and you can get yourself stronger and moving better before you get back into the activity.
If the stress is emotional, you can stop seeing that certain someone causing you stress. You can change locations. You can get healthier and fitter, you can change your job, change your hobbies or stop crossing that road.
Although it's never usually this easy, I'm highlighting the fact that certain actions can be taken in most situations.
To begin removing stress, one of the first things we should do is an audit of our life and find what it is that is bothering us.
Once we know this, we can then go about doing what is necessary to start freeing ourselves from this stress, which will help decrease any pain you have and help to live a happier life.
Sometimes the decisions we need to make to decrease our stress are NOT easy, but we must remember to put ourselves first always. When we begin putting ourselves first, we become much happier, more energised and can give more to others also. It is not selfish!
You'll notice that when you start the audit of your life to determine your stress, you'll find there will be certain parts of your life, causing you stress that you just cannot change. Change is just not an option for these parts.
We can't change the weather, we can't change the past, we can't change human nature, we can't change other people, we can't change our relatives, sometimes we can't change where we have to live.
We must recognise these parts of our life and make peace with them or how we see the situation. This is where the other forms of stress relief techniques come in.
We will get to these other stress relief techniques in the next overcoming pain tool, but for now, it's time to remove the stress in our life by changing that which we can.
DAILY TASK: Spend 20 minutes today (and 10 minutes on following days) writing down a list of things in your life that is causing you stress (both physical and emotional) and also come up with ways that you could change them. Each day start making the changes to begin living a happier life. (Time to complete each day = 10 minutes).
OVERCOMING PAIN TOOL # 4: JOURNALING

So now we've begun changing our situation to decrease stress, it's now time we work on reducing our inner conflicts, which again... Is stress.
We all have so much going on in our lives: Our relationships, our health, our kids, our grandkids, the bills we have to pay, our money, our jobs, our hobbies, our worries, our triumphs, our joys. This list could go on.. And on!
Not all of these are bad, but having a lot of dis-ease going on can wear us down. It's not possible to remove all these stresses. Otherwise, we'd live a pretty dull life.
Having so much to deal with leads to a constant chatter in our minds that we usually just ignore and get on with it.
We have this extra mental weight without really even knowing it, living our life on autopilot.
One of the best ways I have found to silence the underlying buzz in our minds, with ease, is journaling.
Journaling can do wonders for decreasing stress in our daily life. It can shine a light on what it is that is bothering us and show us that whatever it is, really doesn't need to be a concern.
When we do this consistently, we decrease the amount of stress we hold onto and increase our ability to handle any new stress that comes our way.
HOW TO JOURNAL
Each day write down, in longhand, anything and everything that crosses your mind for a set amount of time. Do not overthink it; just do it for the set amount of time.
The only rule is to make sure ONLY YOU will see it!
You must be able to freely write about what's on your mind. Your honest and deep thoughts, without fear of judgment. As soon as we feel someone else may see what is written down, this task loses its effectiveness.
The thoughts are yours and for your eyes only.
When you create a safe space and can express your mind on the page freely, you'll be surprised at what you uncover about your current situation and yourself.
No matter how crazy it is, no matter how silly it may be, only you are going to see what you're writing... So get it out, get it down!
When you get in the routine each day of doing this, you will begin feeling the journaling as a healing tool and your stress levels decreasing — a way of expressing certain feelings and stresses that have been bothering you for some time.
If you're feeling sceptical about doing this, just give it a try for at least ten days and see the difference.
Like most health-related tasks, to get the benefits, consistency is the key.
DAILY TASK: Write down, in longhand, whatever is on your mind. Get into the habit of doing this daily. Keep your diary private, they are your thoughts and no one needs to see them. This will help you process thoughts and feelings that could be getting you down. (Time to complete = 10 minutes).
OVERCOMING PAIN TOOL #5: MEDITATION/ MINDFULNESS
I've covered meditation and mindfulness before because I really do feel it is one of the most important tools in keeping ourselves healthy.
Although the thought of meditating may not sound very fun, it does not have to be a boring, very disciplined practice.
Think of meditation as spending a set amount of time, with intention, on doing something good for yourself, to help reduce stress. That's it! It's that simple.
Meditation/mindfulness plays a significant role in helping with pain for two reasons:
1. Meditation can help with the pain symptoms directly by increasing relaxation - which will help desensitise the nervous system increasing our resistance to stress and the way we deal with it which in turn will help decrease pain.
2. The majority of us tend to think negative about most situations or place high expectations on ourselves, causing our own stress. This may sound a little confusing, but the happier we feel about the world and ourselves, the less stress we are under.
By quietening the mind for a while, we can let go of troubling thoughts and even process suppressed emotions from our past, which may be currently troubling us.
These suppressed emotions and troubling thoughts add to the pain experience.
When we stay consistent with meditation, over time, we'll find ourselves getting more and more relaxed and able to deal with daily stress.
With this new sense of relaxation, you'll start feeling less and less pain.
Here is the meditation technique I recommend (click to see)
VISUALISATION
Similar to what we did in Tool #2 (Changing focus), when meditating spend a few minutes focusing on feeling how you would rather feel instead of being in. What it would feel like to be pain-free. What you would be doing if you weren’t in pain. Your mind is going to resist, but do your best to allow your mind to go there.
Our minds don't know the difference between what is real and what is imagined. So start training your brain to remember what it feels like to be pain-free, which will help to start changing your brain
DAILY TASK: Spend 10 minutes each day performing the meditation/mindfulness technique above with 2 minutes of that being visualisation. (Time to complete = 10 minutes).
Start adding all these tools into your life each day. When you are consistent with these tools, you will be on the right path to overcoming your pain.
SEEK PROFESSIONAL HELP
If you are having trouble with the tools above, or you are continually reliving painful memories that you just can’t seem to get over, it may be best to seek out professional psychological help. Do NOT feel any shame in this.
A trained professional can help you process these memories and emotions, and this will do wonders in helping you overcome pain. Speak to your doctor about a referral for this.
STEP 3: LIVING A HEALTHY LIFE

To finally overcome pain, one of the most useful things we can do for ourselves is to change our habit to more healthy ones
In today's modern society, it's quite easy to become a slave to all the new technology making it harder and harder to display the willpower to do more of what keeps us healthy.
What most of us seem to neglect is that some of these helpful tools we use nowadays can sometimes do more harm than good.
With a click of a button, we can have all sorts of different, often unhealthy foods delivered right to our doorsteps: not just foods, but appliances, furniture, clothes etc. We can binge-watch our favourite TV shows for hours without ever leaving the couch.
We can work from home, without actually ever leaving bed.
A vast majority of people get tangled in these enchanted routines that go on for a lifetime.
How many people do you know personally that start their day by having nothing but coffee, driving to work, sitting in front of the monitor for 9 hours straight, getting takeaway on their way back and staring at the TV before they head to bed?
And this can go on and on and on, until one day we realise that we've spent months, years and decades nurturing these unhealthy habits.
Scary, right?
Yes, a lot has changed in our lives since years ago. Not that I'm saying that we should go back to living in caves and hunting wild animals, but it's imperative to find a suitable balance that will allow us to maintain a healthy lifestyle.
We've sacrificed a lot over the years: nutrition, physical health and perhaps most importantly - sleep. All habits that can cause more pain.
Which brings me to our next tool in overcoming pain.
OVERCOMING PAIN TOOL #6: GETTING THE PROPER AMOUNT OF SLEEP.
First and foremost, let's get something settled - sleep is NOT for the weak.
Sleep is one of the most crucial and by far the most under-appreciated tools for living a healthy life. It affects not only our physical health but our mental and emotional health also.
Our body needs sleep to recover and regain its energy, and if we neglect it, which all of us are guilty of doing, the results can be frightening.
Not getting enough sleep can affect us in all kinds of different ways. Our hormones change. Our mood is affected, we become irritable and cranky and forgetful; our balance is off, so we have an increased risk of falling and causing an injury; our digestion suffers and not to mention that all of our pain symptoms intensify from a sensitised nervous system.
All people, regardless of their age, should aim to get 7-9 hours of good, quality sleep. The range differs from person to person, of course, and you need to figure out how much sleep you need to feel well and rested.
There are plenty of things you can do to improve your sleep WITHOUT using any kind of medication.
You can read my article on improving sleep for seniors right here to find out more.
We should never try to skimp on certain aspects of our life - sleep being one of them. (Unless we have to).
Start making good quality sleep a priority. Buy those quality pillows, invest your money in a good mattress, and why not treat yourself to top-notch linens? Invest in your health.
Once we get all the elements right (comfort, lighting, temperature, sound, etc.), we can finally experience the fruitful properties of sleep on our bodies and our pain levels.
Allow your body to heal and rejuvenate, and you'll notice the drastic changes it has on your overall health and your pain.
DAILY TASK: Don’t underestimate the power of a good night’s sleep. Start making it a priority and do whatever it takes to start getting a good night’s sleep. Start by reading my sleep article here. Make your sleep environment the most comfortable it can be. Set a time you plan on going to bed and stick to it. (Time to complete = 7-9 Hours).
Now that you've learned how sleep can affect your pain, let's get onto the next step you should take in overcoming your pain.
OVERCOMING PAIN TOOL #7: HEALTHY EATING
As I mentioned earlier, unhealthy, processed food is much more accessible than real, healthy food. Not to mention that in a lot of cases, it tastes better!
I'm not suggesting that you need to suppress the urge to eat some chocolate every now and then or refrain from a nice glass of wine when you want it.
However, eating a healthy diet plays a huge role in our pain experience; thus, we should aim to eat healthy each day.
Now, there are plenty of foods, herbs and spices that research has shown (and people swear by) for pain relief. They do contain some healthy and anti-inflammatory properties.
But it's not about finding a magic food or diet; it's about starting to eat in the healthiest way you possibly can, to get healthy and decrease your pain symptoms.
To get started learning about proper nutrition and eating healthy, check out the Healthy Eating section on this website which will help get you started.
You can also ask any questions in the More Life Health Facebook Support Community (click to join).
Everyone has different food requirements and needs. I recommend paying a visit to a dietician or good nutritionist so you can work together in creating a diet suitable for yourself.
DAILY TASK: Head to the Health Eating section of this website, and learn and do what’s required to start eating a healthier diet. Begin by throwing out any junk foods that are not good for your health and causing you pain. (Time to complete = 1 hour) and then start adding in the healthy foods.
Now onto the last step for overcoming pain:
OVERCOMING PAIN TOOL #8: GET MOVING
Physical movement is a basic human need, and today we tend to overlook this
It's far too easy for us to stay inactive, and our comfortable lives are very hard to leave behind.
However, limiting our movement can have serious consequences. As a result, our muscles tend to get smaller and weaker, and we become less fit. What used to be an easy activity for us is now getting harder. We may become out of breath easier and feel our muscles fatiguing with less work.
Our joints start to stiffen up, and our body gets out of shape, placing more stress on our bodies.
It affects us both mentally and physically, and to combat pain, we must start moving more!
Movement is medicine.
The best way to implement more movement into our lives is by gradually increasing exercise but making sure we aren’t overdoing it.
Start with little amounts and gradually progress what you are doing over time.
Building a strong, healthy, fit body takes time, so it's important not to push yourself over the limits and to take it slow. Implementing a regular, slow-paced workout routine will do wonders for your body, and you can make improvements regardless of your age or current situation.
You will start getting stronger, and more flexible, and you will feel fitter, notice you are moving with greater ease, you will begin feeling a sense of confidence and power over your situation and….. you’ll feel your pain symptoms decreasing.
The trick is to focus on doing the activities we enjoy and remembering the healthy beliefs we formed way back in step 1.
"Just because we have pain doesn't necessarily mean we are doing damage".
and
"Resting is not the answer."
The answer lies in consistent exercise with slow, gradual progression while implementing all other steps and tools into your daily life.
Never push yourself into pain. If you're pushing into pain, you've done too much.
If you have trouble designing your own routine, you can always seek help by signing up for an online consult, or you can simply shoot me an email, and we'll work it out.
I also send out regular exercise videos to newsletter subscribers (join below), and there are plenty of exercise videos on the exercise section of this website and the YouTube page.
Making big improvements in pain to eventually overcoming it takes time. It is never usually a smooth road, and setbacks most probably will occur. But the goal is to always look forward, keep a positive frame of mind and, over time, do more and more exercise.
DAILY TASK: Spend at least 30 minutes to 1 hour every day doing some form of physical activity. Do one of my exercise videos here. You don't have to join a gym to exercise! Take a stroll through a park, go for a swim or walk around the neighbourhood. Find what you enjoy!
Do something that you enjoy doing and start looking forward to an active future. (Time to complete = 30 minutes - 1 hour).
OVERCOMING PAIN TOOL #9: SPENDING MORE TIME WITH PEOPLE YOU ENjoy AND DOING THINGS THAT MAKE YOU HAPPY!
Another step I'd like to touch on is spending more time socialising.
As we grow older, we tend to become more self-oriented. We drift apart from certain people, lose connections, and lose our loved ones. All of this can lead to isolation and being less social.
This is why I'd like to take a few moments and talk about loneliness and the importance of socialising.
There are plenty of studies confirming that loneliness and pain are closely connected. Loneliness can affect your health in many areas.
Many people who tend to isolate themselves for prolonged periods of time can experience symptoms of anxiety and depression, which are known to cause further emotional and physical problems.
Other than that, it's reported that being less social can lead to muscle tension, inflammation, migraines, insomnia, digestive issues and an overall weaker immune system.
Humans are, by nature, social beings, and we thrive when surrounded by people we love.
And while it's perfectly normal to have some me time and to focus on our physical, mental and spiritual health, it's just as important to socialise every so often.
Of course, some people are introverted by nature and don't require the company of others as much as other extroverted individuals. Nevertheless, even introverts should make an effort to get involved in some social activities every now and then. It may be unnatural, but when you make the effort, you will feel much better for it.
Spending quality time with people you enjoy spending time with can do wonders for your pain - both emotional and physical.
Also, start doing more of the activities that you know make your heart happy! Just do it! These activities are what make you who you really are!
DAILY TASK: Each day, spend time interacting with others you really enjoy hanging around. Laugh. Have fun. Chat. Get things off your chest.
Reach out to your loved ones and spend time with the people whose company you enjoy. Start making a conscious effort to be more involved in social activities that fulfil you. Join the More Life Health Facebook Support Community (click to join).
Start filling your days with more activities that make you happiest. You know what those activities are, so do what it takes to get involved in more of them. (Time to complete - minimum 1 hour).
Make sure not to overdo this. Like exercise, make sure to start with small amounts of time and build on this.
CONCLUSION
These steps above are the roadmap to overcoming pain. Yes, they do take time, but your health is worth the time and effort.
By following these steps, you will create a routine that will set you on the path to ending your pain and better health.
There may be times when your pain increases in intensity, making completing many of these activities difficult.
If you do have one of these flare-ups in pain, it does not mean you have gone backwards. It could be for many reasons you have had the flare-up, but know this flare-up is only temporary.
During these times - rest, take pain medication as needed (as per your doctor) and utilise any other of the pain management techniques discussed in Part 3.
The pain WILL decrease eventually, and when the pain is manageable, you can get back into the tools mentioned in this article. Slow and steady!
When you continue doing all the steps in this article, eventually, you will reach your goals and finally be able to break the shackles of pain that have been tormenting you for some time now!
All the best on your journey to a pain-free, happier life- you will get there! :)
FURTHER READING
Here are some books I recommend on pain, which will allow you to see your pain in a different light and help you overcome it.


The Pain Series: Part 3 - Managing Pain
Pain is a feeling that presents in areas of physical weakness in our body, caused and intensified by certain stressors/factors (cultural, biological, environmental, psychological and social) that sensitise our nervous system.
With this new definition of pain and knowing what is seen on medical imaging is not the cause of our pain, we are now in a much better position to start tackling pain to overcome it.
So let’s get started... With managing pain!
THE PAIN SERIES - PART 3: MANAGING PAIN
In Part 1, Pain is More Than Meets The Eye, we established that pain was formulated in the brain, it is not a normal symptom of aging and each and every one of us could be and should be, pain-free.
In Part 2, The Real Cause of Pain, we saw that what is seen in medical imaging is not the cause of our pain, and we then redefined pain.
That definition being:
Pain is a feeling that presents in areas of physical weakness in our body, caused and intensified by certain stressors/factors (cultural, biological, environmental, psychological and social).
With this new definition of pain and knowing what is seen on medical imaging is not the cause of our pain, we are now in a much better position to start tackling pain and eventually overcome it.
So let's get started... With managing pain!
MANAGING PAIN
Pain IS important.
Normal or acute pain (pain that lasts less than 6-12 weeks) is our body's warning signal. It is alerting us to disease, or injury, or telling us that we may be overdoing something… "You're hurting here, now do something about it!"
When we listen to this signal, we can prevent serious injury and do what's required to restore our body to functioning as it should.
Take, for example, when we sprain an ankle. Our body alerts us to the pain, and we do what needs to be done for the injury to get better.
Once we start doing the right things, mainly staying off the area, the body will begin working its healing magic, and we are going to get improvements in our pain, until it heals up.
When the pain is bothering us, we use our pain remedies, as needed, because there is no reason to put up with the pain longer than we have to.
We also do the right exercises, and in due time we are back to where we were, feeling well, and doing the things we love again.
It’s a little different for chronic pain (pain that has been around longer than 6-12 weeks).
In chronic pain managing pain still has its place. We do what's required to get relief from the pain.
However, we need a different approach beyond these pain management techniques to overcome our pain, for good (which we will cover in the next section, part 4).
For now, let’s look at how we can manage pain.
WAYS TO MANAGE PAIN
There are many, many ways to manage pain.
Some examples are: Heat packs, heat rubs/creams, cryotherapy (ice), herbal remedies, TENs (Transcutaneous Electrical Stimulation), ultrasound, acupuncture, vibration machines, yoga, pilates, exercises, massage, cupping, stretching, meditation, hypnosis..... the list goes on..... and on.
And we all have our different remedies to manage pain.
I asked this question in the More Life Health Facebook Community (click to join), and it has been one of the most popular posts to date.

As you can see, we all have different remedies for pain.
I also have pain management remedies which I feel work best for patients also!
The treatment techniques I commonly use for pain management in patients are heat (especially in the colder months) and massage.
In my years of experience, I've found these treatment techniques seem to have a good effect on most people, compared to other techniques.
But what works for some, doesn't work for others.
I've had some patients say that certain creams work wonders, certain herbs work wonders, TENs machine works wonders. Or maybe it's ultrasound working wonders. For other patients, these have had zero effect.
Therefore, when managing pain, the key is to find what remedy works for you and in times when you’re in pain, use these remedies!
THERE IS NO NEED TO SUFFER!
CHRONIC PAIN REQUIRES MORE
We've established that pain management techniques are important in getting pain under control.
But with chronic pain, we need to do more than just manage pain.
Pain management treatments should NEVER be the only approach.
And this is where most people get stuck.
Most people think that with a certain condition, for example arthritis, that they are always going to have the associated pain and that pain management techniques are the only way to deal with it
Pain gets accepted as a part of ageing and something that just has to be dealt with.
This is NOT true!
From Part 1 and Part 2, we established that pain comes from the brain, and we saw that what is seen on medical imaging is not the cause of pain.
Chronic pain CAN be overcome. But to do this, a different approach to what is commonly done is needed.
This includes……
Changing focus towards improving health and away from any 'abnormalities' that may be present.
Identifying and eliminating anything that could be aggravating the pain.
Identifying and fixing any strength and mobility issues in the body.
Moving more, eating healthy and caring for the body.
Dealing with troubling emotions from the past and present.
Being kinder to oneself and ensuring your health and happiness becomes number one priority.
We will cover the strategies for overcoming pain in further depth in the next part (Part 4)
And this is exactly how you begin overcoming pain.
Little by little, you start feeling better, looking better, moving better and start feeling in control.
Pain is decreasing AND health is improving.
Little by little, your pain symptoms start disappearing, until gone for good!!
UP NEXT: CLICK FOR PART 4: OVERCOMING PAIN

The Pain Series: Part 2 - The Real Cause of Pain
This Article is the second article of the Pain Series which leads on from Part 1: Pain is More Than Meets The Eye
In this article (Part 2) we'll uncover more about pain, why medical imaging findings (Eg osteoarthritis) are not the cause of chronic pain and I’ll then explain why we actually get pain in certain areas of our body.
PART 2: THE REAL CAUSE OF PAIN
In Part 1 of the Pain Series, titled "Pain is More Than Meets the Eye" we covered the complexity of pain, phantom pain (pain that occurs in limbs that aren't there) and watched a 5-minute video that explained what pain REALLY is, in a way that's easy to understand.
By the end of the article we had established that pain was formulated in the brain, it is NOT a normal symptom of ageing and that each one of us could be, and should be, pain-free.
In this part, we'll uncover more about pain, why medical imaging findings (e. g., osteoarthritis) are not the cause of chronic pain and I'll then explain why we get pain in certain areas of our body.
MEDICAL IMAGING FINDINGS DO NOT EQUAL PAIN
When we are in chronic pain (longer than 6-12 weeks), medical imaging (X-rays, MRI, ultrasound, etc.) is what's most commonly used by Doctors to identify what the cause is.
Medical imaging can identify many physical 'abnormalities' and the majority of the time these ''abnormalities'' are then identified as the cause of pain.
It's a common belief that a scan is going to uncover the cause of chronic pain.
Unfortunately, although this belief is common, holding this belief is where many issues towards overcoming pain start and become a detriment to any progress.
Thinking your pain comes from a physical 'abnormality' (such as degeneration/arthritis) shown on a scan, can lead people to believe that their pain cannot be overcome if this physical 'abnormality' is always going to be there.
But to begin overcoming chronic pain, medical imaging findings need to be taken with a grain of salt.
Medical imaging is great to find any ''red flags" (i.e., something serious) but imaging does very little in explaining the cause of chronic pain.
In some cases, the images can pick up all types of physical ''abnormalities'', we can be riddled with joint degeneration (osteoarthritis) and yet have NO pain.
And in other cases, images can show we have no ''abnormal'' findings or minor degeneration (osteoarthritis), and yet have excruciating pain.
There is a large amount of evidence that suggests that the “abnormalities” found with medical imaging are not causing pain.
Let's look at some of this evidence: (Click the links to see the study)
Study 1: On Spine Degeneration in Populations With No Symptoms:
In this study, imaging findings of degeneration in the spine are present in high proportions of individuals WITHOUT any pain (or other symptoms), increasing with age.
This study concluded that many imaging-based degenerative features are likely a part of normal ageing and unassociated with pain.
Study 2: On The Discordance Between Clinical and Radiographic Knee Osteoarthritis
In this study, up to 85% of adults with no knee pain, had x-rays showing arthritis.
This study concluded that radiographic knee osteoarthritis is an imprecise guide to the likelihood that knee pain or disability will be present.
Study 3: On The Association of Hip Pain with Radiographic Evidence of Hip Osteoarthritis
This study showed that hip pain was NOT present in many hips with radiographic osteoarthritis.
This study concluded that hip pain is discordant with radiographic hip osteoarthritis
Study 4: On The Pattern and Prevalence of Lumbar Spine MRI Changes
In this study of 1043 random volunteers, forty percent of individuals under 30 years of age had lumbar spine degeneration (arthritis), with the prevalence of lumbar spine degeneration increasing progressively to over 90% by 50 to 55 years of age.
This study demonstrates how common lumbar spine degeneration is, without pain.
This study showed that it is just as common to have NO PAIN in the presence of these “abnormalities” seen on medical imaging.
Here is a graph that summarises the findings.

Percentages of pain versus no pain were similar for all. Including osteoarthritis (cartilage damage).
These are just five studies I picked from a large amount. There are plenty more studies out there proving this.
It's clear that medical imaging is never going to show your pain.
It can't!
So you may be thinking, “if physical 'abnormalities' seen on medical imaging are not what causes pain, then what causes it?”
THE REAL CAUSE OF PAIN (& ARTHRITIS)
Pain is..... A feeling.
A feeling that presents in areas of physical weakness in our body caused and intensified by certain stressors/factors (cultural, biological, environmental, psychological and social factors).
As we age, we have been exposed to and can take on, more stress over the years, explaining the higher incidence of pain in seniors.
Arthritis is often used to refer to any physical disorder that affects the joints.
The most common type of arthritis is osteoarthritis (OA), where the softer cartilage in our joints can wear, leading to the bones moving closer together.
Arthritis is usually associated with pain, but can also cause stiffness and may limit your ability to move around freely.
Osteoarthritis increases in prevalence as we age. It is common in the knees, hips, spine, shoulders, elbows and fingers, and is usually the areas of weakness for most seniors.
When pain shows up in areas of weakness, it's usually going to be the areas of arthritis. (It is not uncommon for pain to move around in people if a new, weaker area is to present).
Arthritis is not the cause of pain; it's a weak area where pain MAY show up.
By knowing this, we can begin to make progress.
YOU DO NOT NEED TO BE FREE OF ARTHRITIS TO HAVE NO PAIN.
If you could be pain-free, move the best you have in years, yet still have arthritis identified on scans, would your arthritis still be an issue?
YOU CAN BE PAIN-FREE WITH ARTHRITIS
The first step is to shift your focus away from pain and the associated 'abnormalities' and towards wellness & health.
Healthy body, healthy muscles, healthy joints and a healthy mind.
We'll cover more in PART 3, where we look at managing pain and in PART 4: overcoming pain.
Click here for Part 3 - Managing Pain

The Pain Series: Part 1 - Pain Is More Than Meets The Eye
Everyone has their remedies that help MANAGE chronic pain, which do have a place and I could easily just mention a few which may help. However, to OVERCOME pain a different approach is needed.
This 3 part series of articles is my answer to the pain questions I get and the different approach that is needed.
I'll put everything I know about pain into these articles to not only help you manage pain, but also help to overcome it.
PART 1: PAIN IS MORE THAN MEETS THE EYE
When I meet new people and they find out I'm a Physiotherapist, it's almost as if I've said: "tell me all about your different aches and pains!"
Wherever I am, when people know what I do, they'll usually start talking about their pain and ask for advice on it.
It comes with the territory of being a Physio.
I do, however, have a fascination with pain. Obviously not being in it, but studying it further in my spare time. So I don't mind hearing people's stories of pain.
I usually hear many similar stories, or pain patterns, between people. But specific stories, especially ones I heard at the beginning of my career, really intrigued me.
A story that stands out is one told by a pain researcher in my early university days. This story was about a man with excruciating hand pain.
Doctors could not find a cause of this man's pain, but it was clear to them this pain was real.
He tried everything to stop the pain in his hand, and everything he tried came to no avail.
Eventually he couldn't handle the pain any longer and desperately wanted it gone. He was so desperate that he went on the hunt to find a surgeon who would amputate his hand.
After going to many surgeons who declined, finally, he found one who agreed to the surgery.
Not long later, the surgery was complete, and his hand was now gone.
Some time post-surgery and after all healing had taken place, you'd think the pain would now be gone, right?…………. Wrong!
The same pain, at the same intensity, still existed in this man's hand….. A hand that now wasn't there.
This is not a one-off story, this type of pain is not uncommon in people who have had limbs amputated and it is a type of pain known as Phantom Pain.
This was one story of many that piqued my interest. I heard many more stories and saw many pain-patterns in patients, which demonstrated to me there was something more to pain than meets the eye. Pain wasn't just something physical.
This is what lead me to study pain in greater depth.
When most other Physiotherapists were studying different massage techniques or something similar, I took courses and read books on pain and the brain.
So when people now ask for advice on their pain, you could say that I'm the right person to answer this question for them.
However, giving an answer is never straightforward.
Most of the time, it's not the acute pain people are wanting advice for. Acute pain is pain after an injury or a health ailment that lasts only a short amount of time.
It's usually pain of the chronic type they are asking about. Pain that lasts longer than 6-12 weeks.
And chronic pain is complex.
I mean, everyone has their remedies that help MANAGE chronic pain, which do have their place, and I will go through them in Part 3 of this series. However, to OVERCOME pain, a different approach is needed.
This 4 part series of articles is my answer to the pain questions I get and the different approach that is needed.
I'll put everything I know about pain into these articles to not only help you manage pain but also help to overcome it.
To get started, here is a short video by the New South Wales Government.
This video explains pain a lot better than I could in 5 minutes.
Click to watch and learn below.
UNDERSTANDING PAIN

The case of chronic pain
This is an excellent video educating on what pain really is and how to deal with it.
It is targeted toward younger people in chronic pain; however, do NOT be deterred by this.
Everything mentioned in this video still applies to those of all ages.
Now that’s it for Part 1 of The Pain Series. In finishing this part, I want you to remember this:
PAIN IS NOT A NORMAL SYMPTOM OF AGING.
IT IS POSSIBLE TO BE PAIN-FREE.
UP NEXT:
In PART 2, we’ll see how this new model of pain relates to seniors, with reference to a specific common pain-related condition (arthritis).
In PART 3, we’ll cover ways to manage pain. And….
In PART 4, we'll cover ways to overcome pain, for good.
CONTINUE TO - PART 2 - THE REAL CAUSE OF PAIN.

Decreasing Stress and Relaxation Made Easy!
It is important, to improve our health, that we are doing what we can to decrease stress.
But many of us have a hard time letting go of our stresses, so I want to help!
I feel the best way to decrease stress, calm the mind and be more present is through meditation.
FIRST PUBLISHED: 27/05/2018. LAST UPDATED: 4/7/2022
A QUICK TECHNIQUE FOR SENIORS TO REDUCE STRESS
It is important to improve your health and decrease your falls risk, that you are doing what you can to reduce stress.
Meditation is the best way to decrease stress, calm the mind, and be more present.
Meditation doesn't have to be a very disciplined, monk-like practice.
Think of meditation as spending a set amount of time, with intention, on doing something good for yourself to help reduce stress. That's it! It's that simple.
Meditation techniques are growing in popularity and are not just a fashion trend. There is increasing evidence of the benefits of meditation for wellness and other areas of life.
There is evidence that meditation slows the ageing process, decreasing pain symptoms, improving alertness and strengthening our immune system.
I notice I'm happier, more alert and calmer when I meditate. I feel healthier, have more energy, and don't get bogged down by the stresses of my day.
In short, MEDITATION WORKS!
There are many meditations or ways to meditate and relax the mind. It could be as simple as laying in a hot bath and just allowing yourself to relax.
My favourite way is mindfulness meditation (outlined below). But if mindfulness is not for you, find something to minimise the stress that works for you!
Don't neglect the mind's role in improving health. The mind and body ARE connected.
It took me a long time to get into meditation myself to decrease stress. I knew the benefits but just never thought it was for me. Once I began, stayed consistent and noticed results, I got hooked!
Consistency is the key to any meditation practice, and 10 minutes is the perfect place to start.
I recommend 10 minutes of meditation daily to improve your health and decrease your fall risk.
A SIMPLE MEDITATION TECHNIQUE FOR SENIORS:
Here is a meditation technique you can use. Try it each morning, before bed, or when you feel stressed. Give it a try and see how you feel.
Mindful Meditation Steps:
When alert, not sleepy, sit in a comfortable chair with your feet flat on the floor. You don't have to be in the 'legs crossed, lotus, position we commonly see with meditation (diagram below).

Meditation - Lotus position
If you want to sit in this position, by all means, go for it. But it is not required.
Just get comfortable and do not lay down. You don't want to fall asleep.
3. Set a timer for 5-10 minutes of undistracted time. No distractions, with complete focus for the time set.
Start with less time and make it easy for yourself to build the habit. As you stay consistent and start enjoying meditation, you can increase the time. The goal is, like exercise, to build the habit and stay consistent.
4. Sit in silence or play soothing music during your session. A simple Google or YouTube search on "meditation music" can help with this.
5. Now you're ready to go! Start by taking a deep breath all the way in, through the nose and then a deep breath all the way out, again through the nose. Repeat this three times with your eyes open. Allowing yourself to relax with each breath.
6. Now, close your eyes and keep them closed for the rest of the session.
7. Take slower, controlled breaths in and out through the nose. Nice and slow.
8. Focus on these slow and controlled breaths going in and out of your nose. Keep your attention on your breath.
Your mind will wander. Thoughts will arise. This is ok! Run with the thoughts for a while but try not to run away with the thoughts entirely. Do your best to bring your focus back to the body and the breath. Allow yourself to get more relaxed with each breath.
9. Once you start to feel yourself relaxing. Continue your breathing, but now change your focus to your body and how it feels. Starting at the top of the head, slowly move your way throughout the body to your feet. Focusing on relaxing each part of your body as you move through.
10. Repeat this body scan, the slow controlled breathing and continue to allow each part of your body to get more and more relaxed for the time set.
11. Once finished, take this new relaxation into your day and repeat the process daily.
Meditation does not need to be perfect. If you are having trouble, it's ok! Just sit in silence, enjoy the quiet time and try your best to relax. Over time, you will get better!
If you prefer something to listen to and follow along with, there are plenty of apps and guided meditations online, which make meditation simple. To find these, do a google search.
This process will get easier, and you'll notice significant differences in your everyday life if you stay consistent!
Vow to make it a daily habit, and it's only a matter of time before you start seeing the results in many areas of your life!

🥩🥚 Healthy Eating Tip #3: Eat More Protein
Protein is important for every cell in our body. It’s main job is to build and repair tissues.
It’s the building block for muscles, cartilage, skin, bones and blood. It is used to make enzymes, hormones and other body chemicals.
Protein will increase our metabolism. Make us feel more full after eating. It will help us lose weight, build muscle and give us the fitter/more toned appearance (by helping lose weight and build muscle).
Read this article to find out more about protein and how to easily get more protein in your diet.
HEALTHY EATING TIP # 3: EAT SUFFICIENT PROTEIN DAILY!


Before we get into protein in a little detail, we need to take a look at what our food in more depth.
All the food we eat is made up of both macronutrients and micronutrients.
The macronutrients are the nutrients that supply us with energy. There are three macronutrients: Protein, carbohydrates and fats. Macronutrients make up the majority of the food, whatever it is (hence macro).
The micronutrients, on the other hand, are the nutrients only needed in small amounts yet are vital for the proper functioning of our body to maintain health. (These are the vitamins and minerals).
To maintain good health, we must ensure we are getting adequate energy from protein, carbohydrates AND fats, each day, from healthy foods.
These foods should also contain plenty of micronutrients to ensure our body is functioning optimally and are in good health. Some foods are more nutrient-dense than others.
We also want to stay properly hydrated. Our body is 70% water, after all.
These foods should also contain plenty of micronutrients to ensure our body is functioning optimally and are in good health. Some foods are more nutrient-dense than others.
I'll save carbohydrates and fats for later articles. But for now, our thoughts should be shifting towards eating more healthy protein each day.
SO WHAT IS PROTEIN?
When thinking of protein, think of meats, fish, cheese, eggs, milk, beans, nuts and seeds.
Protein is vital for every cell in our body. Its main job is to build and repair tissues.
It's the building block for muscles, cartilage, skin, bones and blood. It is used to make enzymes, hormones and other body chemicals.
Protein will increase our metabolism. Make us feel fuller after eating. It will help us lose weight, build muscle and give us the fitter/more toned appearance (by helping lose weight and build muscle).
Protein is an essential nutrient, especially when exercising and one we must ensure we are getting adequate of amounts daily.
HOW MUCH PROTEIN SHOULD WE BE GETTING?
The Australian Dietary Guidelines recommends that 15-25% of our total energy intake should come from protein, with a daily intake of the following:
The RDI of protein for women aged 19–70 years is 46 grams per day.
The RDI of protein for men aged 19-70 years is 64 grams per day.
Women over 70 should have at least 57g per day.
Men over 70 should have over 81g per day.
However, recent literature has argued that protein intake higher than this may be required to help older adults sustain muscle strength and function into older age.
The European Society for Clinical Nutrition and Metabolism (ESPEN) gives the following recommendations, based on research gathered are made:
1 - For healthy seniors - at least 1.0 to 1.2 g protein/kg body weight/day is recommended.
2- For seniors who are at risk of malnutrition because they have acute or chronic illness, the diet should provide 1.2 to 1.5 g protein/kg body weight/day.
3 - For seniors with sever illness or injury - even higher intake of 1.2 to 1.5 g protein/kg body weight/day may be required.
ESPEN also recommend daily exercise and resistance training to maintain health and muscle strength and function.
Do you feel you are getting enough protein?
HOW TO GET MORE PROTEIN
To make it easier to get the daily requirements of protein. It's a good idea to understand how much of it is in your food.
Using Google's protein calculator, we get the following:
Chicken - 80-gram serve = 22 grams of protein
Lean Minced beef - 80-gram serve = 21 grams of protein
Tuna - 80-gram serve - 24g of protein
Milk - 1 cup = 9 grams of protein
Egg - 1 egg = 6 grams of protein
Nuts - 30 gram serve = 6 grams of protein
MIKE'S HOT TIP: To get your recommended daily intake of protein, aim to get at least one serving of protein at each meal.
The piece of toast, Vegemite and glass of orange juice, is going to need a little protein boost from now on.
If you don't like the sources above, there are plenty more sources of protein including Seafood, turkey, pumpkin seeds, lentils, chickpeas, cottage cheese, other cheeses, quinoa, yoghurt and even oats.
Eating more foods higher in protein will make a big difference in your health and your appearance.
The difficulty with eating more protein, however, is it's much harder to get high protein foods into our diet. They are way less accessible than other foods. But with a little thought and preparation, we can start getting more protein with ease.
Here are some ways to get some extra protein into your day.
IDEAS OF GETTING MORE PROTEIN INTO YOUR DAY:
Eat meat and different cuts of meat to increase your collagen intake.
Eat bone broth. (Click for a healthy bone broth recipe).
Try this protein filled lettuce cup ginger beef recipe. Or this chocolate protein ball recipe.
Have a hard-boiled egg or two as a snack or eat eggs for breakfast- Most of have been known to eat cereal with our milk. Why not switch that cereal for a two-egg omelette, and a side of some fruit! Eggs are nature's multivitamin.
Eat cottage cheese - I love eating cottage cheese as a way to get more protein. Check your health food store for better quality brands.
Swap regular yoghurt for Greek yoghurt - Many yoghurts are full of sugar and additives, switch the cheaper kind of yoghurt for greek yoghurt
Add cheese to your salads or eat them on healthy crackers- I like parmesan, feta, halloumi.
Eat a handful of nuts - My favourite nuts are macadamias. Be careful not to go too crazy.
Add peas to your meals - A serving of green peas can have up to 8g of protein.
Make hummus as a dip or put it on a sandwich- chickpeas are full of protein.
By adding a few of these simple tips to your day, you'll find it much easier to get your daily intake of protein and improve your health.

Sleep Is Great Medicine: How To Get A Good Night's Sleep Over 60
Lack of sleep should NOT be accepted as a symptom of ageing.
Just because you are older, does not mean you should be tired all the time.
High quality, restful sleep is very important to our physical and emotional health and actually one of the most under-appreciated steps we can do to improve it.
FIRST PUBLISHED: 05/1/2018. LAST UPDATED: 11/7/2022
SLEEP TIPS FOR SENIORS
Not Getting a good night's sleep shouldn’t be accepted as a normal symptom of ageing.
Just because you are older does not mean you should be tired all the time.
High-quality, restful sleep is essential to our physical and emotional health and one of the most under-appreciated steps we can take to improve it.
Sleep is essential medicine, and most of us are all guilty, myself included, of neglecting it in some way or another.
There is no change in the amount of sleep you require at any age! We should all aim to get 7-9 hours of quality sleep every night. And doing whatever we can to make sure this happens.
When we get less sleep, we are more forgetful, our mood is down, and we are more irritable (no one wants to hang around a cranky person!). And the risk of falling increases [1, 2].
If that's not enough, it has also been shown that not getting enough sleep is one of the most significant lifestyle factors determining whether or not you will develop Alzheimer's disease.
When we get a good night's sleep, we are happier, healthier, and more alert, any work we do is easier, life is easier, we have much more energy, and we enjoy life much more.
You can make some changes to ensure you get a restful sleep every night.
In this article, I will detail how you can get a good night's sleep each night.
Do your best to implement these strategies below, and you will get into much deeper sleep each night AND sleep for longer.
1. SPEAK TO YOUR DOCTOR TO RULE OUT ANY UNDERLYING ISSUES
Health conditions include frequent urination, chronic or acute pain, arthritis, asthma, breathing disorders (sleep apnoea and snoring), diabetes, osteoporosis, night-time heartburn, or restless leg syndrome (RLS) can interfere with your sleep.
If you feel health ailments are causing sleep issues, speak to your doctor about this and work with your doctor on natural solutions to help you sleep.
2. CREATE THE RIGHT ENVIRONMENT FOR SLEEP
Here are some tips to make your bedroom EXTRA comfortable:
Have a nice comfortable bed.
Keep your room or bed temperature just right – not too hot or not too cold. The ideal temperature for a good night's sleep is around 18 degrees Celsius. For me, this is too cold. Find the temperature which works best for you.
TIP: If you don't have air-conditioning, there are blankets available that can not only cool but also heat your bed. If your partner prefers a different temperature than you, these products can be set to different temperatures on each side.
Ensure your room is as quiet and dark as possible. Cut out any noise best you can and eliminate bright lights.
Keep your room for just bedtime activities. Sleep and .. cuddles!
3. GET THE RIGHT LIGHT
When we think of getting a good night's sleep, we don't usually think of getting adequate sunlight. However, getting outside in the sun, experiencing daylight is very important for health and to get a good night's sleep.
Sunlight helps regulate our sleep and wake cycles, increases our vitamin D levels and lifts our mood.
Sunlight also directly inhibits a vital hormone (melatonin) during the day, allowing it to be produced at night when required.
Melatonin is much needed for good health and the onset of a healthy sleep cycle at night time.
To optimise your melatonin production, spend time outdoors or near sunlight daily. Don't overdo it by getting sunburnt.
Avoid artificial light (those from televisions, mobile phones, tablets, or bright alarm clocks) at least two hours before bed. These items trick our body into thinking it's daytime, suppressing our body's production of melatonin.
Switch off all screens two hours before bed. Read a paperback book or a tablet with no backlight and move that bright alarm clock out of view.
4. OPTIMISE YOUR SLEEP PATTERNS
The best time to sleep is as close to sundown as possible. The best time to wake up is as close to sunrise as possible. Why? Because as the sun goes down, our melatonin levels start to rise.
In today's day and age, getting to bed around this time is very difficult to do. But if you're extra keen to improve your sleep, try to get into a similar sleep pattern each night and go to sleep as close to sundown as possible.
If you're struggling to improve your sleep pattern and are tired during the day. Take naps. I love naps!
Don't ever feel guilty for taking naps or for sleeping, for that matter. Sleep is a natural doctor you go to help restore you. See this doctor more often and for longer.
5. GET ACTIVE AND SPEND MORE TIME WITH FRIENDS AND FAMILY
Getting active and getting social can improve sleep.
Exercise releases chemicals that will help you get a more restful sleep.
And spending time with people you enjoy hanging around can improve your energy levels and mood and is also a great way to keep your activity levels up.
On the other hand, being less social may make you drowsy and feel bored, lonely and lethargic - which affects sleeping patterns.
Getting and staying active and hanging around people that make you feel good will improve your mood, helping you get a good night's sleep.
So get moving more and start seeing those people you enjoy time with more often.
6. EAT HEALTHIER
The healthier you eat, the better you will feel, and your body's systems will work. The better you feel, the better your body works, and the better you will sleep.
I know you don't need any more reminders about the importance of eating healthy but always do your best to eat those foods high in the healthy stuff (more nutrients).
Some nutrition tips to help you get a great night's sleep:
Stay away from too much caffeine, especially later in the day. Caffeine is in coffee, tea, soft drinks and chocolate.
Minimise, or avoid alcohol – higher amounts of alcohol in your system does not allow deep, restful sleep.
Avoid large meals close to bedtime. Your body should be resting, not digesting.
Minimise liquids 60 minutes before bed. This will decrease or negate the need to get up to go to the toilet during the night.
6. REDUCE STRESS AND RELAX MORE OFTEN
Getting your stress levels under control is very important.
If you find yourself worried, anxious or depressed during the day, having difficulty relaxing or continuously thinking about something, you may be under high stress.
Many events in life can cause stress.
Later in life, significant events like retirement, missing someone or moving locations can cause high stress.
Daily worries or stresses can also interfere with sleep at night.
Learn how to let go of your thoughts and worries; by doing this, you will improve your sleep.
You may know I'm big on mindfulness for decreasing stress, and I think everyone should find a technique that will help bring on relaxation. This should be done daily.
When we are more relaxed, it's easier to let new stresses go and look at certain situations differently.
Some ways to decrease stress are:
Listen to soothing music.
Read a book that makes you feel relaxed.
Take the time to relax before going to bed.
Use a relaxation technique (meditation, mindfulness, hot bath - whatever you know works for you) to prepare your body for sleep.
Speak to a counsellor, good friend or family member about what's troubling you.
Set goals to work towards to move your focus to something productive, rather than keeping your focus on your worries.
7. MEDICATIONS
Finally, some medications can affect your sleep. If you've noticed a pattern of sleep issues since starting a new medication, chat with your doctor about this and see what changes can be made.
Medication for sleep should not be taken every night.
Sleeping medication is helpful in some instances, but it is not a long-term solution for helping you sleep.
The long-term solution is finding the cause of why you are having trouble sleeping and eliminating it.
There you have seven strategies to help you improve your sleep. Start making the changes above from today and you'll find your sleep improving ten-fold. Here’s to a good night’s sleep.. Every night!
SOURCES
TO VIEW ALL SOURCES USED IN THIS ARTICLE AND FOR ADDITIONAL RESOURCES, CLICK HERE.

Using Body Weight Scales: Why You Shouldn't Get Caught Up
The bathroom scale, is a quick, easy and accessible way to measure our total body weight.
We kick out the scale from under our bathroom cabinet, press the button on, wait for it to zero, step on them and voila! We’ve got our measurement.
They are a great tool to let us know how much we weigh and give us an idea of any changes in our body weight over time.
But the benefits of the scale stop here! …
Body weight scales, are a quick, easy and accessible way to measure your total body weight.
You move the scale from under your bathroom cabinet, turn it on, wait for it to zero, step on it and voila! You’ve got your measurement.
They are a great tool to let you know how much you weigh and give an idea of any changes in your body weight over time.
But the benefits of these scales stop here!
Body weight scales will give you an accurate measure of our total body weight, but this is all it will give you.
Body weight scales are not a good tracking tool to determine if you are losing or gaining fat!
There are many factors, besides fat gain or loss, that can alter the reading.
From certain foods causing you to retain more, or less, water in your body and muscle building exercises causing you to gain more muscle! (We all know that muscle weighs more than fat).
Let’s look at an example of how a body weight scale reading can misguide us:
Betty is unhappy with the extra fat that has slowly accumulated around her waist. She also hasn’t been very active over the past 6 months, which means her legs are getting weaker.
She finds herself having a little more difficulty moving around and has noticed carrying shopping bags is harder than what it used to be.
Betty dusts off her scales, steps on them and is mortified with what she sees.
She is 4 kgs heavier than she has ever been in her life. She knew she had gained some weight, but 4kgs heavier than she has ever been? Where did this increase in weight come from?
Unhappy Betty decides to do something about her situation.
Betty has made the decision that she wants to get stronger and lose fat.
She begins exercises and increases her activity level.
She cuts out all the junk food she is eating, starts eating a little less and has added some healthier foods into her day.
Betty feels she is doing everything right. (And she is!)
Betty stays consistent and is starting to actually like exercising and weeks have now passed.
Betty is now feeling better. She feels she is moving about much easier and the shopping bags seem lighter again. Betty also feels she looks better.
Betty is happy!
Happy Betty decides to jump on the scales just to confirm what she is thinking is correct!
Uh oh! Betty was thinking the scale numbers were going to be down, but Betty weighs exactly the same. 😟How quickly Betty's mood can change!
How can this be?? All that hard work that Betty has put in over the past weeks and no weight loss to show for it.
Believe it or not, this is not an uncommon scenario! And this is where our motivation may decrease if we don't know better.
Little does Betty know she has lost fat and has re-gained that muscle in her body she once had.
When we start exercising more and eating healthy we lose fat and get stronger. Our muscles grow. Our body composition changes.
Yet the scale can shown no difference. It can even show that we have put on weight, when our goal is to lose it and we are doing the right things.
I see over and over again people getting too caught up in the number.
The scales only show our TOTAL weight. They do not indicate if you are actually losing fat. They do not indicate if you are gaining muscle.
Which is why the scale should NOT be used as the only indicator of results when attempting to lose fat.
Getting your body fat percentage tested by a Health Professional (using body calipers or technology) is a better guide of progress when attempting to lose weight. Even a tape measure can be a better guide of fat lost.
When not having the guidance of a Health Professional to accurately measure our body composition, we can also use other indicators, that usually can't be quantified, to help determine the effectiveness of our fat loss plan.
Other Indicators to Use:
Determine how much better you feel.
Determine how much easier you move around.
Determine if your clothes aren’t hugging your body as much as they used to.
Determine if you look better in your own eyes.
Notice the comments you are getting from other people.
Use these indicators with confidence. Don't let yourself slip into a negative headspace.
Feel good and continue that good feeling. Take a light hearted approach!
Don’t think you have to work really, really hard, doing exercises you don’t like.
Find exercises and physical activity you enjoy doing. When we enjoy the exercises/activity it's never a chore.
Combine this with healthy eating and you’ll start noticing the differences.
You'll start getting all those indicators mentioned above and your weekly body weight measurements will eventually reflect this.
Don’t get caught up in the scale readings!
Be happy, keep active, do the activities you enjoy, stay consistent and eat well.
And the rest will take care of itself.

🍫 Mike's Nutrition Tip #2: Is Chocolate Healthy For Seniors?
The Health Benefits of Chocolate
Chocolate is full of healthy fats, vitamins and minerals. It is an antioxidant rich superfood. Cocoa actually beats other “superfoods”, which you’ve probably seen highly praised in articles or around your health food stores and supermarkets, for antioxidant capacity. Like acai, pomegranate, cranberry and blueberry.

I believe chocolate, (the right kind), is a great addition to any healthy eating plan. 🍫
Me, a Health Professional, telling people it's actually good for health. Sounds a little crazy right?
You're probably thinking: "Isn’t this meant to be a big ‘no, no’ from a health perspective"
Well, in my opinion, it’s not!
Although many other Health Professionals and Exercise Trainers would disagree with me and tell you to stay away from chocolate for your health, I have to say I disagree with this. :)
Unless you tell me you wanted to get an extra skinny bikini body (which I'm yet to hear this in my line of work) I'm not going to tell you to stop eating chocolate!
I’m 100% FOR eating a little chocolate for it’s health benefits... And because it tastes good!
Now, I’m not saying to go crazy on all chocolate you can get your hands on!
Chocolate IS still high in fat and sugar and therefore calories. And eating an excess of calories WILL cause you to put on weight. (It only takes a small amount of chocolate to get a whole lot of calories).
And we want to make sure we are eating the RIGHT type of chocolate.
However…
Chocolate is not the devil of foods which so commonly gets a bad rap, and I could think of hundreds of foods to cut out of your diet for good health. A block of good quality dark chocolate, is not one of them. (See my article on health eating here).
The Health Benefits of Chocolate
Chocolate contains healthy fats, vitamins and minerals (including magnesium, iron, zinc and manganese).
It is also an antioxidant rich superfood. Cocoa actually beats other “superfoods”, which you’ve probably seen highly praised in articles or around your health food stores and supermarkets, for antioxidant capacity. Like acai, pomegranate, cranberry and blueberry.
Being full of healthy nutrients, chocolate has been shown that it can:
Decrease stress and inflammation
Protect against UV damage
Protect from disease fighting free radicals
Potentially prevent cancer
Improve heart health
Improve blood pressure and blood sugar
Improve overall cholesterol profile
Improve cognitive function
And most importantly.. It tastes good and makes us happy! Happiness is health!
So you see there any many health benefits to eating chocolate, which is why I sometimes eat a little every day!
Now as I said, we don’t want to be eating the junk filled chocolate bars, we want to be eating the good quality stuff.
The Chocolate Bar I Recommend:
Dark chocolate is a healthier option over milk chocolate. This is due to the higher cocoa, which means more nutrients and less sugar. The higher the percentage of cocoa the higher the nutrients and the less amount of sugar.
However, this still doesn't mean a good quality milk chocolate is necessarily bad for us!
A great chocolate bar is the Lindt dark chocolate block (70% and up). You can find the one with the right amount of sweetness for you, without being too bitter. Some people like their chocolate very dark!
If you don't eat dark chocolate because you prefer milk chocolate, it may take some time to adjust to it.
I recommend this chocolate because there are no added chemicals or other unhealthy ingredients which don't need to be in our chocolate. It is simply cocoa, sugar, cocoa butter and vanilla. All natural ingredients. (This may be different in other countries, so check this if not in Australia).
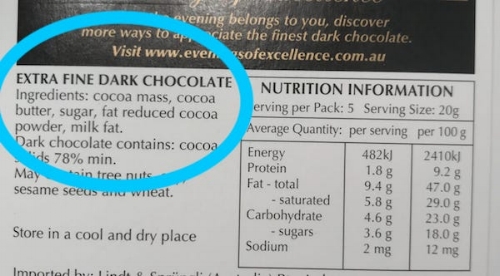
Lindt 78% Chocolate Bar Ingredients.
There are other great bars out there also, but why I recommend the Lindt bar is because it is very easy to get hold of. I think every supermarket sells it.
These bars are a little more expensive than other chocolate bars, because cheaper ingredients aren't used, but it's worth the little extra price for your health.
I am one to crave chocolate and I eat two pieces usually a day.
So in summary, it’s ok to eat good quality chocolate, don’t go overboard and enjoy life! :)

🐄 🐮 Mike's Nutrition Tip #1: Butter or Margarine?
Butter has been a staple for centuries, with Margarine coming into popularity in recent times.
It was once thought that saturated fat was a bad choice for heart health. With butter being mainly saturated fat, this food was seen as the devil with margarine being seen as a "healthy alternative."
Butter or margarine? - Seniors nutrition tips
Something I love just as much as exercise..... food.
Studying different ways of healthy eating is something that interests me. I like studying it, I love helping people eat healthily, and I like eating healthy myself.
By making the right food choices, you can improve your health, lose weight, increase your energy levels as well as look and feel better!
To kick off my nutrition tips, I'm going to speak about which of the yellow spreads, butter or margarine, that we love to spread thick over our toast, we should choose.
This idea came a week ago when I opened a staffroom fridge and saw this:

Now you may be thinking, "what is the big deal with this margarine spread, and why did Mike write an email about it?"
Using butter or margarine can be quite a confusing topic. Especially when you see the healthy hype spread (pun intended) all over the labels of each.
Which leads me to:
Mike’s Nutrition Tip #1:
Choose butter over margarine (or similar spreads).
Let me explain why I wanted to write this email to you and why I'd choose butter over margarine...
Always.
Here's why:
Butter has been a staple for centuries.
In recent years, it was thought that saturated fat was a bad choice for heart health. With butter being mainly saturated fat, this food was seen as the devil with margarine being seen as a "healthy alternative."
Many people and professionals will still support this.
However, this has been debunked many times and it has been shown that saturated fat is protective. We need saturated fat for good health!
The Difference Between Margarine and Butter:
Margarine was created to replace butter and is a highly processed food.
The main ingredient in margarine is vegetable oil (something I recommend to stay well clear of), along with many artificial ingredients such as emulsifiers, colours (margarine is actually an off grey colour before the colours are added) and flavours. (To learn more about this click here)
Let’s look closer at the ingredients on the margarine in the staffroom fridge and another I found at the supermarket.

Margarine #1: Ingredients

Margarine #2: Natural Butter Flavour 🤢
Notice the amount of ingredients and all the numbers. This is the case with almost any margarine you pick up.
Why I Don't Like Vegetable Oil Based Spreads:
Vegetable oil is liquid at room temperature and because of this, margarine is often hydrogenated to make it harder and to extend the shelf life. Hydrogenation turns some of the vegetable oils into trans fats (THE BAD STUFF).
Why I Like Butter:
Butter on the other hand isn’t processed. It is made by churning the fatty part of a cow’s milk until it turns into butter. It is FULL of vitamins and minerals and then usually some salt and water is added.
It's also tastes a whole lot better.
Let’s take a look at the ingredients of some butters:

Butter A: Ingredients: Organic cream, sea salt, water

Butter B: Ingredients: Cow's milk, Salt
As you can see only 2-3 ingredients compared to the long list of ingredients in the margarine.
Remember: The fewer ingredients in your food and the more natural the ingredients are, the better the food is going to be for you.
The ONLY Advantage of Vegetable Oil-Based Spread:
There is one and only one (minor) advantage of the primary ingredient being vegetable oil and a reason why some people prefer margarine: it is easier to spread.
For this reason, some of the labelled “easy spreadable" butters have vegetable oil added to them to make it softer. Some vegetable oils you may see added to your butter could be canola oil, soybean oil, sunflower oil or just "vegetable oil.
Keep a lookout for this and stick to the butters without vegetable oils.
The butter I eat: any GRASS-FED BUTTER (butter from cows who eat grass).
Choose grass-fed because the cows are eating what they should be eating.
Healthy Cow 🐮. Healthy Butter. Healthy You. 😊
To learn more about healthy eating - click here.

The Guide to Stronger Legs For Seniors
(INCLUDES : THE BEST LEG STRENGTHENING EXERCISES AND STRONGER LEGS WORKOUT VIDEO)
With stronger legs comes many benefits; we move well and effortlessly, we can decrease or prevent pain in our knees and our hips and we can help prevent falls.
In this article, we will cover why it's possible to increase leg strength regardless of age, how all of us should be moving to keep our knees healthy and how you can strengthen your legs to keep yourself moving as you should and by doing this decreasing or preventing knee pain!
(Includes: The Best Leg Strengthening Exercises and STRONGER Legs Workout Video)
With stronger legs comes many benefits; we move well and effortlessly, we can decrease or prevent pain in our knees and our hips, and we can help prevent falls.
Regardless of your current physical capabilities, keeping your legs strong and moving as well as you can is essential.
When our legs start getting weaker, life is much, much harder.
Whether you feel your legs are fine with no strength loss and are doing everything you have always done but want to keep it that way or improve your strength even further. Or, you're in the opposite situation, can feel yourself getting weaker, and even the simplest of tasks are causing you trouble. Either way, this article will be of great help to you.
In this article, we will cover why it's possible to increase leg strength regardless of age, how all of us should be moving to keep our knees healthy and how you can strengthen your legs to keep yourself moving as you should and by doing this decreasing or preventing knee pain!
CONTENTS
WHY IT'S POSSIBLE TO IMPROVE LEG STRENGTH AT ANY AGE & DECREASE PAIN
Most of the changes (losing muscle bulk and/or reduced strength) are NOT caused just by our bodies undergoing the natural ageing process. The majority of change occurs due to lack of use.
We do less physical activity, and we stop using the muscles in the way we used to. The activities that keep our muscles strong. Leading to smaller and weaker muscles.
2) Pain in the knees, with or without osteoarthritis, can be helped and prevented by changing the way we move and by strengthening our legs.
If you are feeling down because you have been told you have osteoarthritis, I want you to put this diagnosis aside for a while.
Although osteoarthritis and pain usually come together. Osteoarthritis is NOT the cause of pain. You can have osteoarthritis and be pain-free, many, many people are.
So, let’s not focus on what we can’t change (the arthritis diagnosis) and focus and correct what we can change (the way we move and our leg strength).
Changing these factors has been proven to decrease strain on the knees, preventing the worsening of joint wear and tear and helping and/or reducing pain symptoms. [1]
So, what if we focused on correcting your movement patterns, allowing the body to move as it should? And, what if we also strengthened weak muscles in our legs?
We'd decrease the strain on our knees, preventing any further pain or preventing pain altogether! We would also find knee exercises much easier and less painful! We'd also strengthen our legs, decreasing the strain on our knees and making everything we do in life much easier.
There are other factors we can change to decrease knee pain symptoms, such as: losing weight, choosing softer surfaces over harder surfaces when walking (to decrease shock absorption through the knees), wearing better shoes (with shock-absorbing soles) and wearing knee supports (to provide warmth and give confidence).
But to make real, lasting changes, we must move correctly and strengthen our legs! This goes for everyone. Even if you have no pain, by learning the techniques in this article, you will learn how to improve your movement and increase your leg strength, preventing any pain that could occur.
The first step:
MOVING CORRECTLY TO DECREASE OR PREVENT PAIN
In our day-to-day lives, we perform certain movements but give little to no thought to how we perform them. This is fine. This is how movement should be.
But when we perform the movements incorrectly, over time problems can arise.
Bad postures, awkward, repetitive, and incorrect movements put a strain on our muscles and joints, the knee being a joint which can take on the brunt of the excess strain.
Common incorrectly performed movements that place excess strain through the knees are kneeling, squatting or even the simple task of standing up!
We can improve these movements by making a few changes. By doing this, you'll be minimising the strain placed through the knees each day which will relieve pain or prevent pain and allow you to perform exercises as they should to strengthen the legs.
AVOID THESE MISTAKES WHEN STANDING UP
We stand up and sit down many, many times during the day and therefore throughout our life. From the couch, from a chair, from the toilet, and so on.
Standing seems like such a simple task, and it should be. However, it's commonly performed in a way that puts a lot of stress through the knees.
The most common mistake seen when standing is incorrect knee alignment (knees moving in). Like this:

Incorrect Standing 1: Sitting with knees facing in.

Incorrect Standing 2 - Knees coming inward when standing, not inline with toes.
What we see above is usually the result of weak hips and glutes (buttocks).
Knees coming in is more common in women. Women have a wider pelvis and are usually told from an early age to sit with their knees together, "sit like a lady". This sitting pattern is repeated day in, and day out for life, to the point it becomes the normal way to sit and stand.
With these factors combined, we see an imbalance in our inner and outer thigh muscles. Our inner thigh muscles become overactive with weaker outer thigh muscles (hip and buttocks).
The above way of standing puts a whole lot of strain on our knees because we are not moving our bodies in their natural alignment.
This is not only the case when standing up, because of these muscle imbalances, we are putting excess strain on our knees repetitively in different amounts when we walk upstairs, jog, kneel and even walk on the flat.
There is less force through our knees when walking on the flat over jogging or walking upstairs, but small repetitive forces over a lifetime add up!
CHECK YOUR STAND
Before we check if we stand with our knees coming in, let’s see what normal standing looks like. Knees should be in line with toes and remain like this throughout the stand. (See pictures below).

Correct Standing 1: Knees inline with toes.

Correct Standing 2: Correct knee alignment. Knees in line with toes.
STAND TEST
Let’s take the stand test and see if we have a natural tendency for our knees to come together when standing. Do not try to perform it correctly, just sit down and stand as you usually would. Yep, it’s that simple! :)
Do you find your knees come in when you are just sitting there and/or do you find they move in when you stand up?
If your knees are moving together, then you are not utilising your lower body muscles correctly and putting excess strain on the knees.
Now we are aware, We must correct this.
HOW TO STAND UP CORRECTLY (VIDEO)
The first step is bringing awareness to this issue when sitting. Do your best to avoid sitting with your knees together. Sit with your knees in line with your toes and your feet flat on the floor. This will be uncomfortable at first but stick to it. To continue to "sit like a lady" without your knees together, you can use a towel or blanket to cover up.
The next step is the awareness of keeping the knees in line with the toes when we stand up. When they start to come in, correct it.
When you continue to stand correctly, you can decrease the strain you put through your knees and then work on strengthening your muscles correctly.
We must strengthen the muscles NOT ONLY surrounding the knee, which is what most people only do to improve their knees but by strengthening ALL MUSCLES in our legs, especially our hips and buttocks.
When we strengthen all muscles in our legs, we can start and keep moving as we should.
AVOID THESE SQUAT MISTAKES
Another important movement is the squat.
It is good to be able to squat correctly so we can place less strain on our backs when we do specific tasks like lifting objects off the floor. However, squatting is also an important exercise to perform to strengthen our legs.
I love the squat for seniors because it works every muscle in the lower body and activates the core.
However, like the sit-to-stand, it is usually performed incorrectly and when performed incorrectly, can INCREASE knee strain.
The two most common mistakes I see when people squat putting added strain on the knees are:
1) Knees coming inwards (as below) - just like what happens when we stand up.
and
2) Coming forward from the knees (as below) making our knees come forward over the toes. (This isn’t an issue when sitting from standing because people know to hinge at the hips and stick their bottom out when having to find the chair).

Incorrect Squat:
Lady in Yellow Shirt: Squatting from knees, although this would be passable for a partial squat, if this lady was to squat down further, her knees would come past the line of her toes. I would like to see this lady sitting back more into the squat.
Lady in White Shirt: Again, coming forward from the knees, knees moving inward.
HOW TO SQUAT CORRECTLY (VIDEO)
To perform the squat with correct technique, watch these videos:
By squatting correctly, you will be moving as you should and when for exercise, you will be targeting and strengthening the muscles effectively without putting strain on the knees.
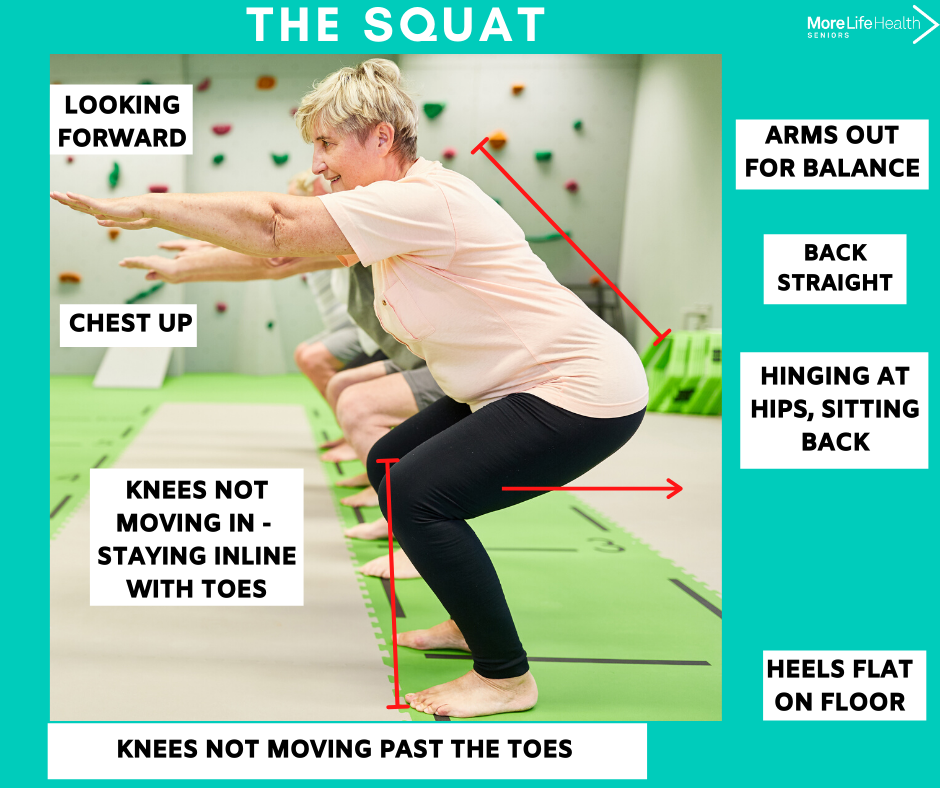

STRENGTHENING THE LEGS FOR SENIORS
HOW TO MAKE LEG EXERCISES EASIER OR PERFORM THEM WITH PAIN
If having difficulty with the sit-to-stand or the squat, there are many things you can do to make it easier until you are performing these exercises with ease.
For the Sit to Stand:
1) Use Arm Rests:
Using the armrests to help assist with your standing is fine. By doing this, you are still getting the benefits of the exercise for the stage you are at, but just using your arms to provide a little assistance to help you perform the exercise correctly.
As you start to get stronger, you can decrease the amount of assistance you are using over time. (i.e. move from two hands to one hand, to no hands).
Concentrate on using your legs more than your arms for each stand.
2) Change Seat Height:
Standing from a higher seat height or taller chair will make it easier for you to stand and, again, still give the benefits of the exercise, challenging your strength for the stage you are at.
Find a chair that is taller, or place a phone book or cushion on the chair to raise the height. As you start to get stronger, you can lower the height to continue challenging yourself and improving your strength.
When you slowly decrease the chair height as you get stronger, you'll continue to improve your strength and eventually be strong enough to stand in those times when you're seated at a low height (e.g. deep, low or soft couch)
For the Squat:
1) Hold Onto A Chair, Rail or Bench:
Use your arms to assist with the squat, and use your arms to assist as required. (Make sure your bench is sturdy and your chair does not have wheels).
2) Perform a Partial Squat:
By only squatting down a partial distance (picture 2 of squat exercise below) will still challenge your strength, making you stronger for the stage you are at. As you get stronger, you can go a little deeper into the squat, but never deeper than parallel
We all have different capabilities and strength, and this is fine. With time, practice and consistency, what was once considered hard will become a whole lot easier.
Be patient, don't compare yourself to anyone else; only compare you to you.
The 10 Best leg Strengthening Exercises For Seniors
So now we’ve established the sit to stand and the squat are important movements to do each day and when performed correctly are very important to get stronger legs so we move better and decrease pain.
Here are additional exercises, which are best for seniors to improve leg strength.
CLICK HERE FOR THE 10 BEST STRENGTHENING EXERCISES FOR SENIORS
Once performed and performed consistently you'll notice big differences in your leg strength, many of your everyday activities feeling a whole lot easier with your newly strengthened legs.
SENIORS LEG STRENTHENING WORKOUT VIDEO
To make it easier here is a leg exercises workout video you can follow along to whenever you want to help get your legs stronger. It includes a warm up, all exercises above and a stretch.
Video: The Best Leg Strengthening Exercises for Seniors
CLICK HERE FOR MORE LEG STRENGTHENING EXERCISE VIDEOS
So there you have it. The best way to improve your leg strength so you can decrease and prevent pain, prevent falls, move better, feel better and even improve the way you look.
With stronger legs we are more confident and we can continue to do the things we love that keep us happy.
To keep your legs strong and yourself in physical shape and healthy, I send regular workouts and tips to mailing list subscribers and for those on my Facebook. Make sure you follow along to both!